Kaizen in 2024

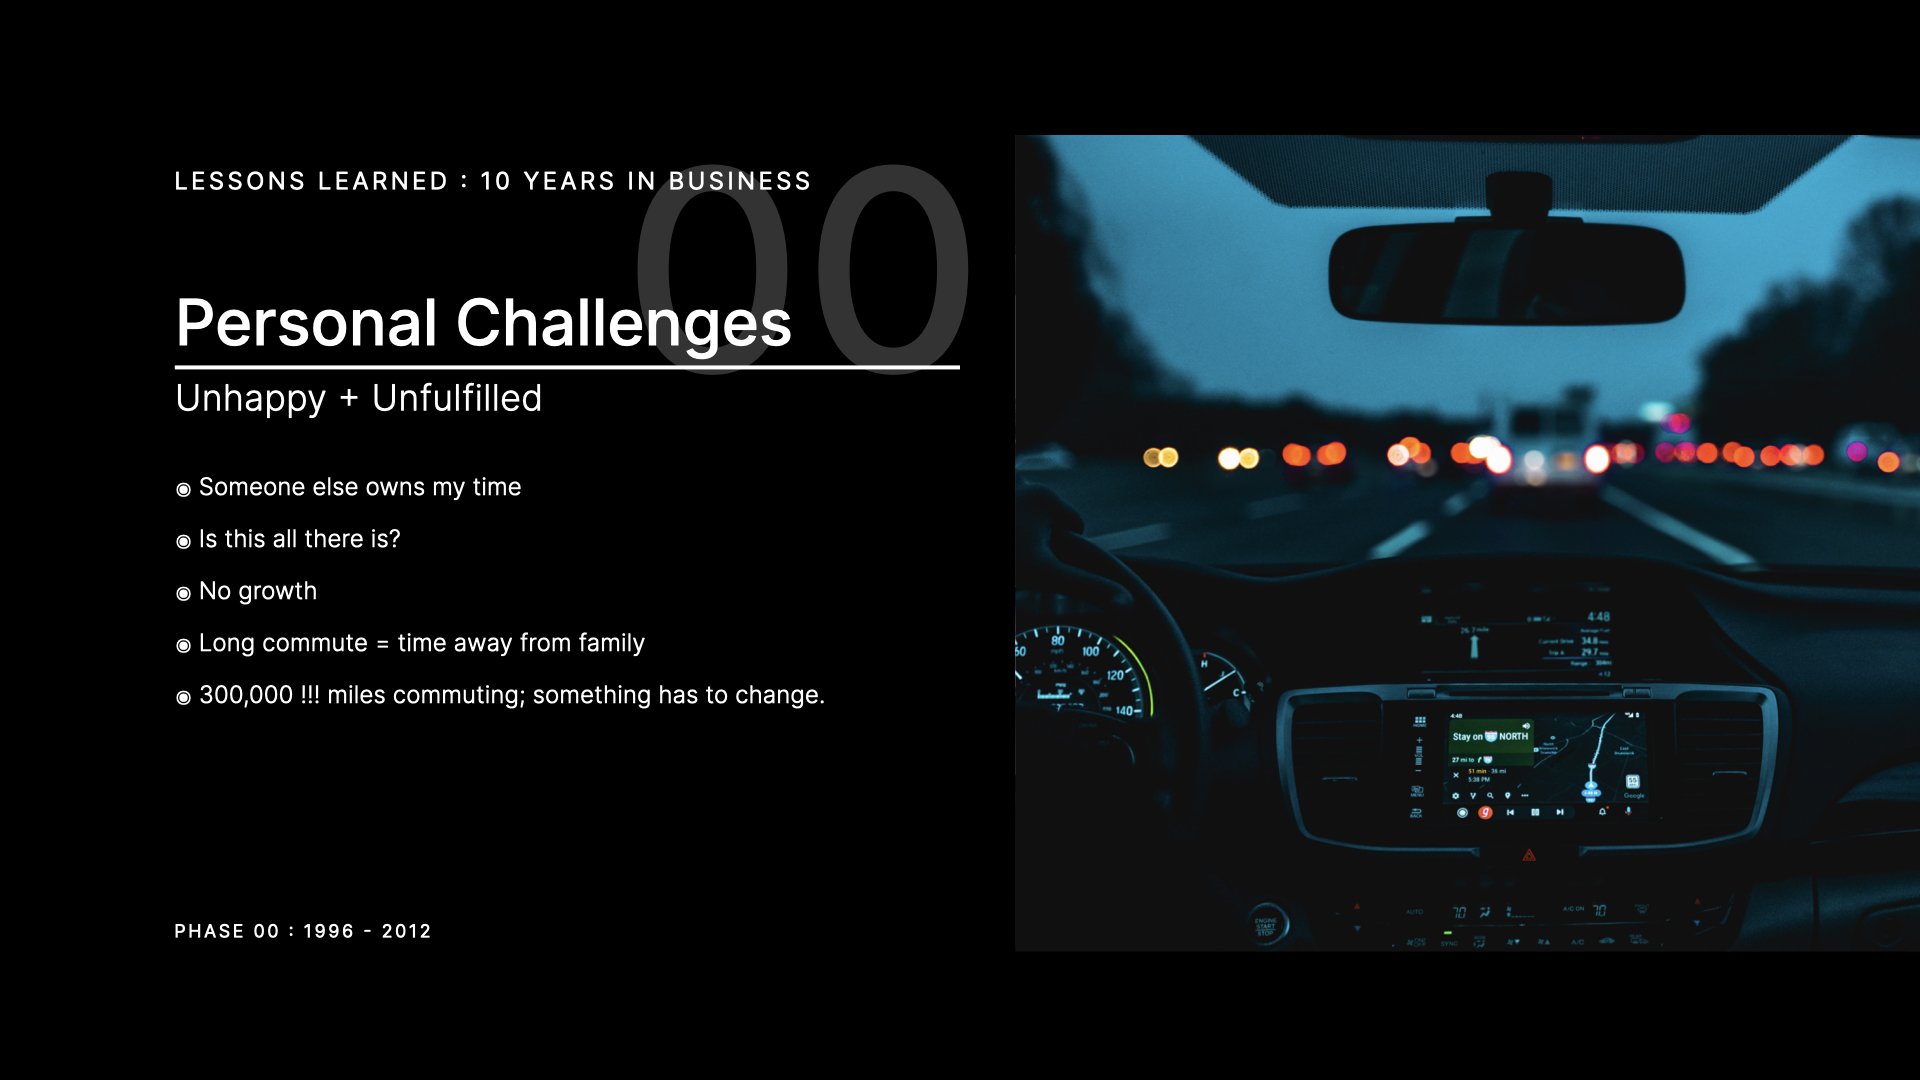
I don’t know about you, but I bristle at all the, “New Year, New You” post-holiday admonishments we hear every new year. As if we have to completely reinvent ourselves to make any kind of progress.

Typical new year resolutions set aggressive goals (tripling revenues, more projects, better clients, etc.), then force you to make equally major changes to achieve them.

It may feel like the ‘right thing to do’ as the CEO vision-casting the year ahead from your studio desk in early January. But in my experience, all too often it ends in burnout, frustration, and failure. By February you’re back to old habits, grinding it out, doing what you’ve always done.

I believe you can achieve more each year by focusing on small, continual improvements.

Improve what’s already working and gradually upgrade and phase out the things that aren’t.

The Japanese call this Kaizen, a practice of making continuous, incremental improvements in processes, products, and services. The goal is to enhance efficiency, quality, and overall performance gradually over time.

It’s similar to Apple releasing an update to iOS. They don’t throw out the entire code base and start over, they release patches and updates to fix bugs, add features and plug security vulnerabilities.

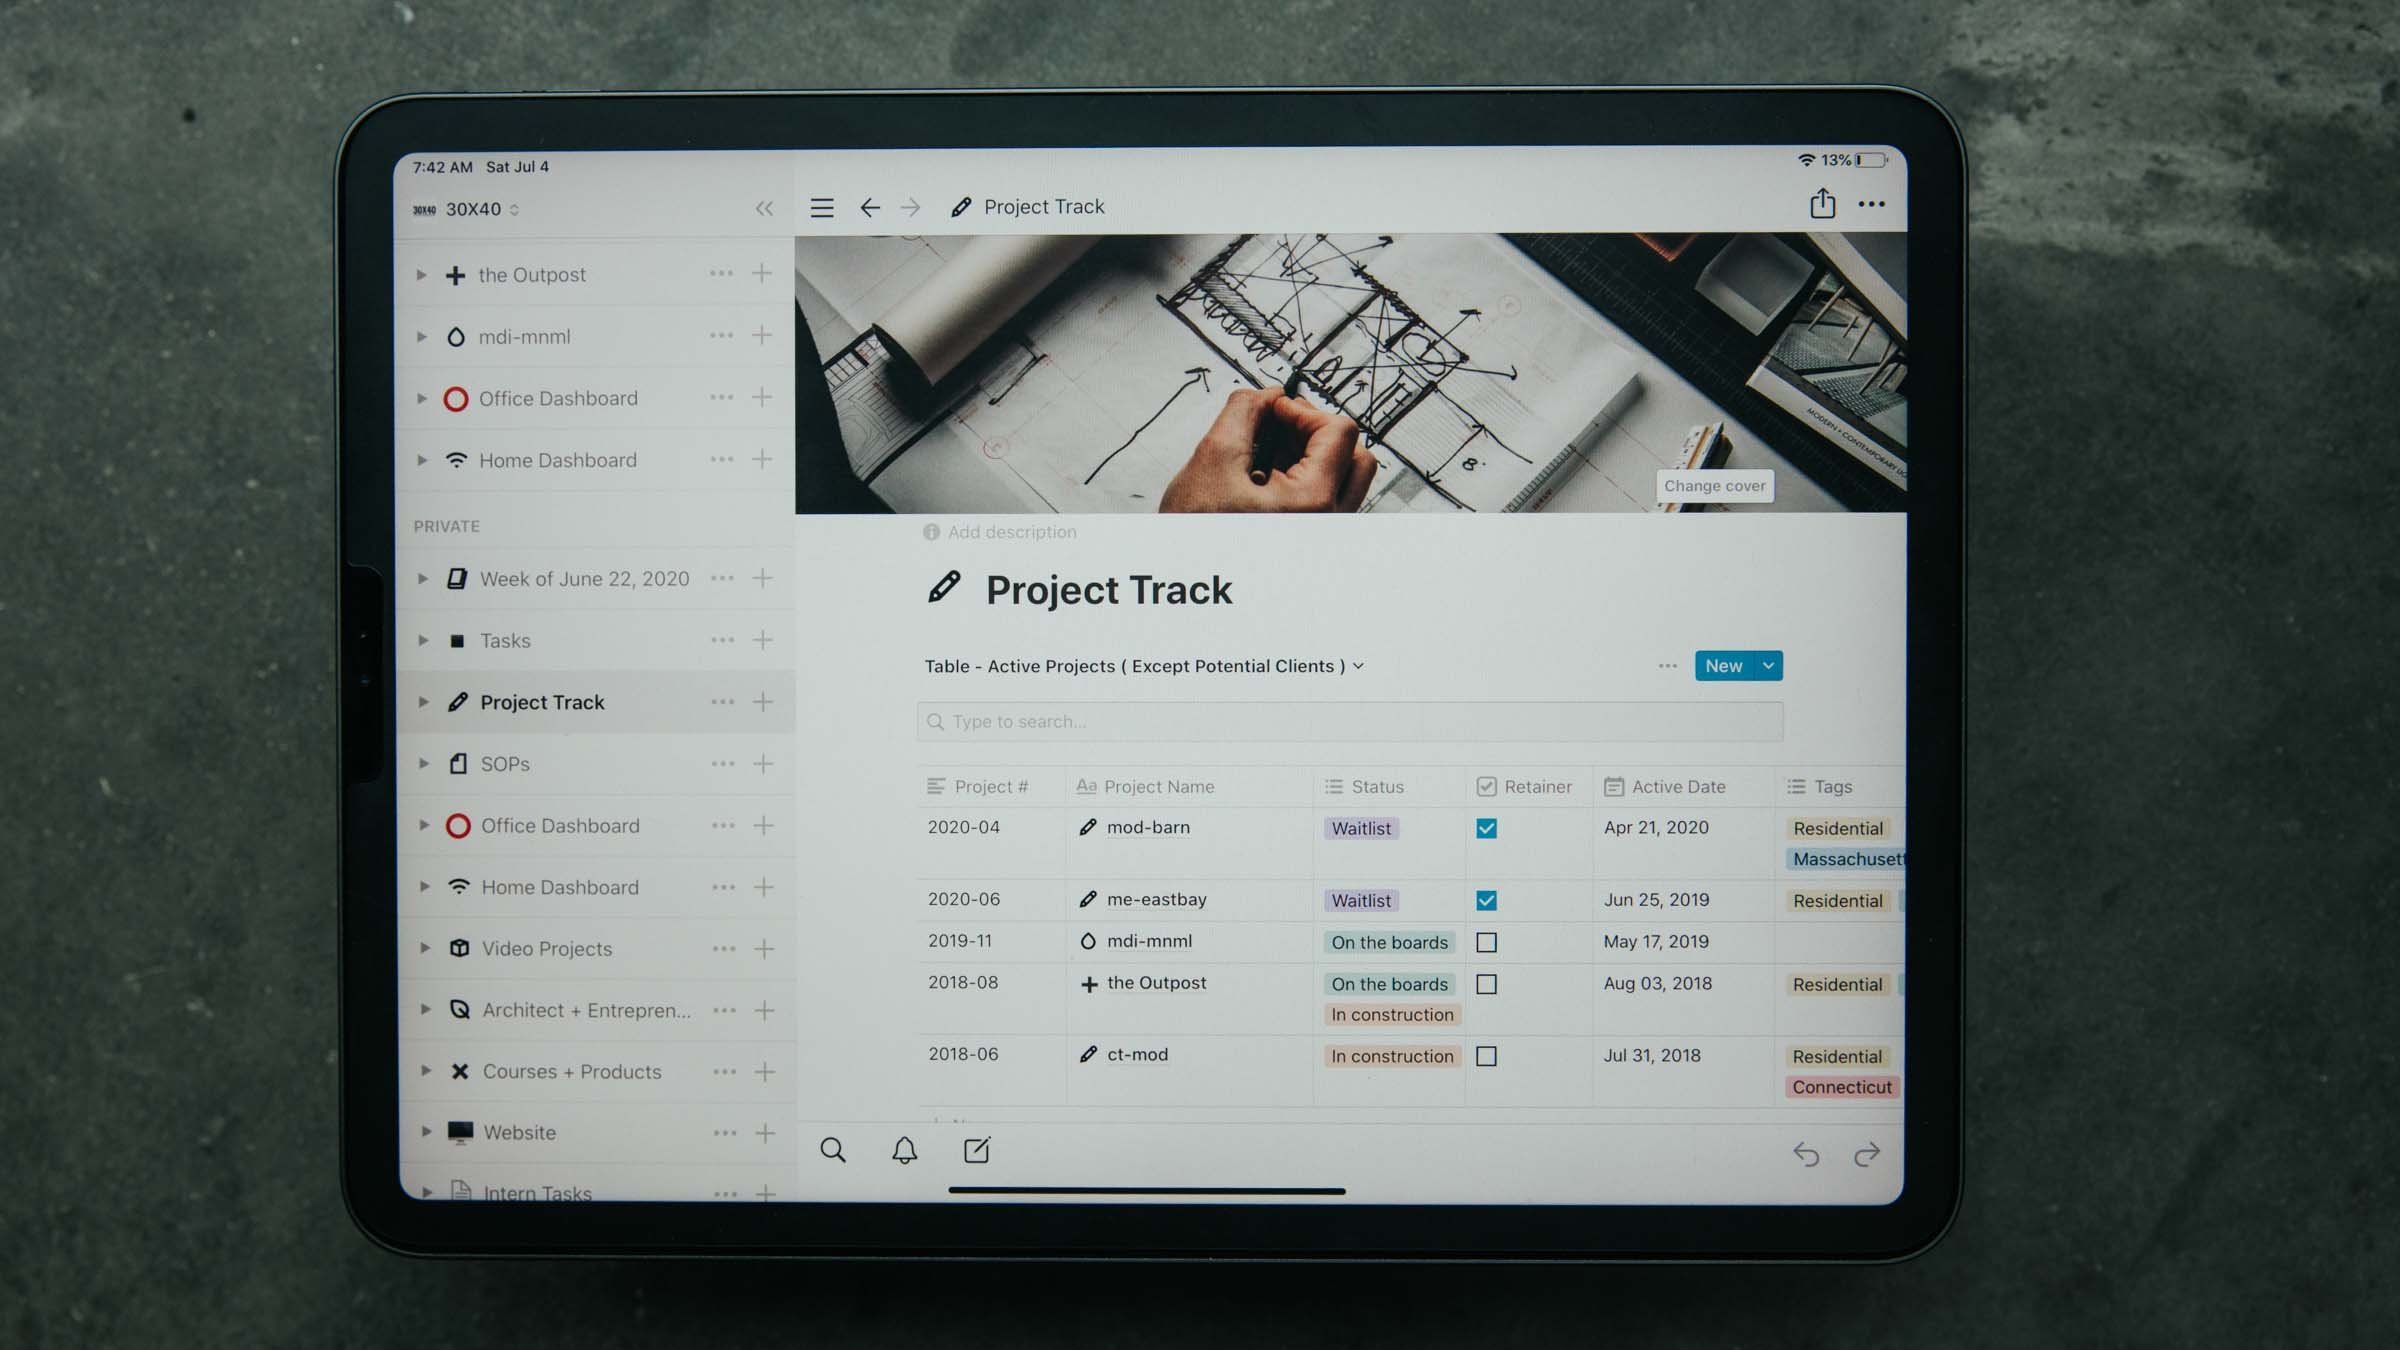
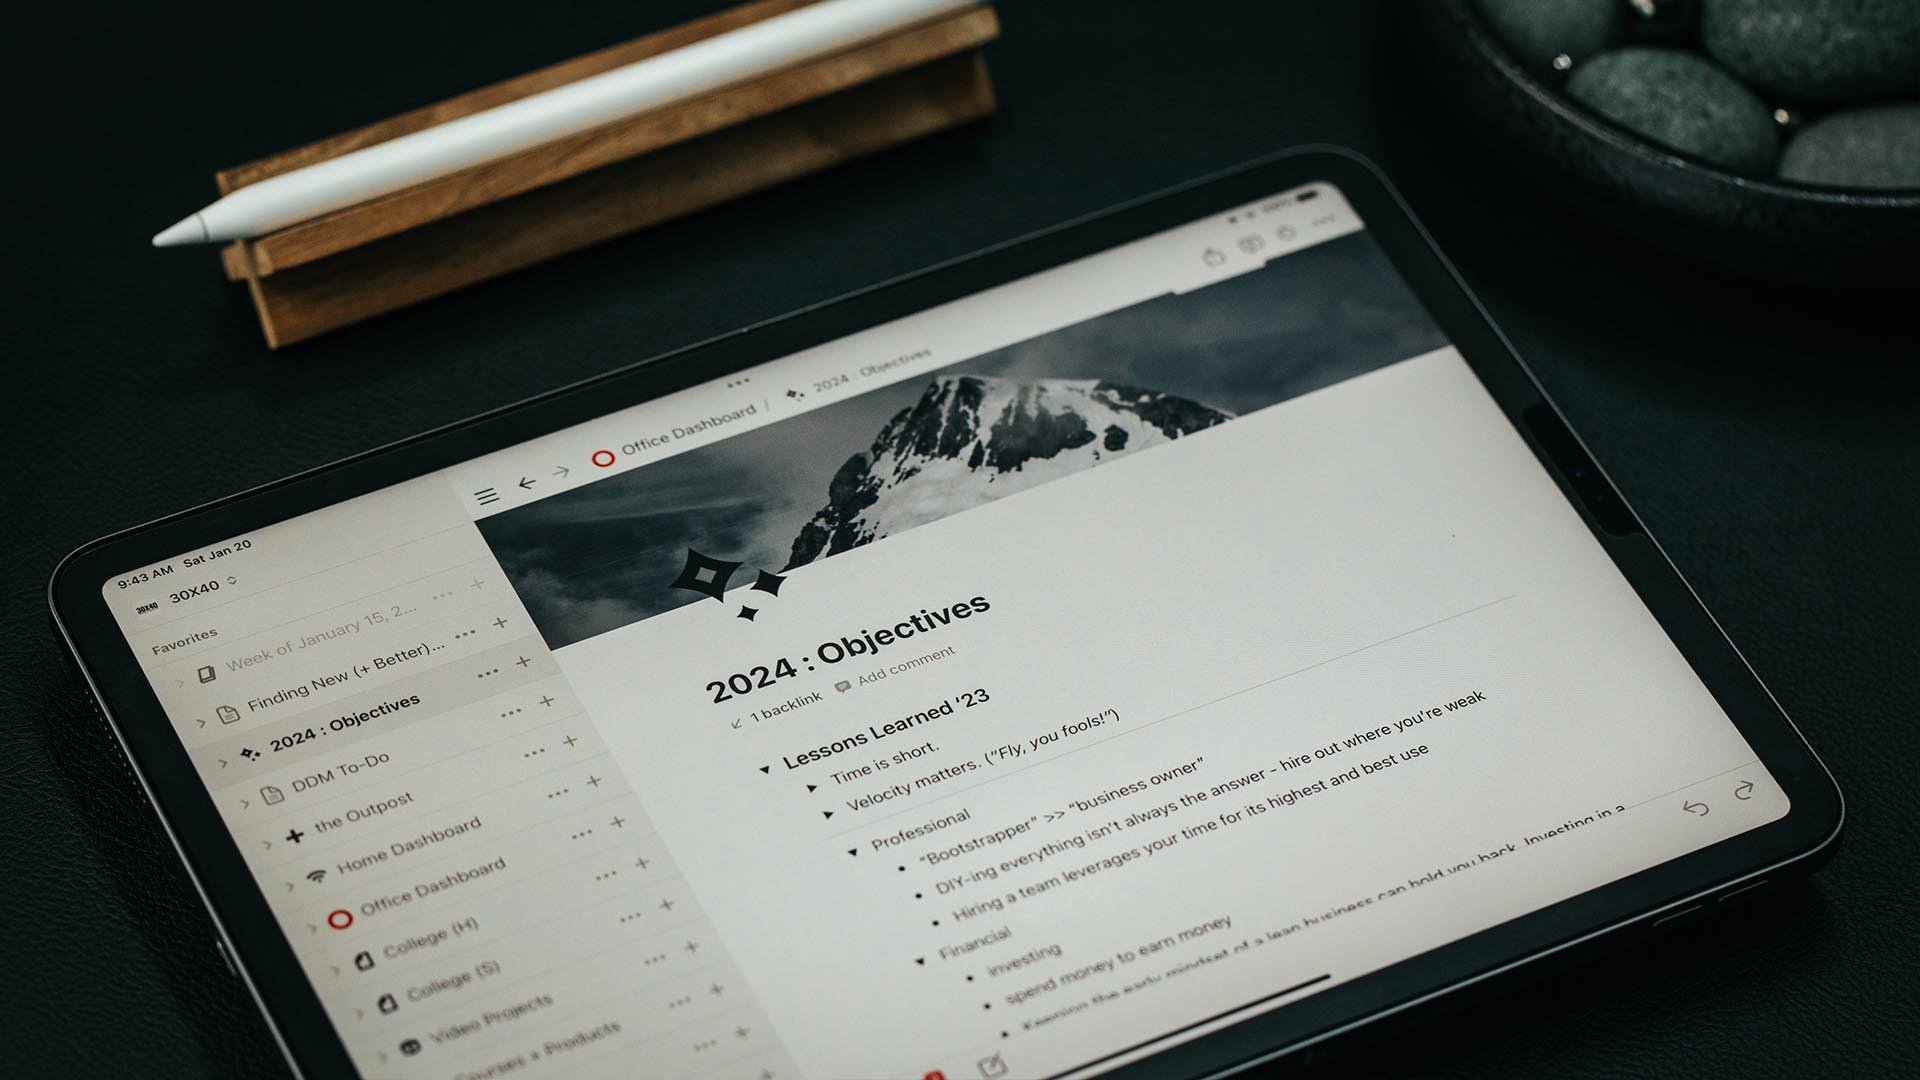
Instead of making major changes every January, I keep the word Kaizen at the top of my Notion dashboard and it’s become a guiding principle for the business. Think of all the small improvements you can make each week and implement a daily routine for checking them off your list. It’s easy and it’s attainable.

The Pareto principle can show you where to start.

The Pareto Principle, also known as the 80/20 rule, can help you prioritize your efforts for maximum impact. The principle suggests that roughly 80% of the effects come from 20% of the causes.

  • 80% of your revenues will come from 20% of your clients.

    • Implement a referral system to access their network to bring in new leads or ask about their next project (ready to start on that guest house?, brand new ADU incentives in '24, etc.) Keep it simple.

  • 80% of your new clients will come from 20% of your marketing.

    • What top-of-funnel activity can you do each day to find new (+ better clients)? One social post a day: maybe a sketch each morning posted to IG?

  • 80% of your challenges are coming from 20% of something in your career or business (i.e. - not enough work or revenue, client X is terrible to work with, collaborator Y takes all my time, boss Z is a micromanager)?

    • Focus your efforts on these critical issues first. Take small steps each day to make the change you’re seeking.

Small changes aren’t nearly as exciting as, “Triple my revenues this year.” But, they can be more impactful because they compound over time. If you invest in ‘average’ index funds, you know this to be true:


So to get more done in 2024 here’s an 80/20 challenge for you: what's something you're going to apply Kaizen to this year?

If you don’t know where to start, think about all the systems and processes you rely on each day but are repetitive and take time to execute. Formalizing your SOPs, creating branded templates and processes are table stakes for achieving bigger things with less overwhelm and higher profit margins.

Here’s a few examples:

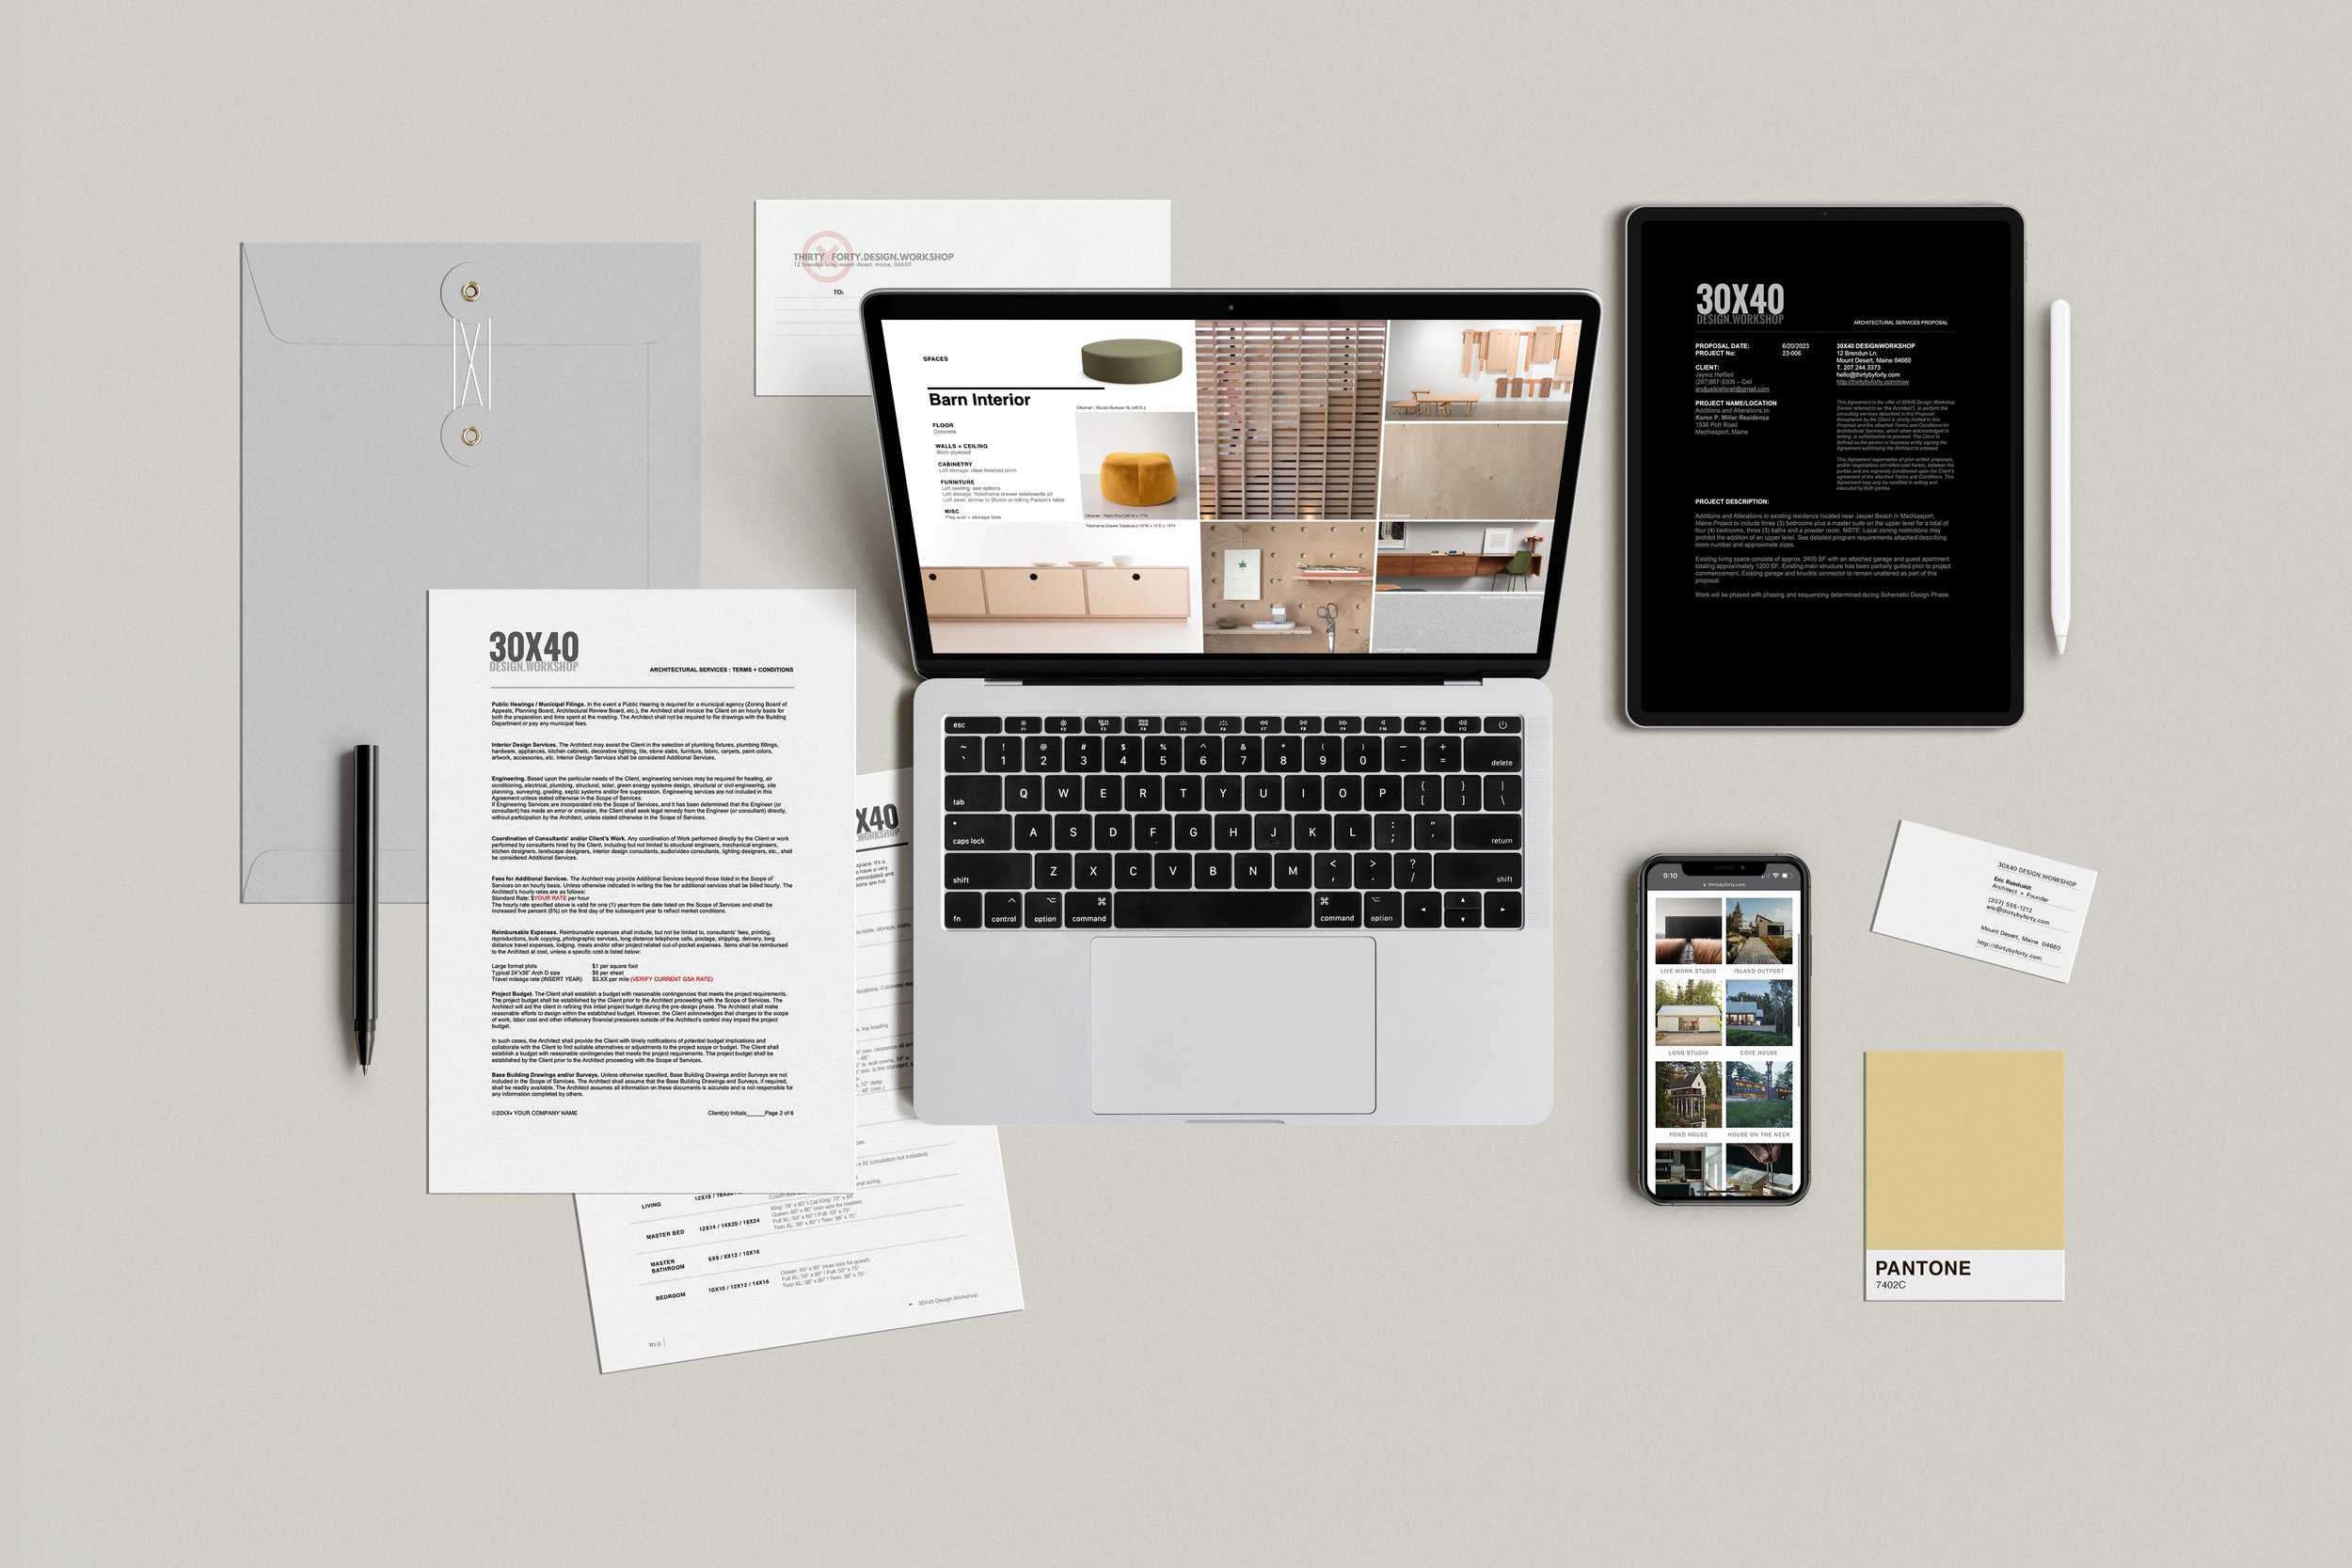
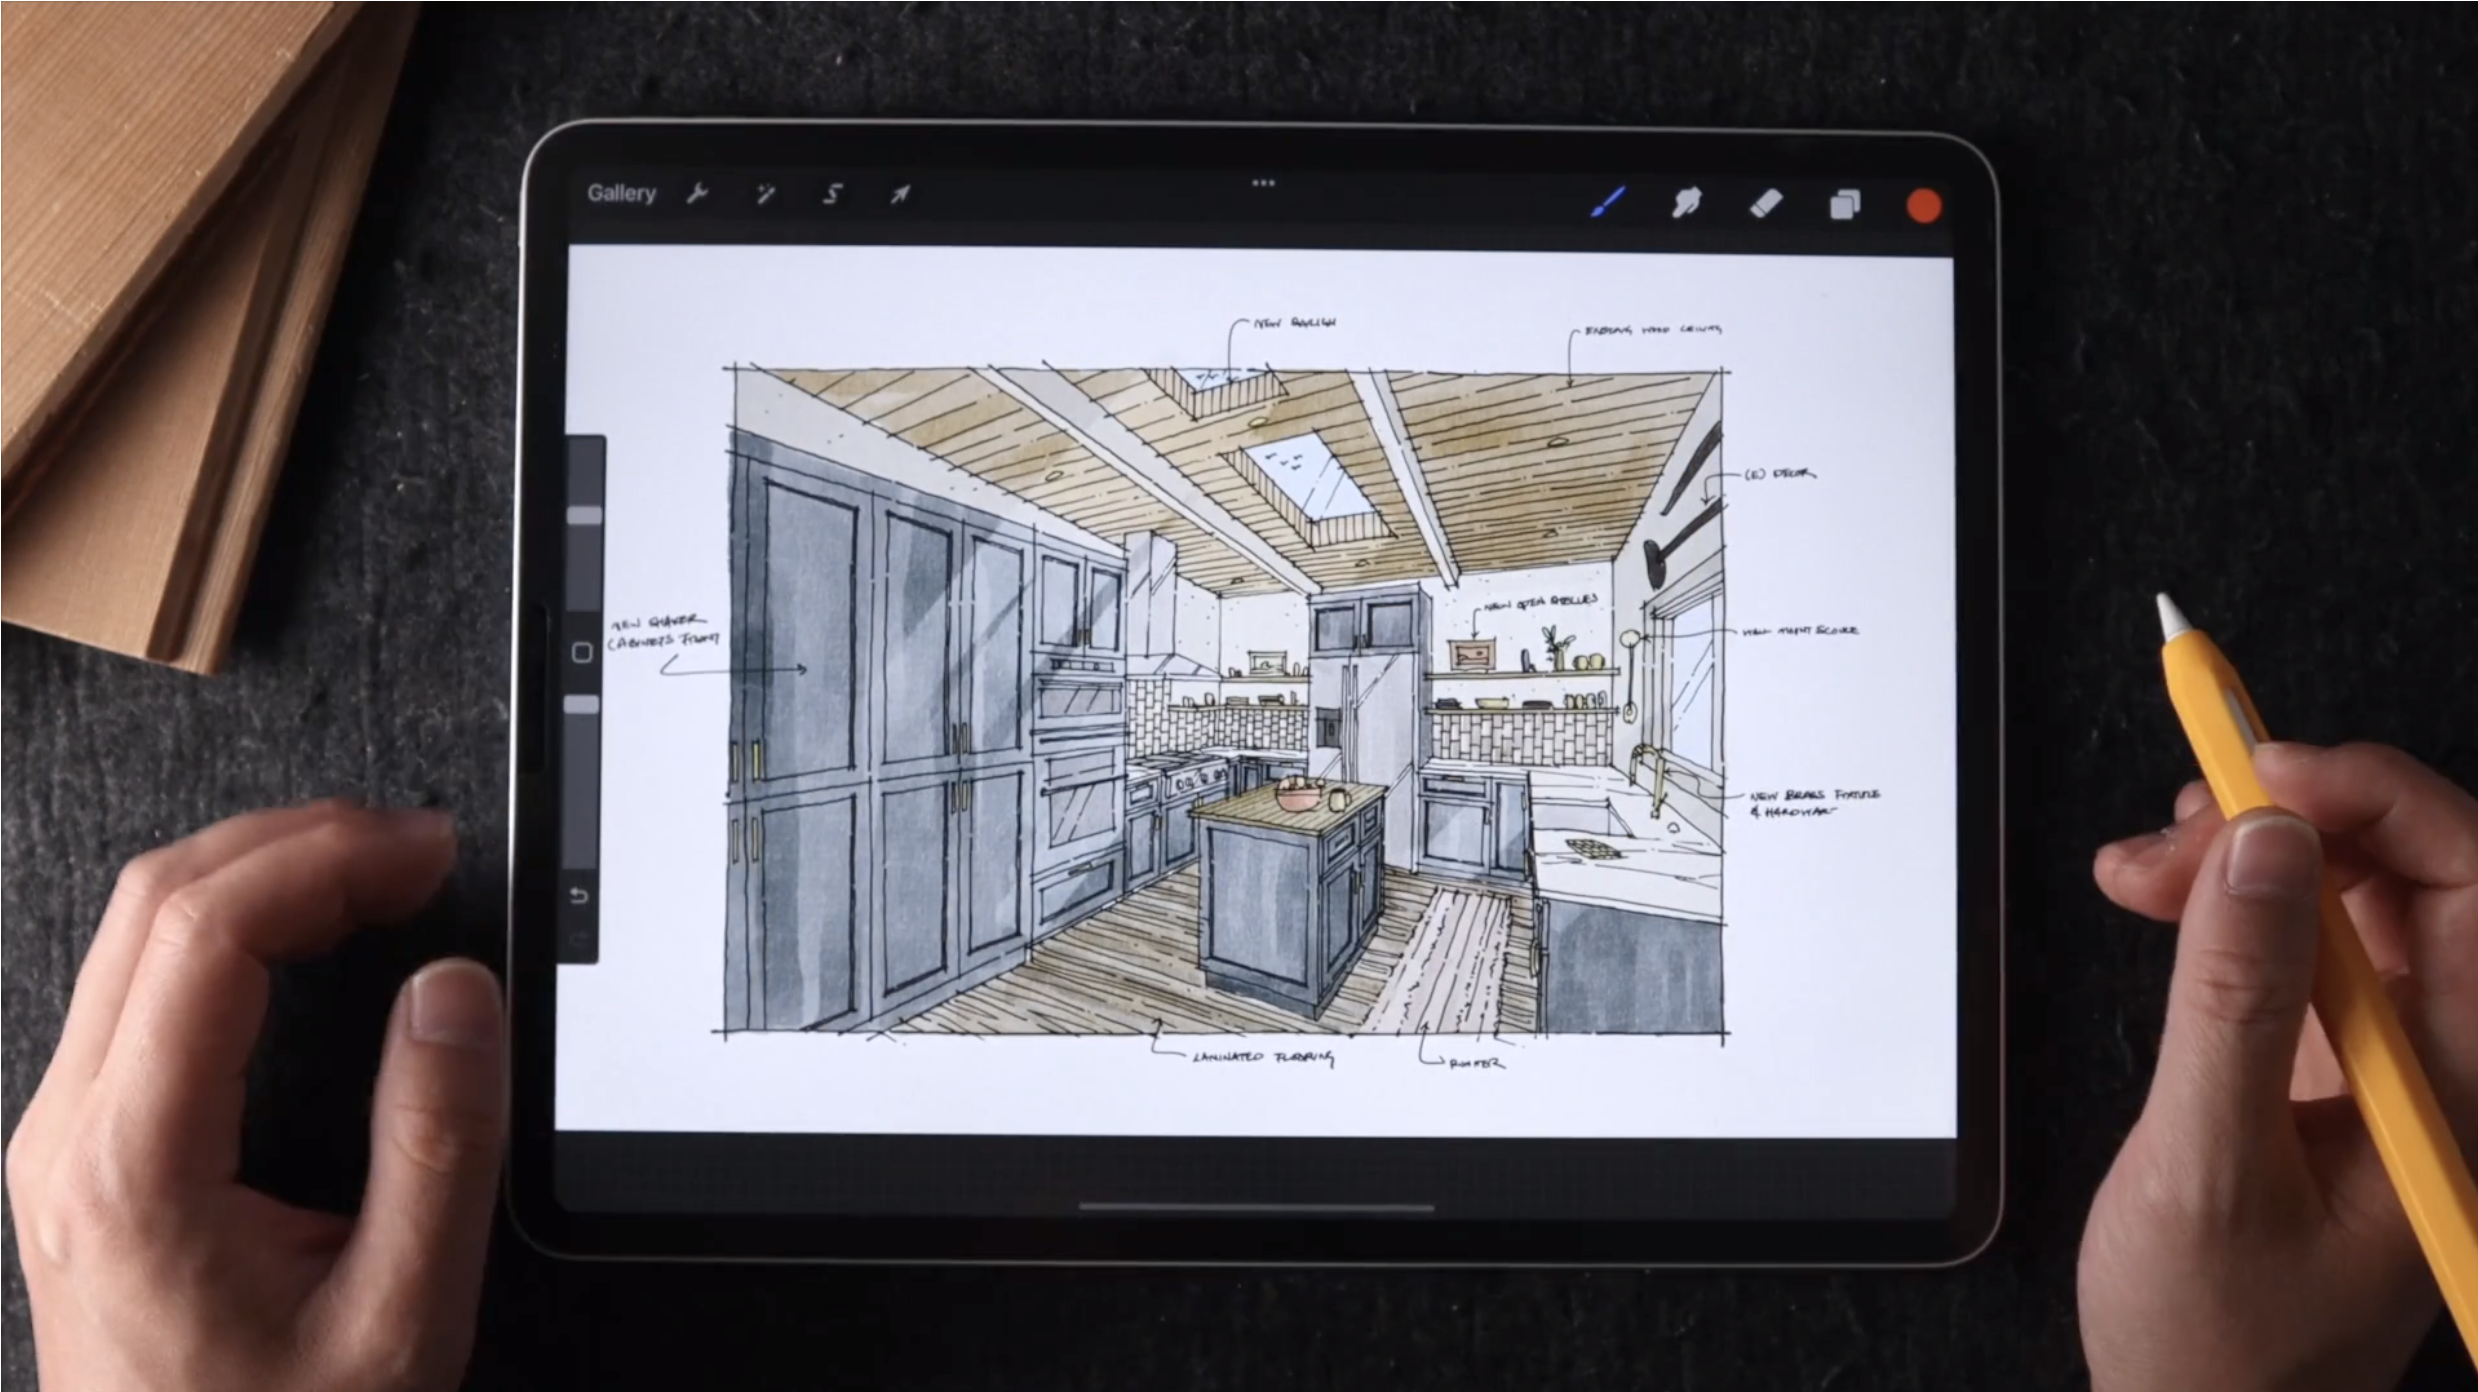
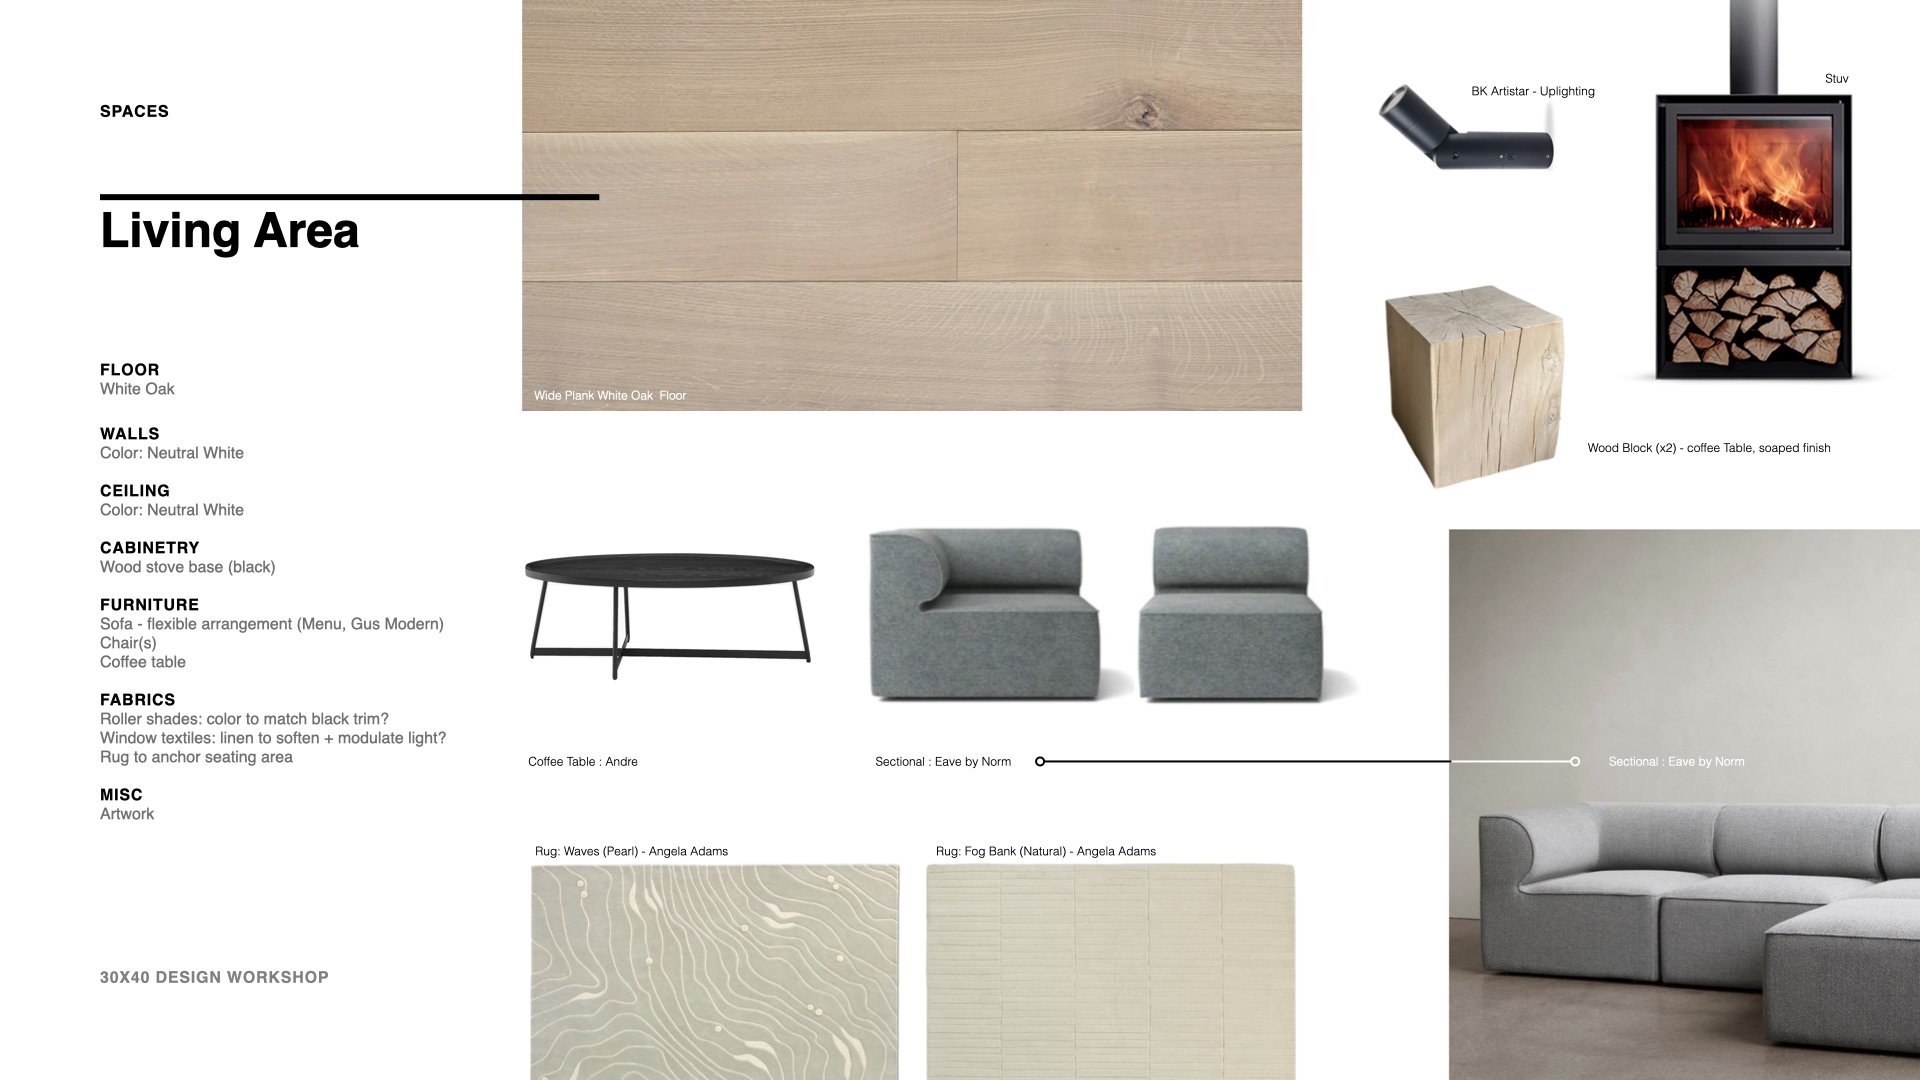
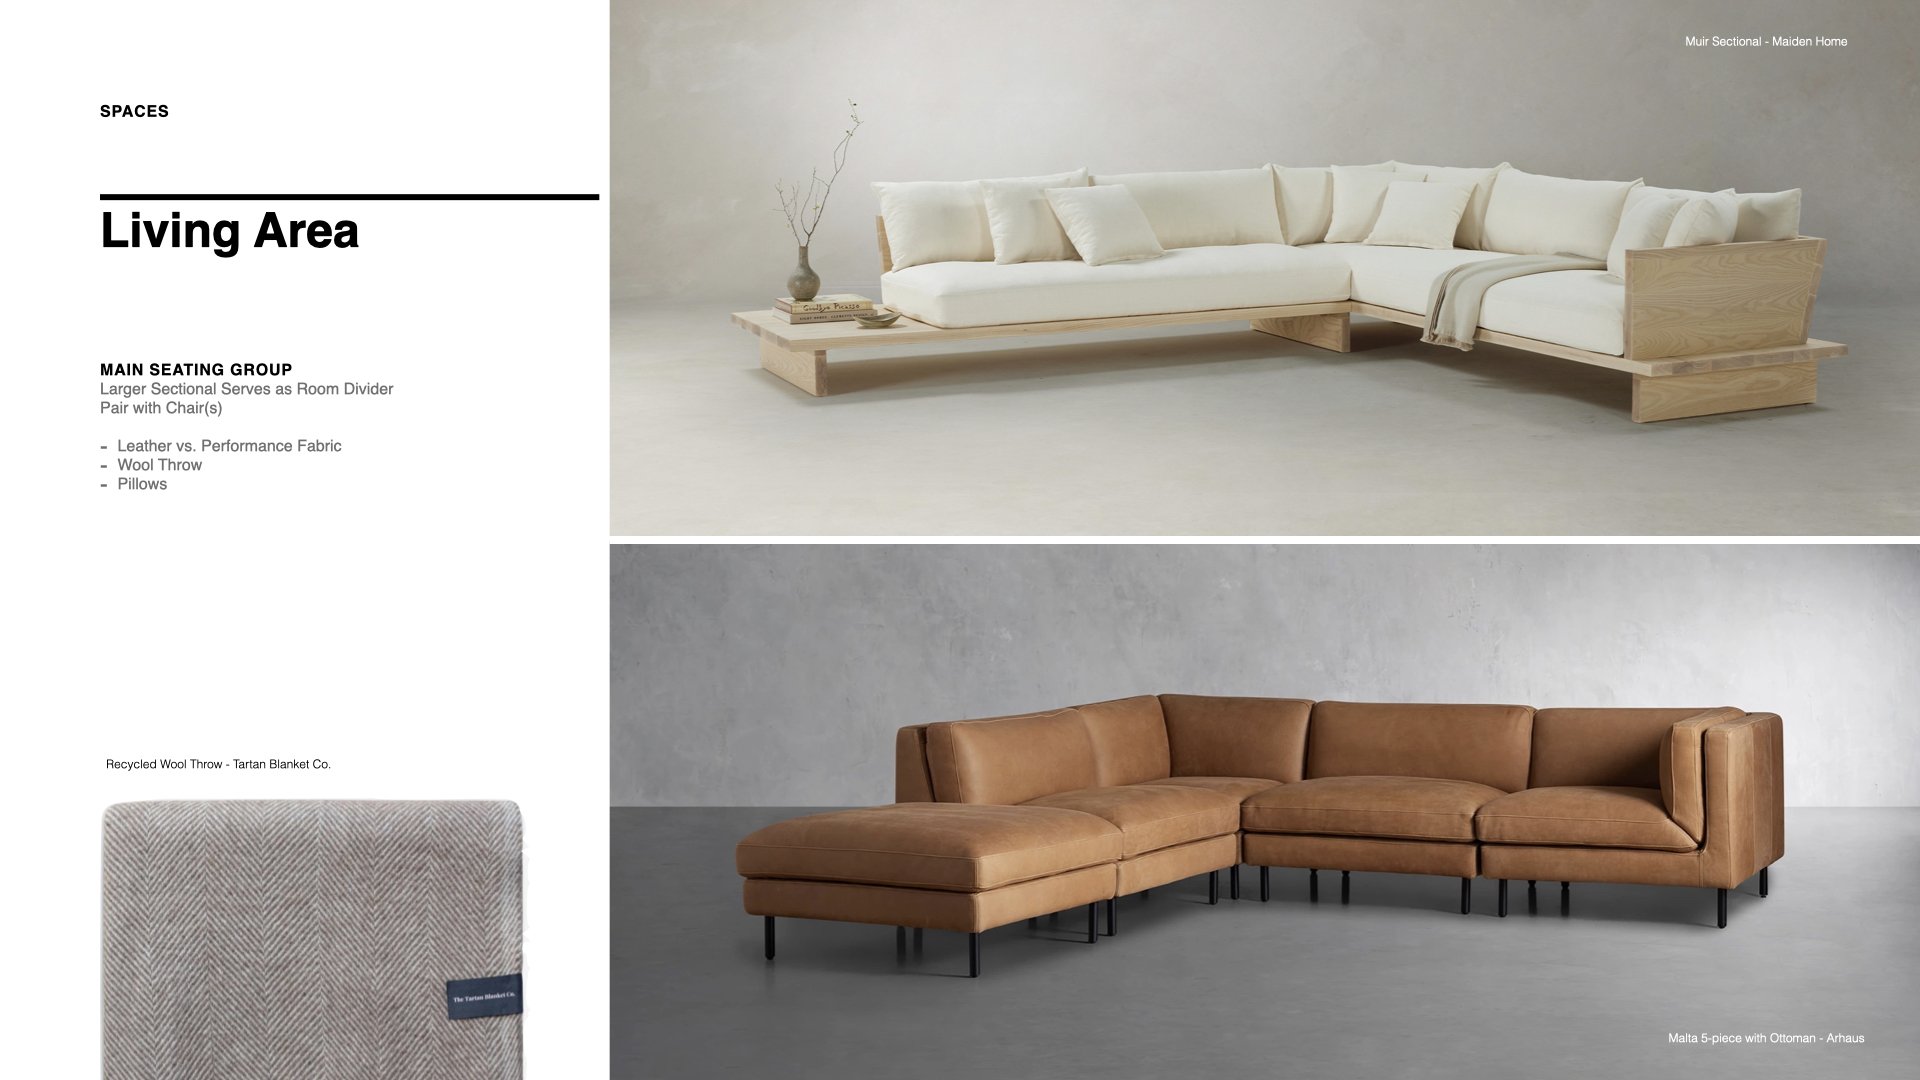
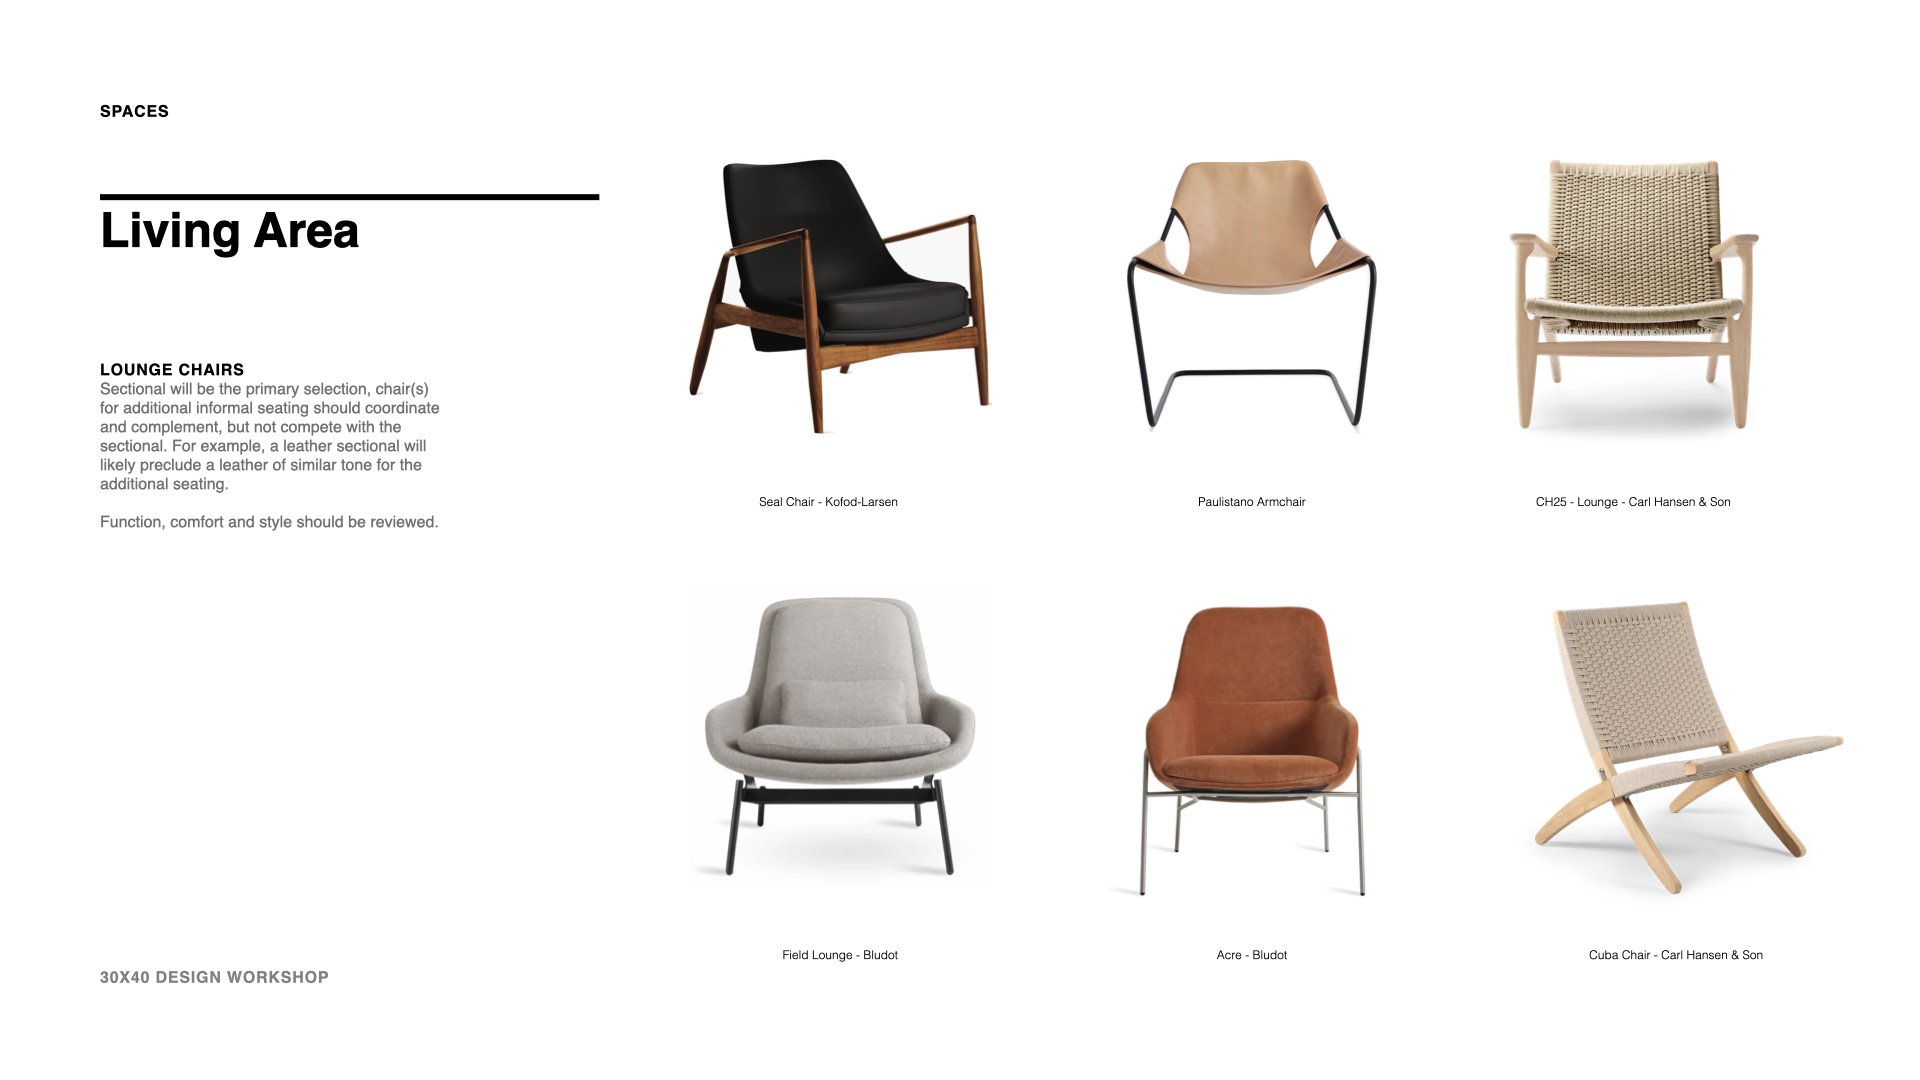
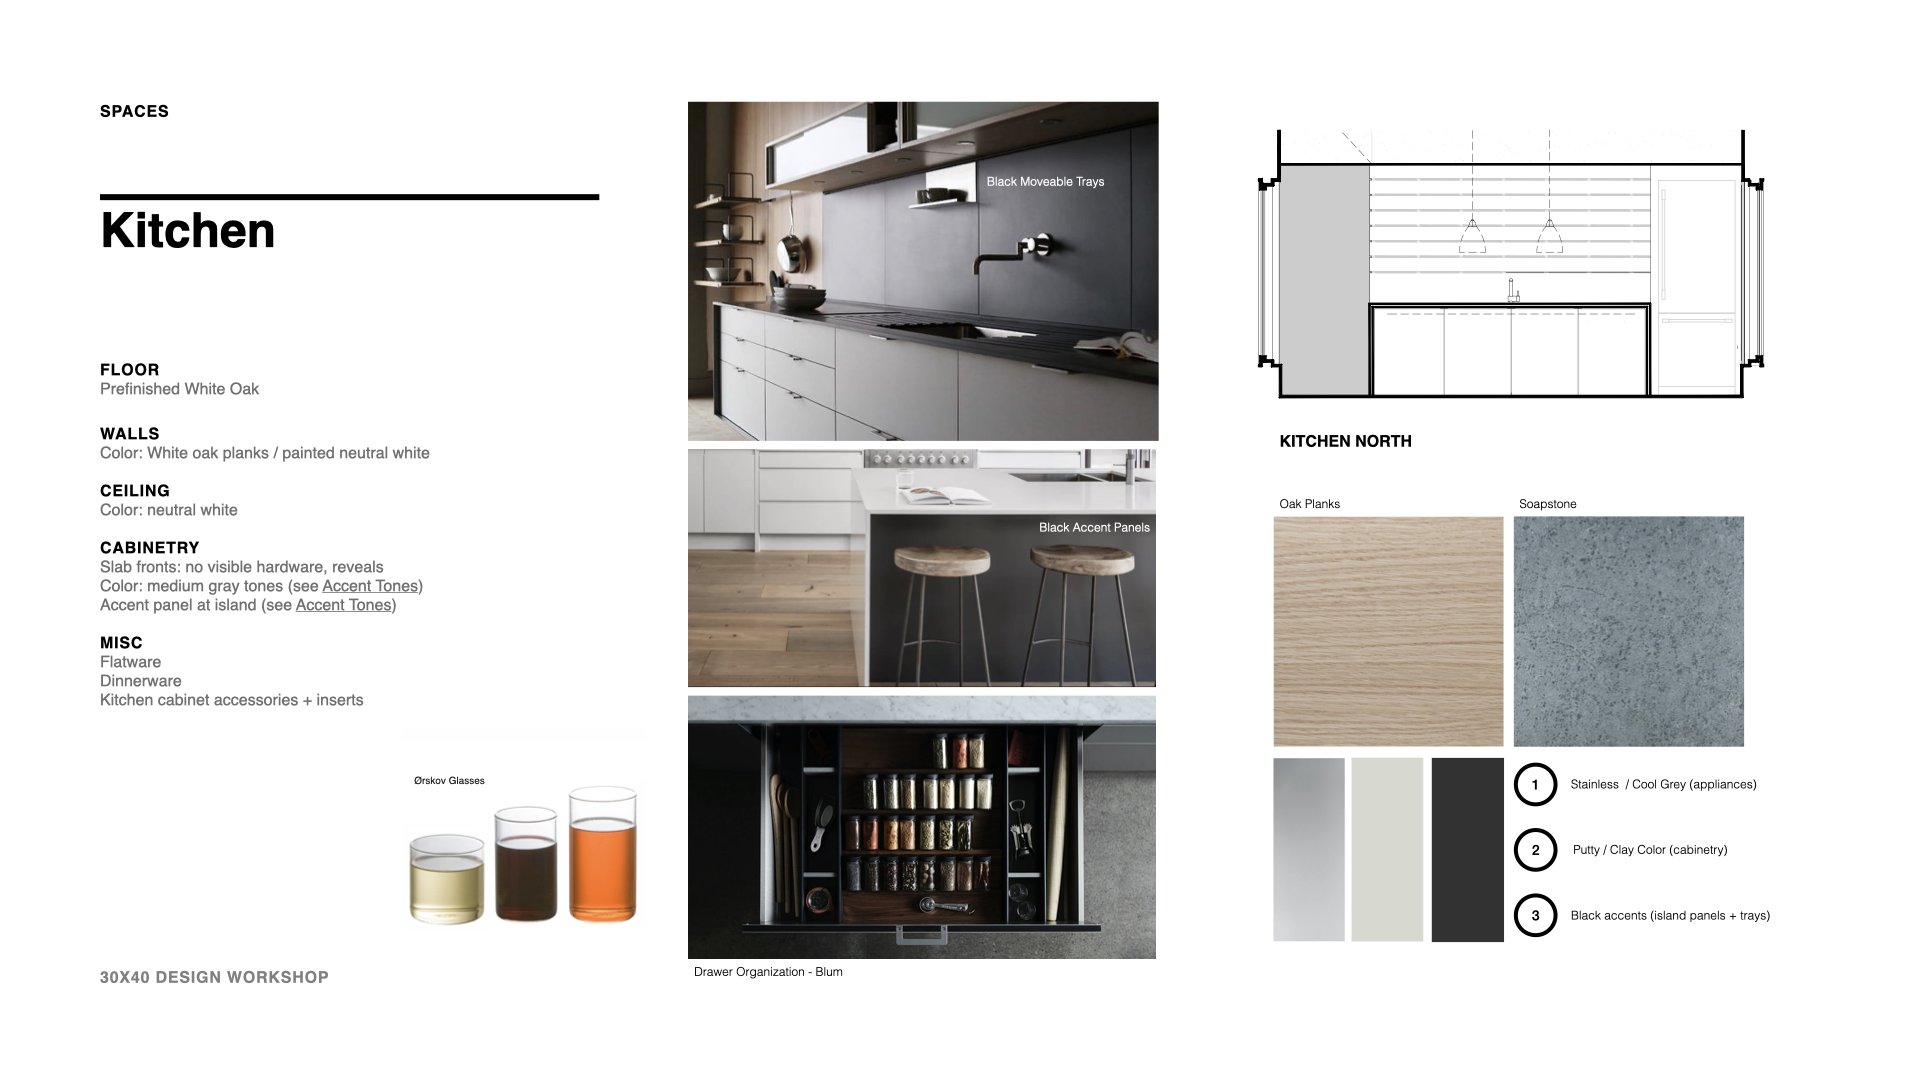
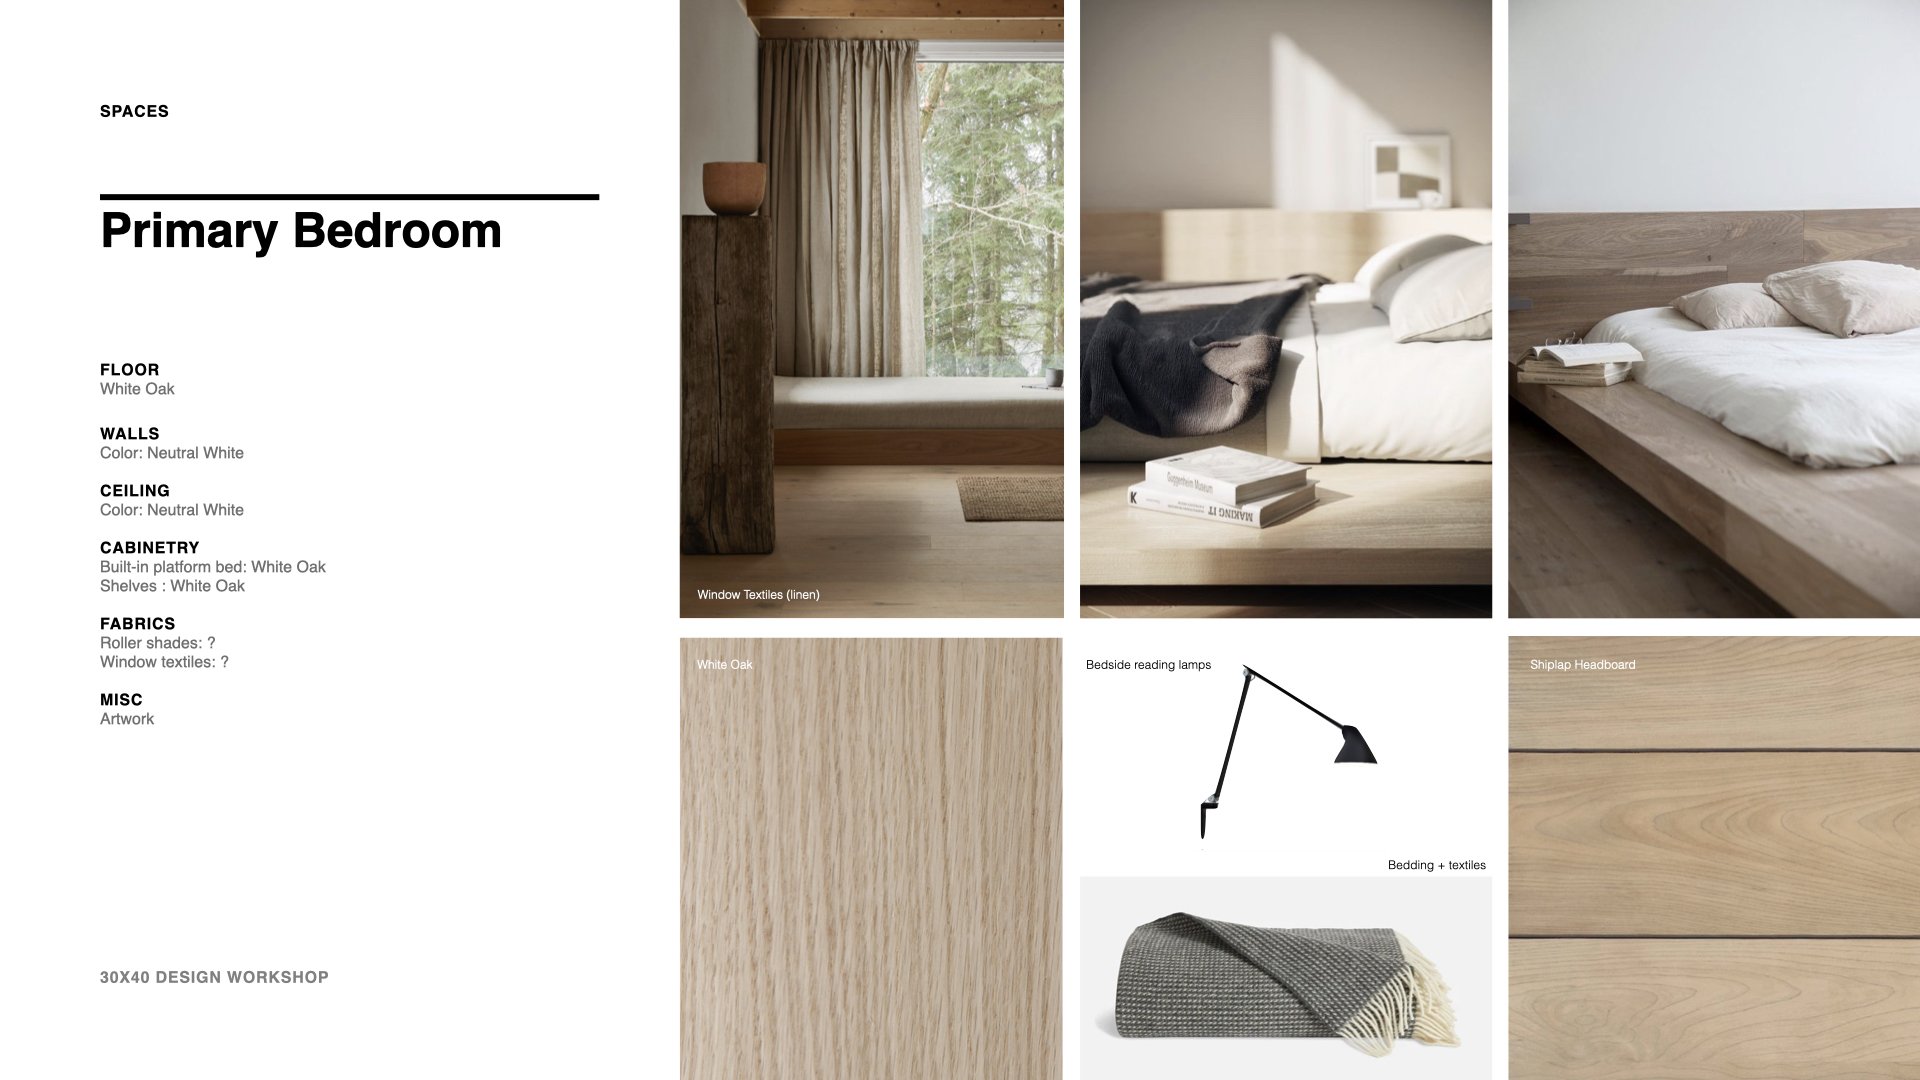
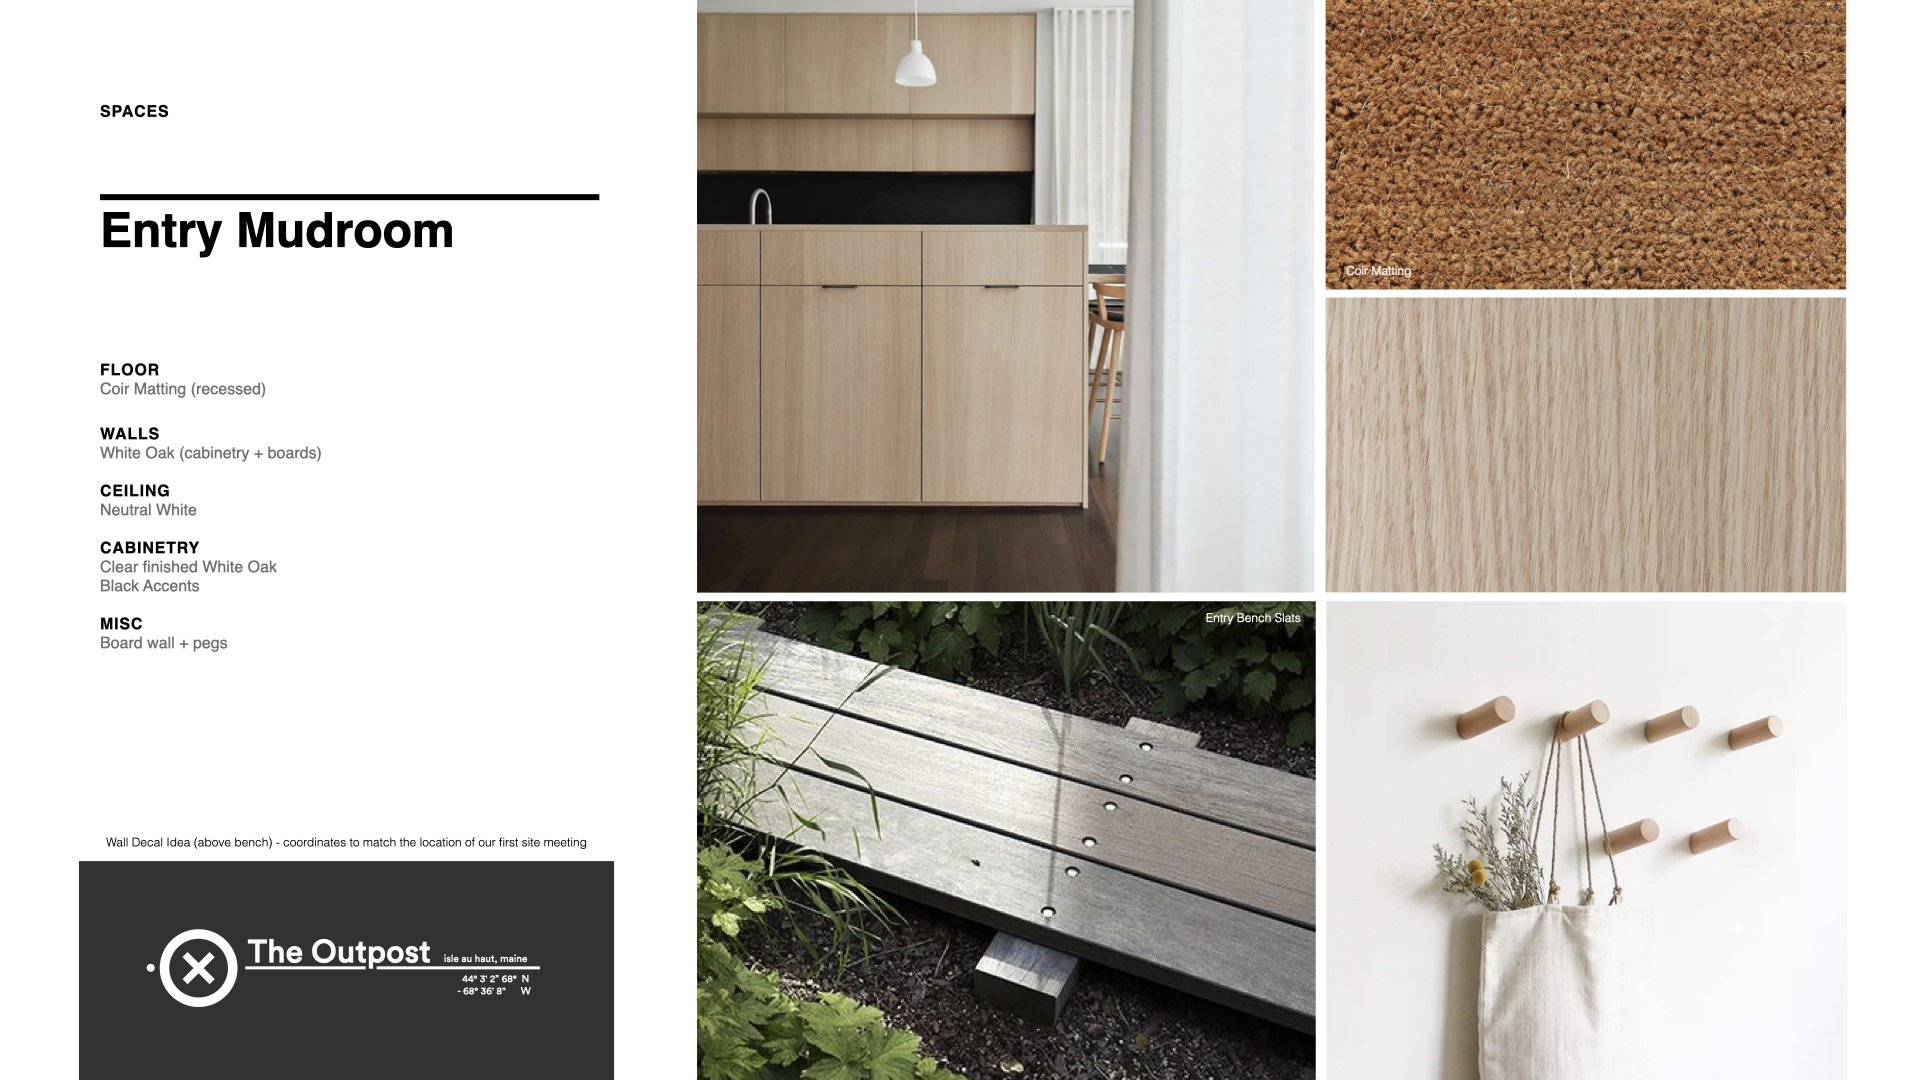
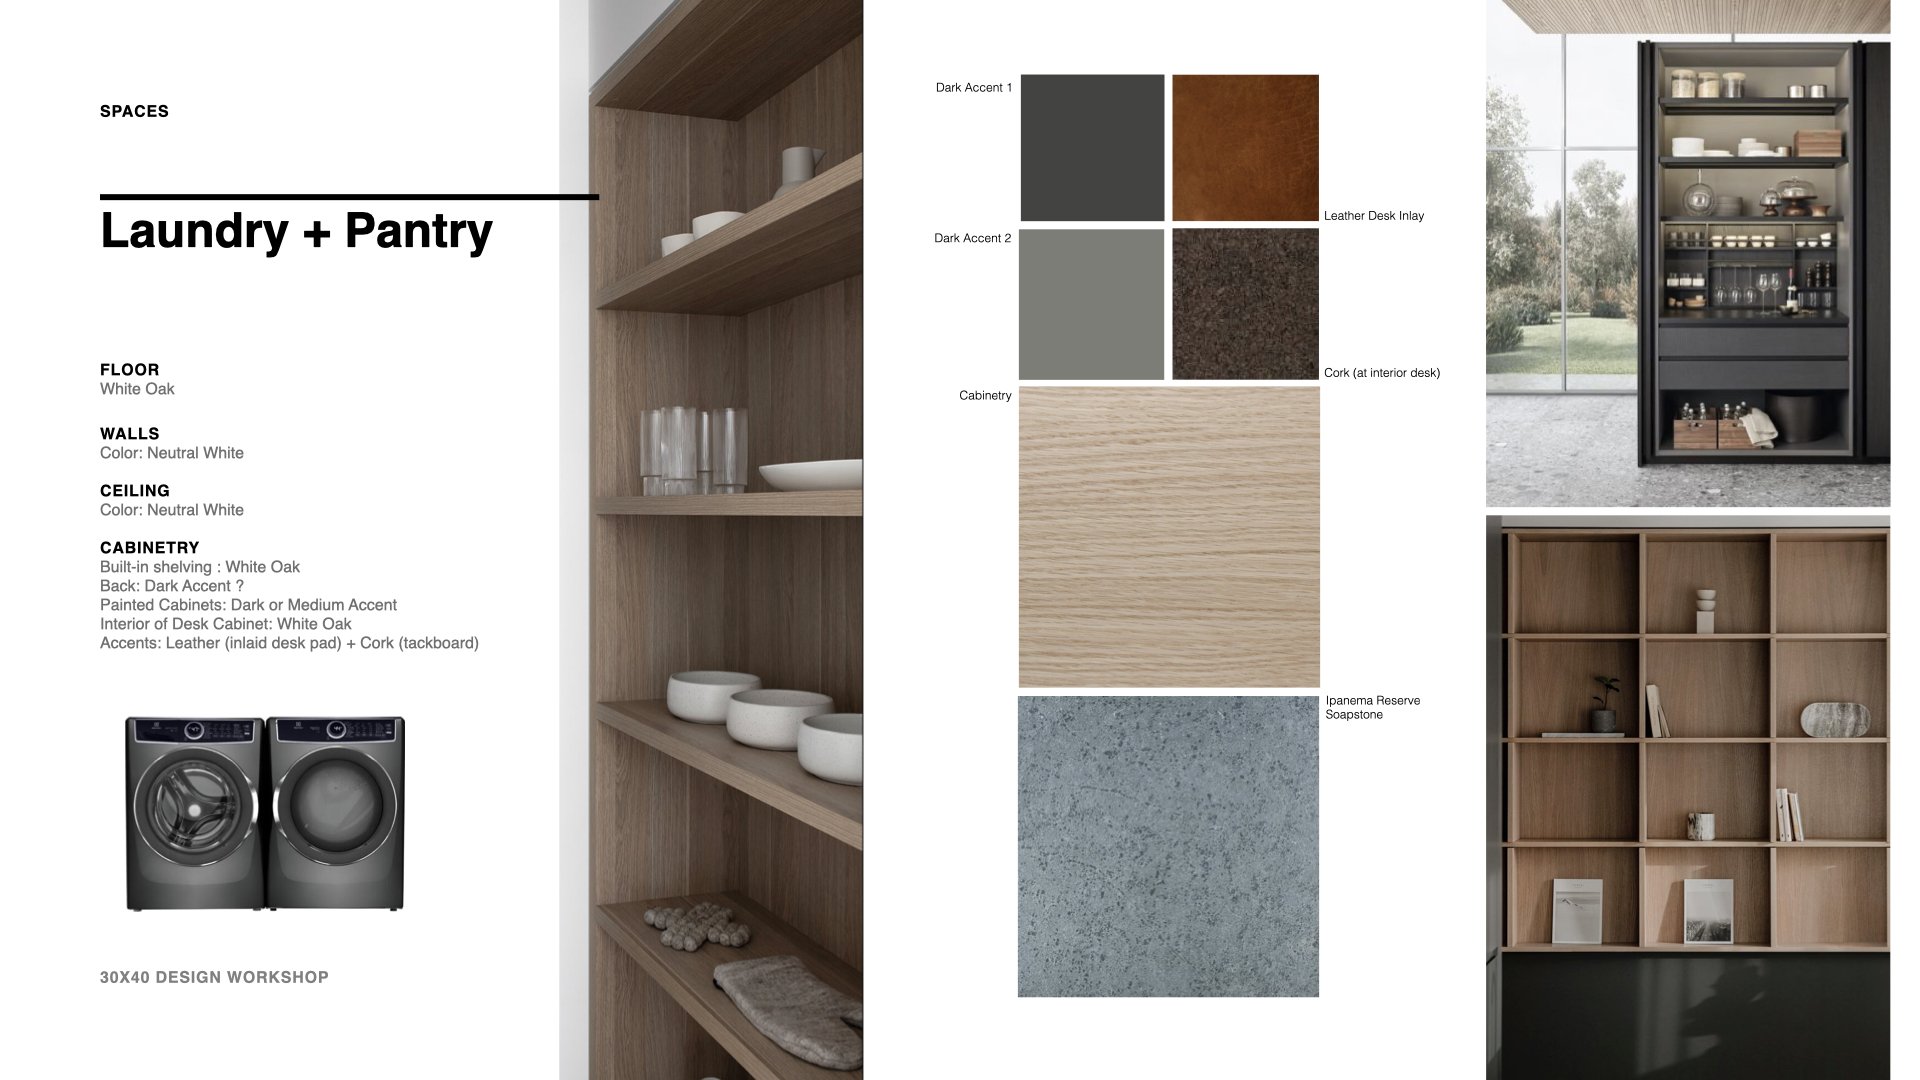
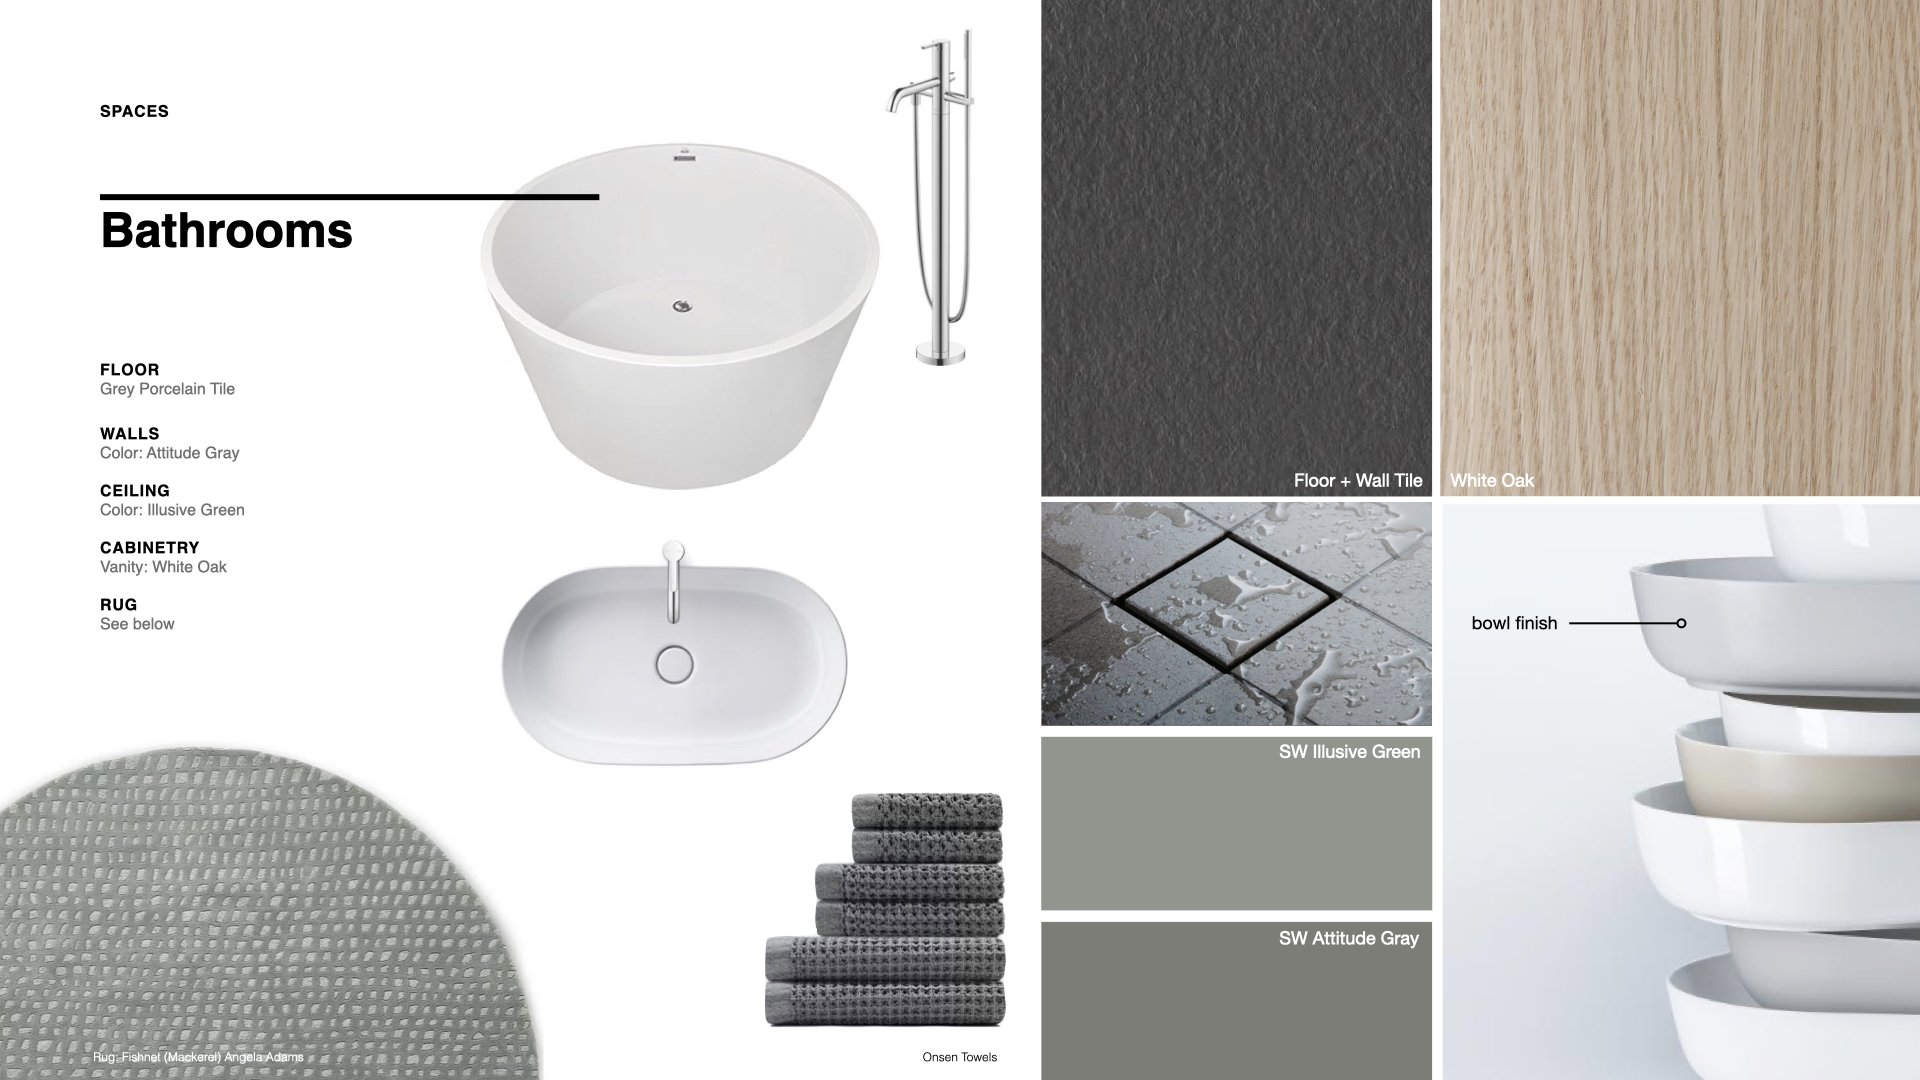
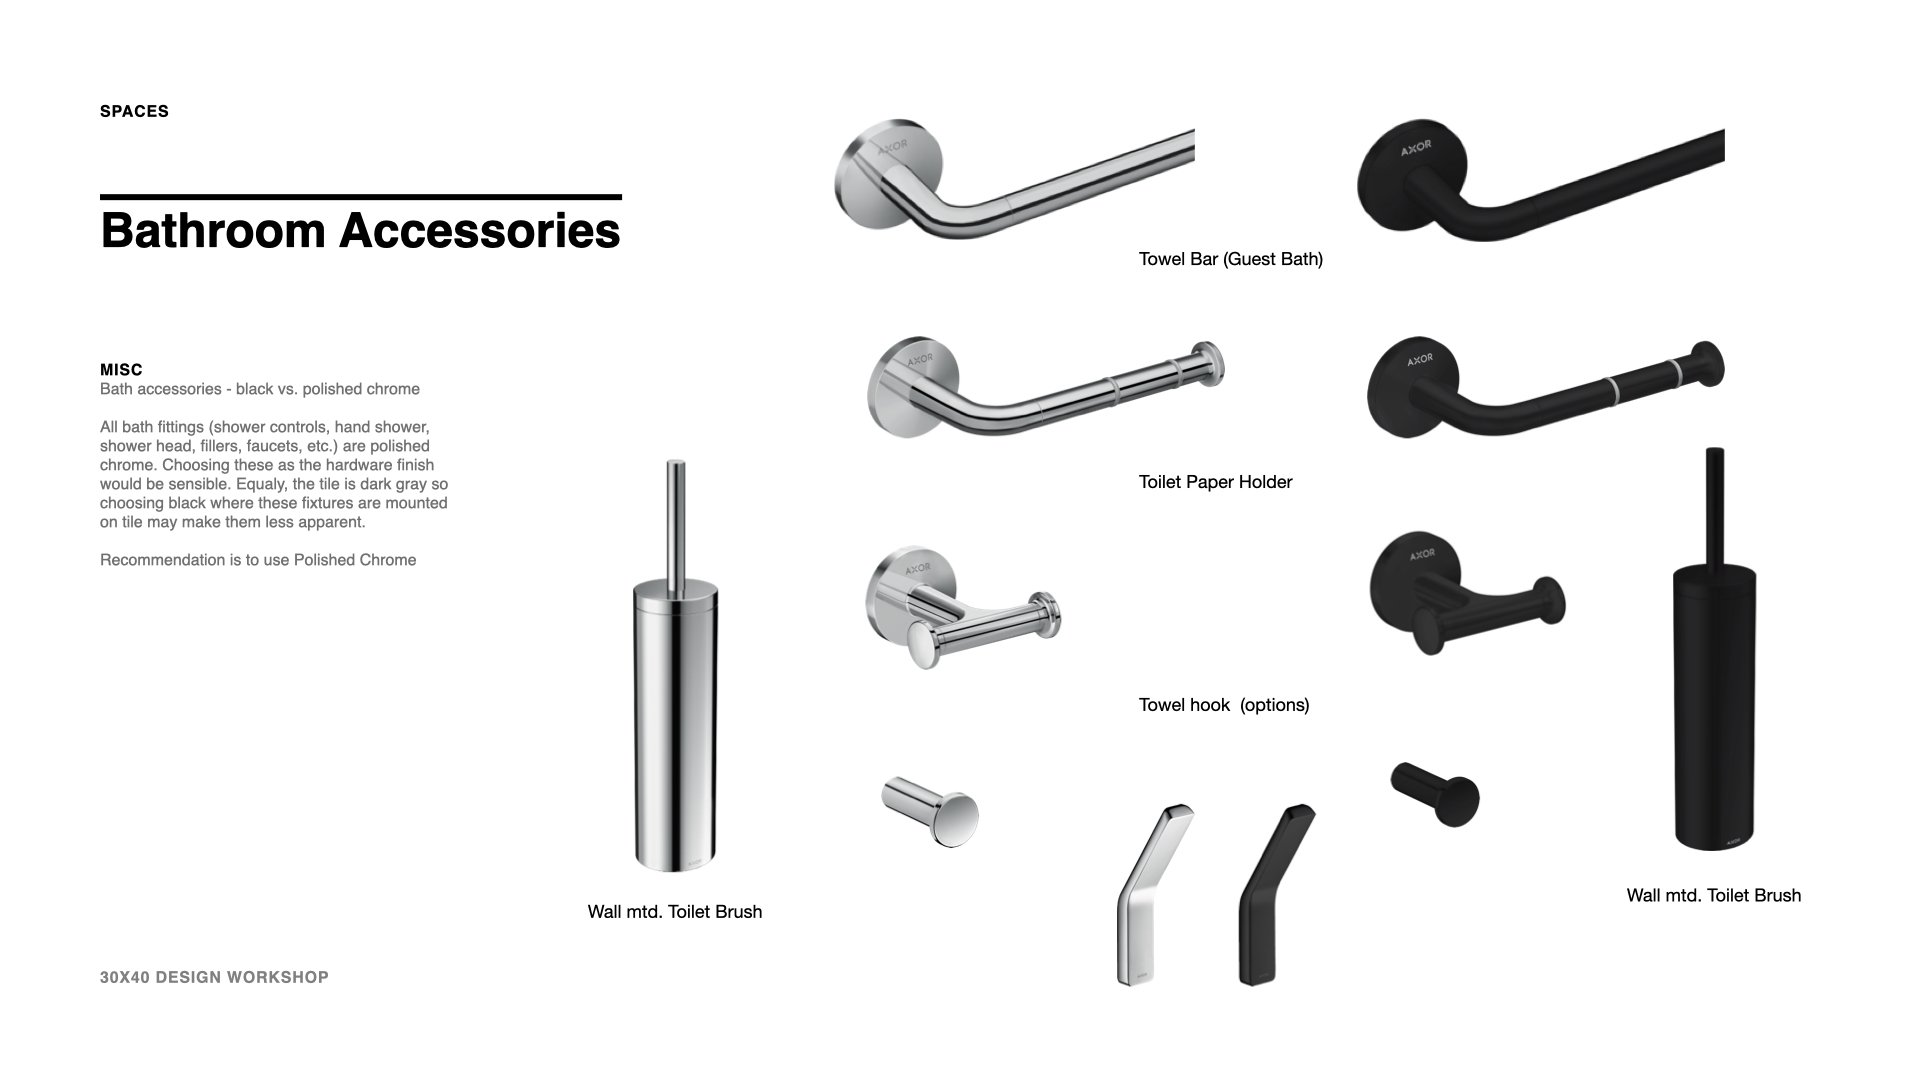
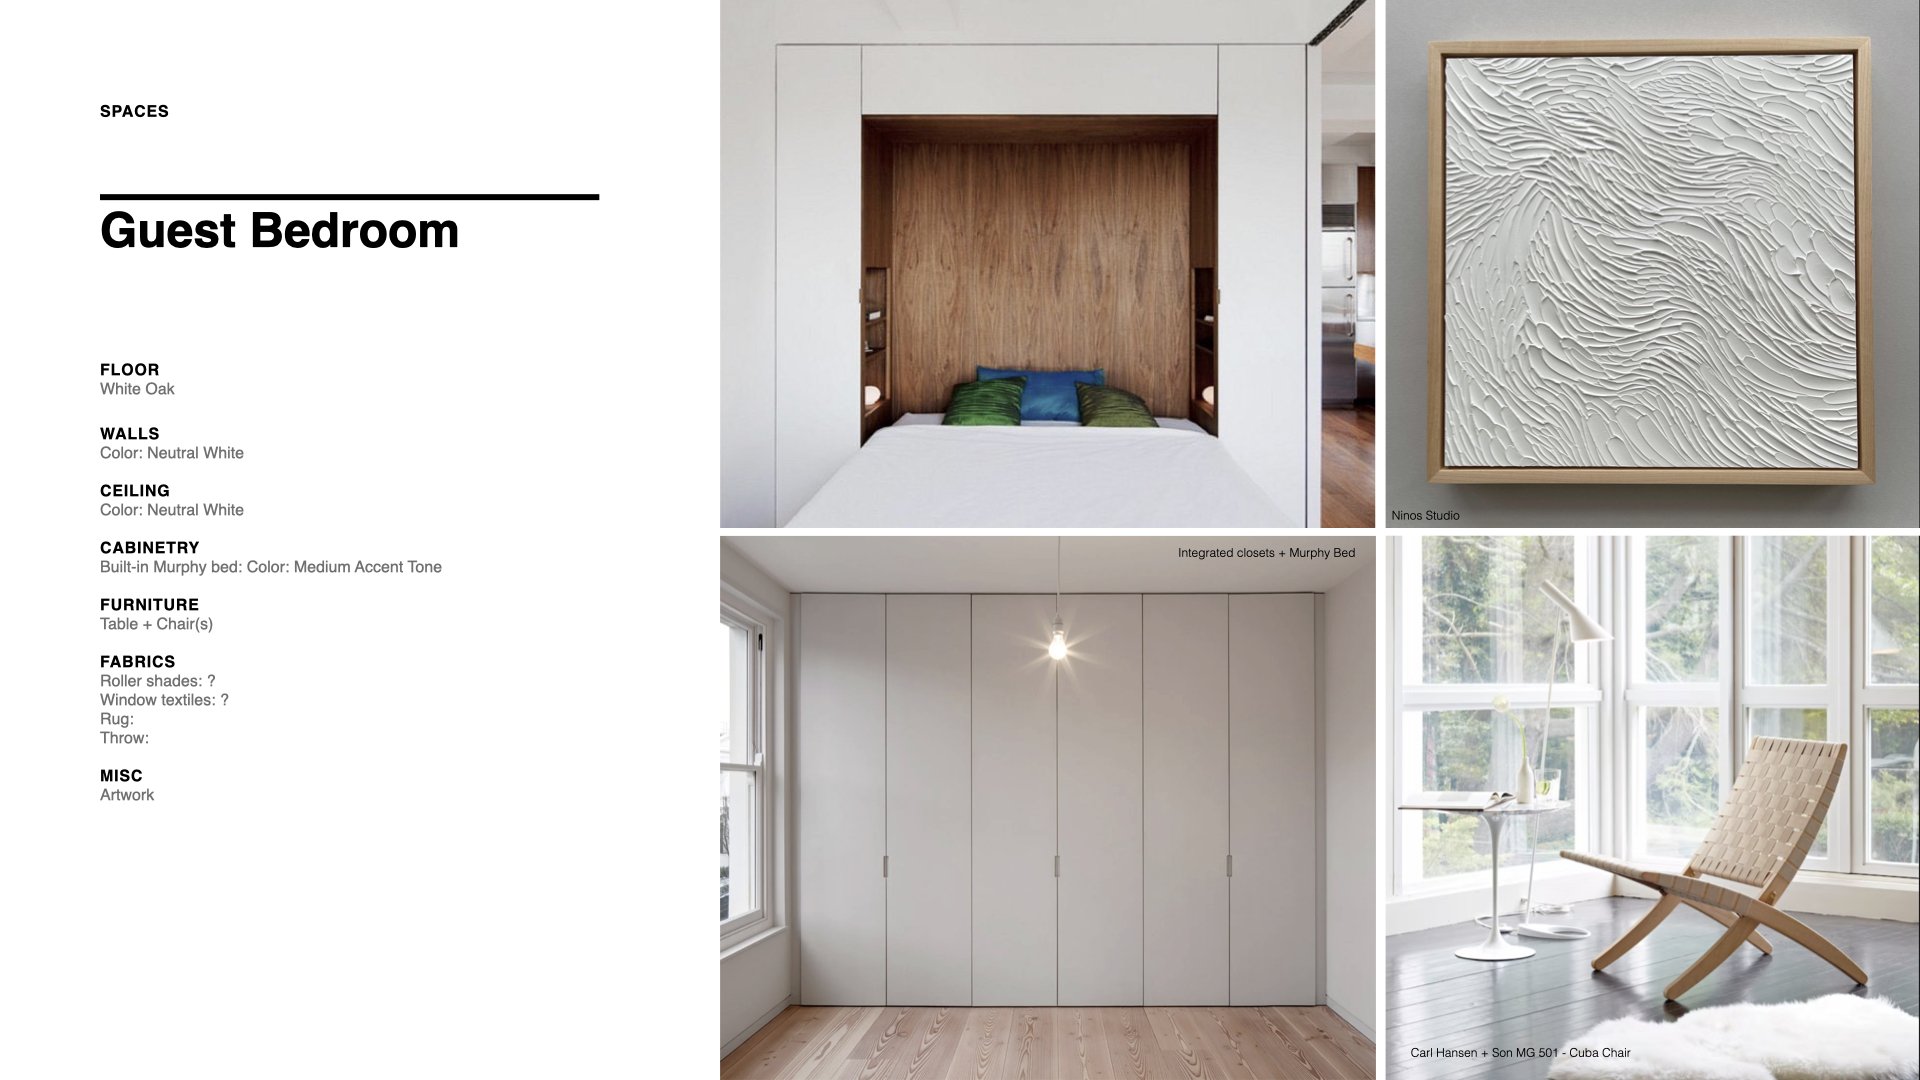
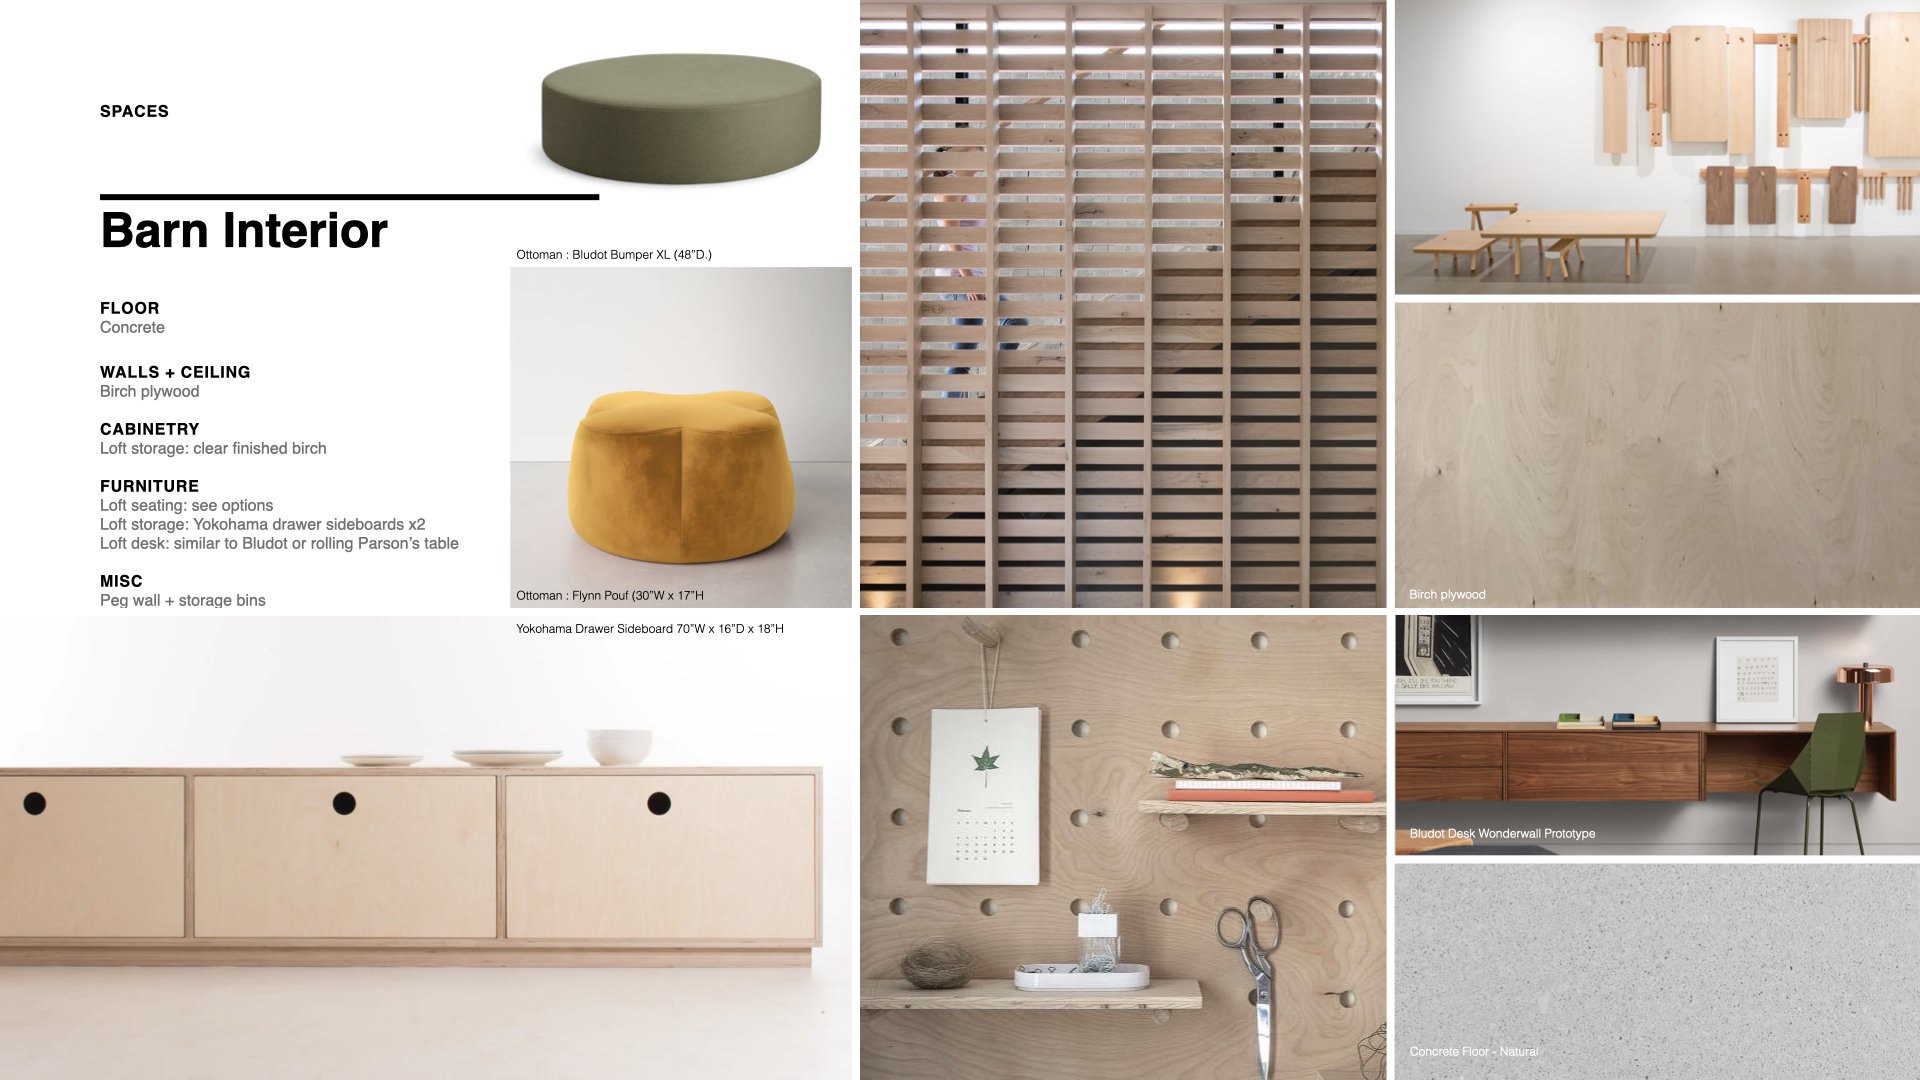
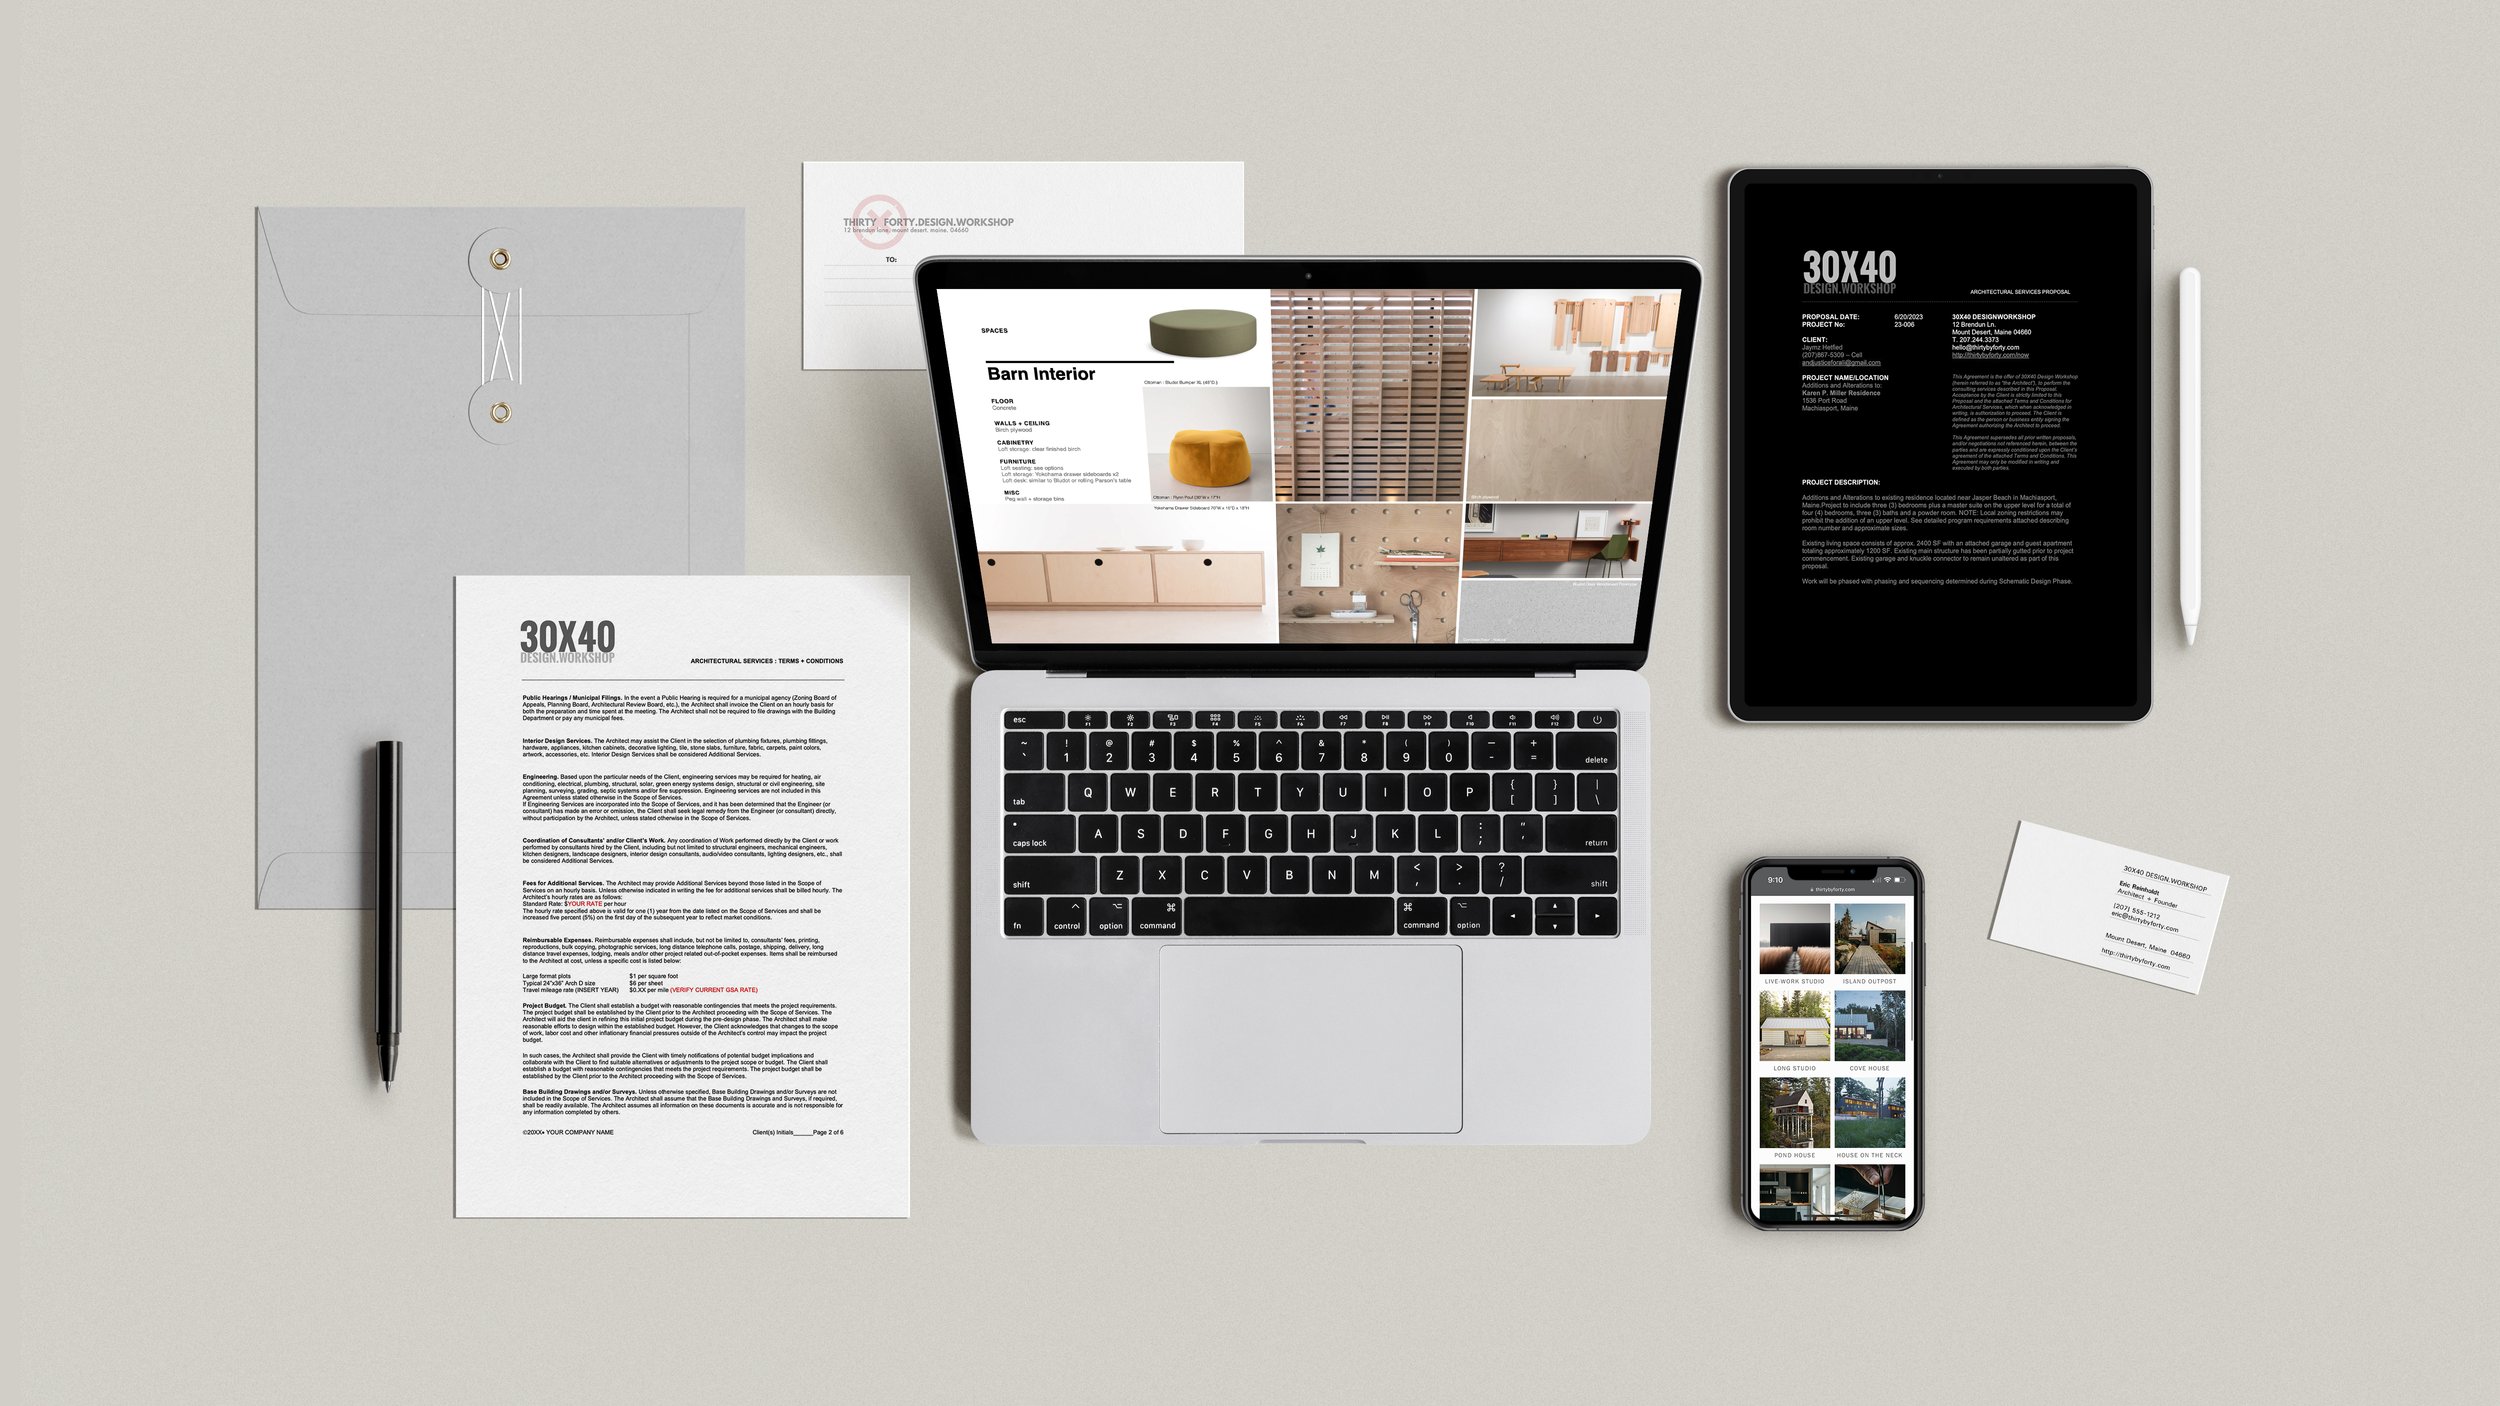
Create presentation templates for client meetings. Do you search through the countless project folders to find a presentation you can cannibalize? I used to do that. Now I use pre-formatted templates when I need to prepare for a presentation. I have one for hardware + fittings, lighting fixtures + devices, interior + exterior material palettes, plumbing fixtures and just last year a new one for interior design + furnishings. The fonts are preset and my branding is there, so I simply paste in images of the relevant products and compose the presentation. I can export it as a PDF and then send it to the client after the meeting for their review and comment. A consistent look across all my documents is a professional deliverable that commands a professional fee.

Do you spend a lot of time answering prospective clients’ questions? Create a simple document that answers the most common questions you know every new client has. Talk about your process, your fee structure, and how long a typical project takes to design. This positions you as the expert, builds trust and allows those who aren’t a good fit to self-identify. Net effect: it reduces hours of back-and-forth answering the same rote questions everyone asks.

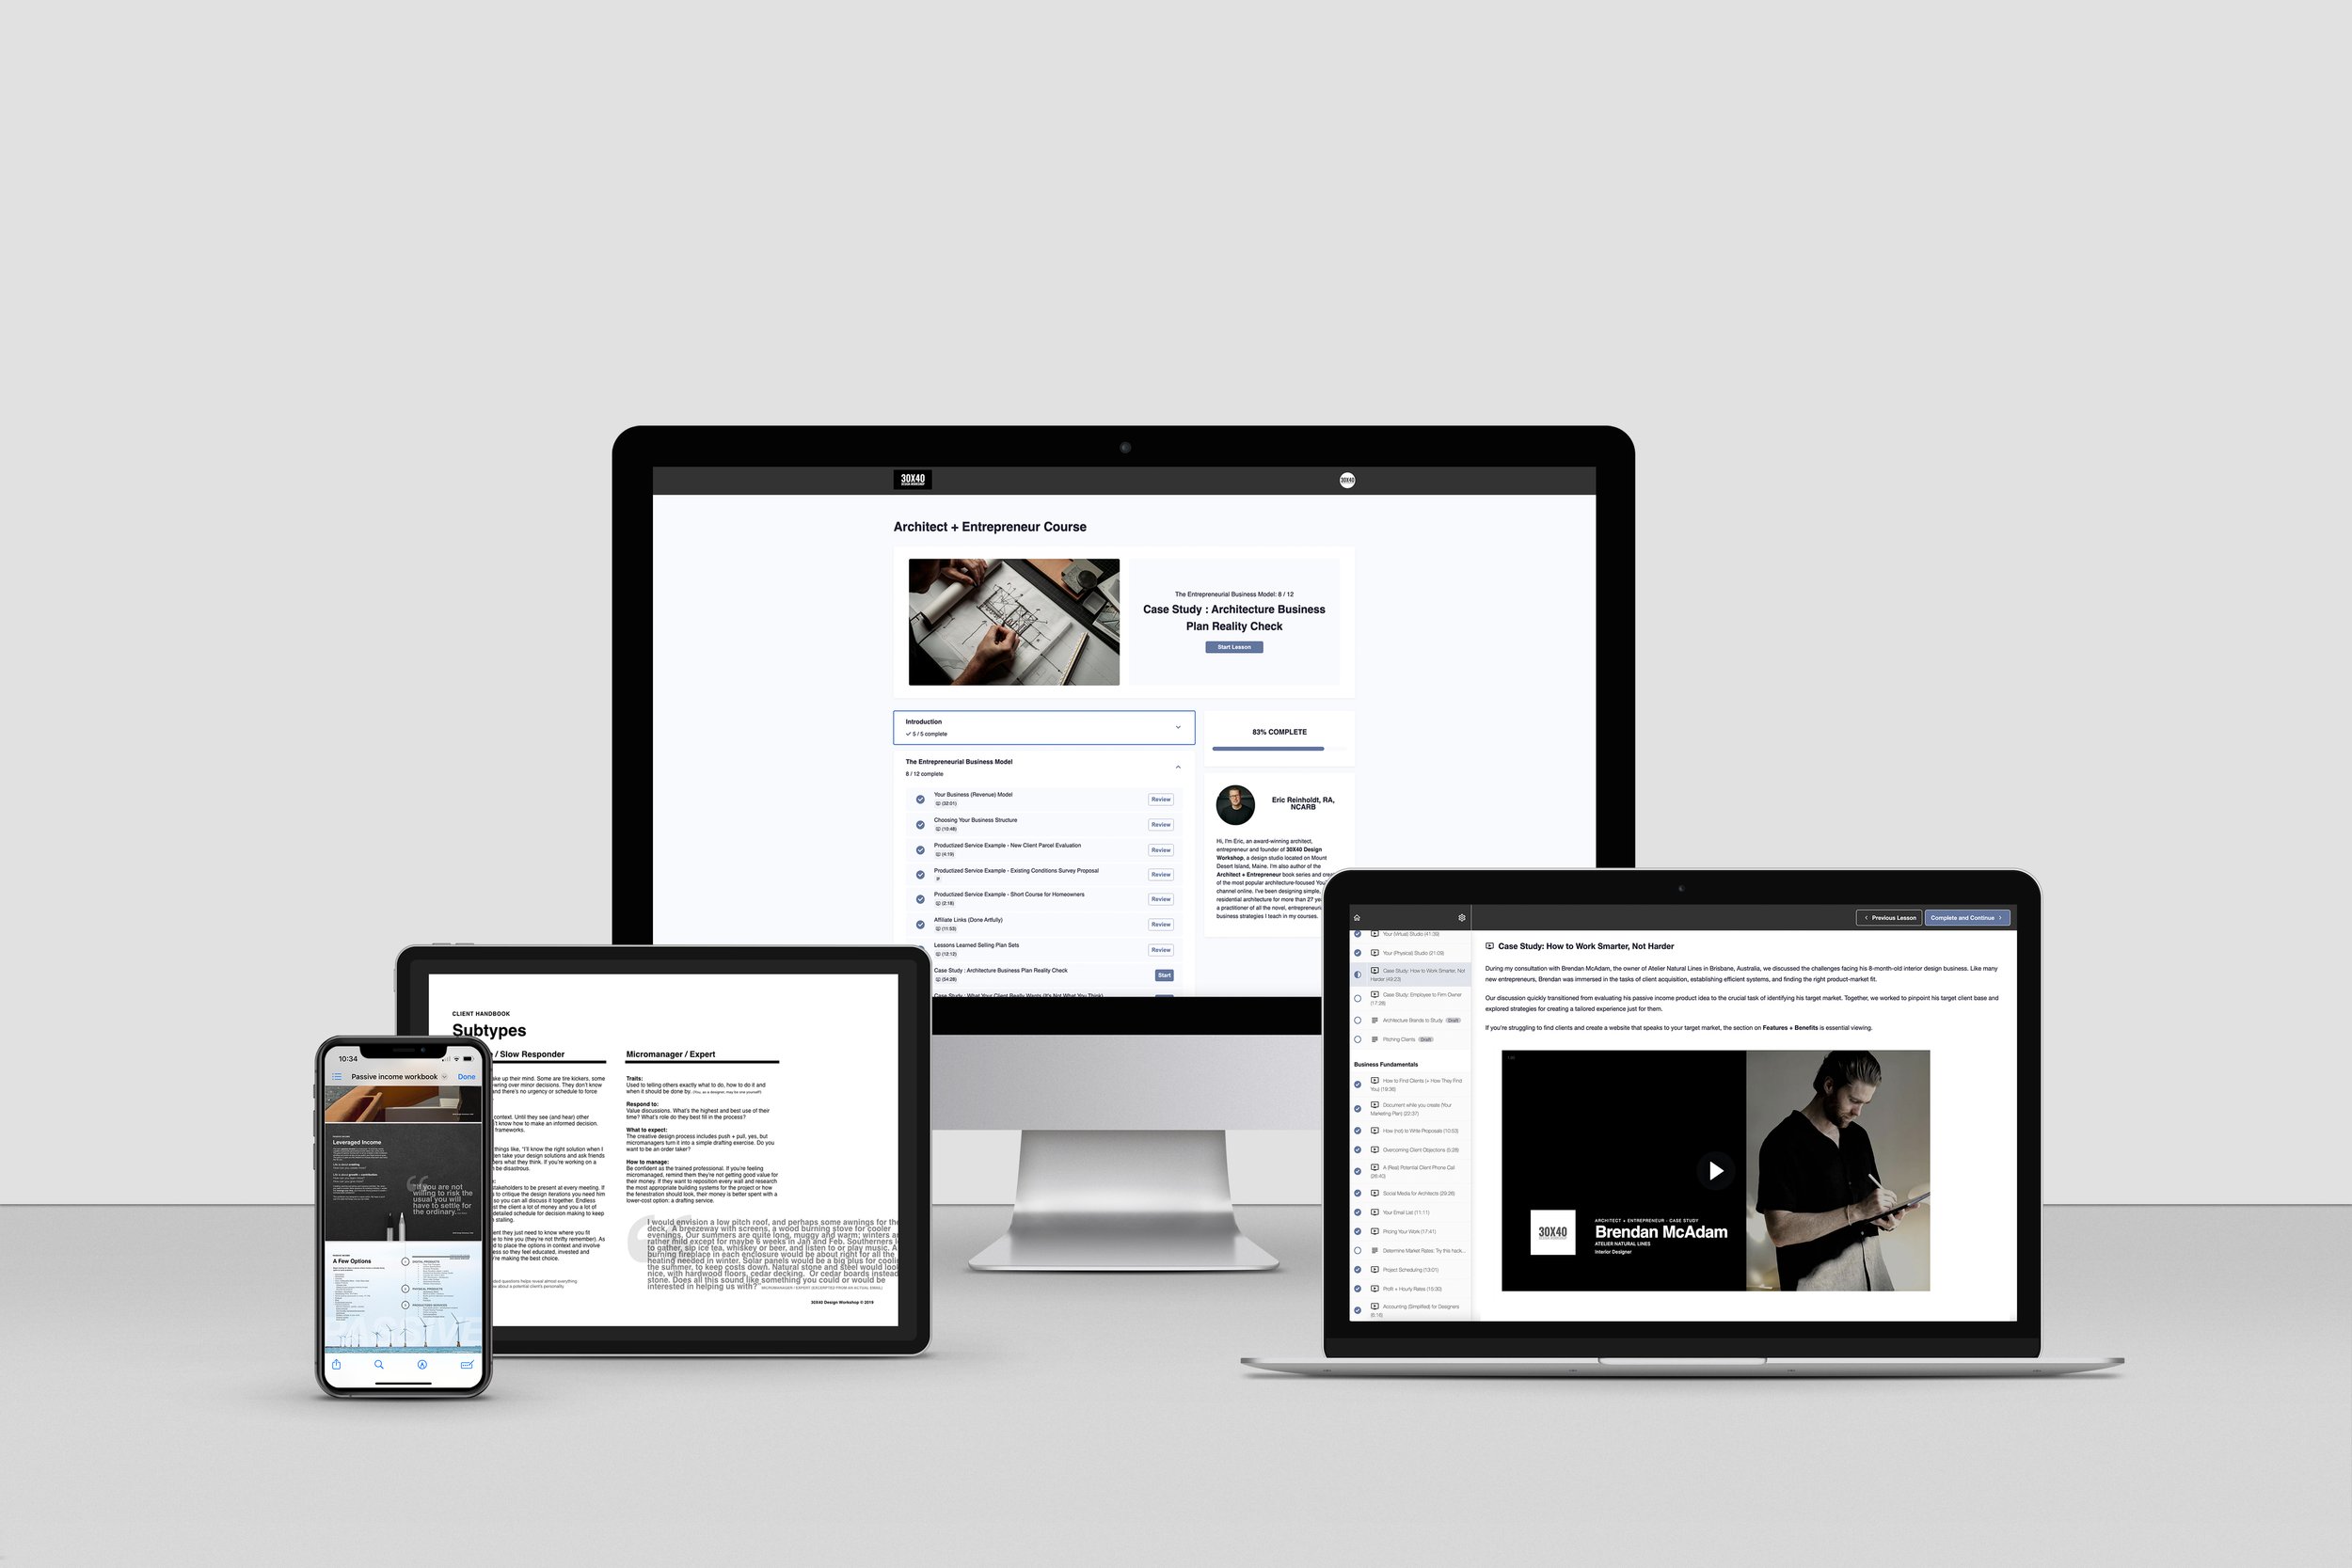
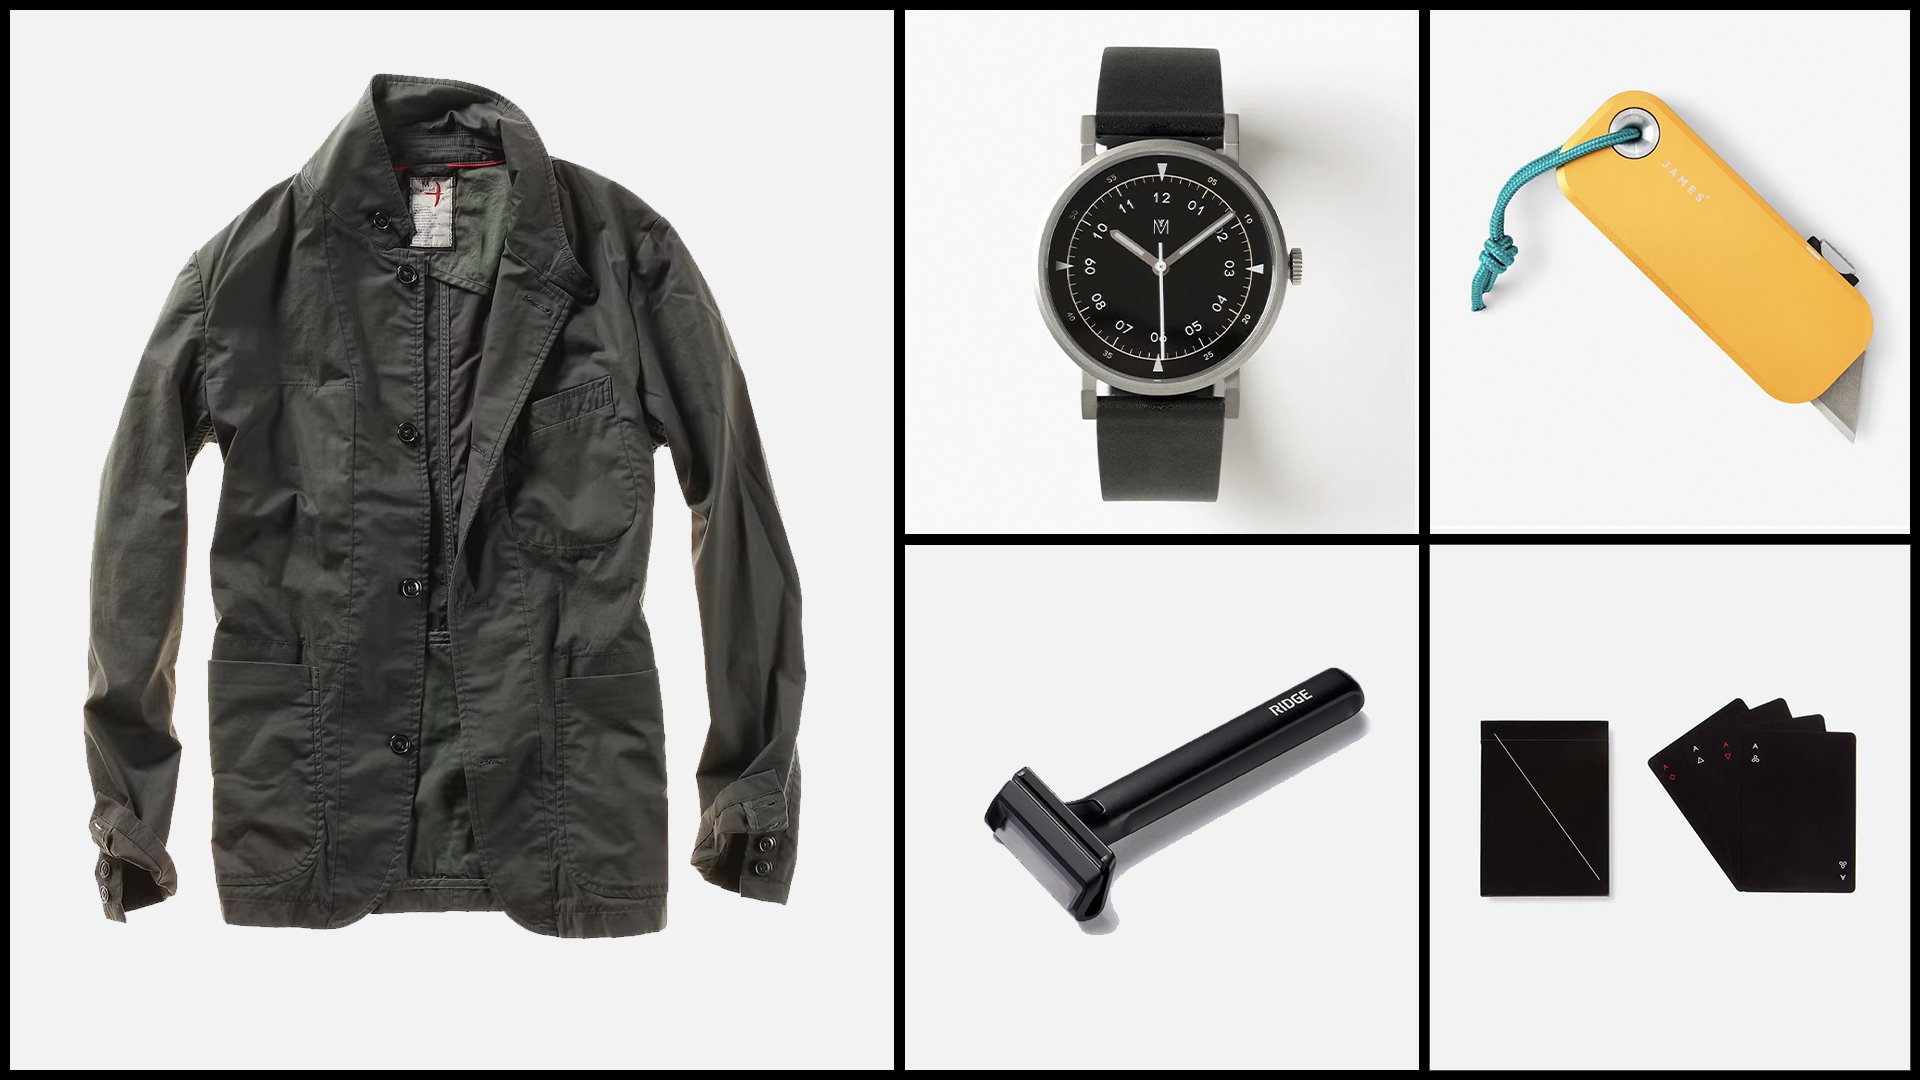
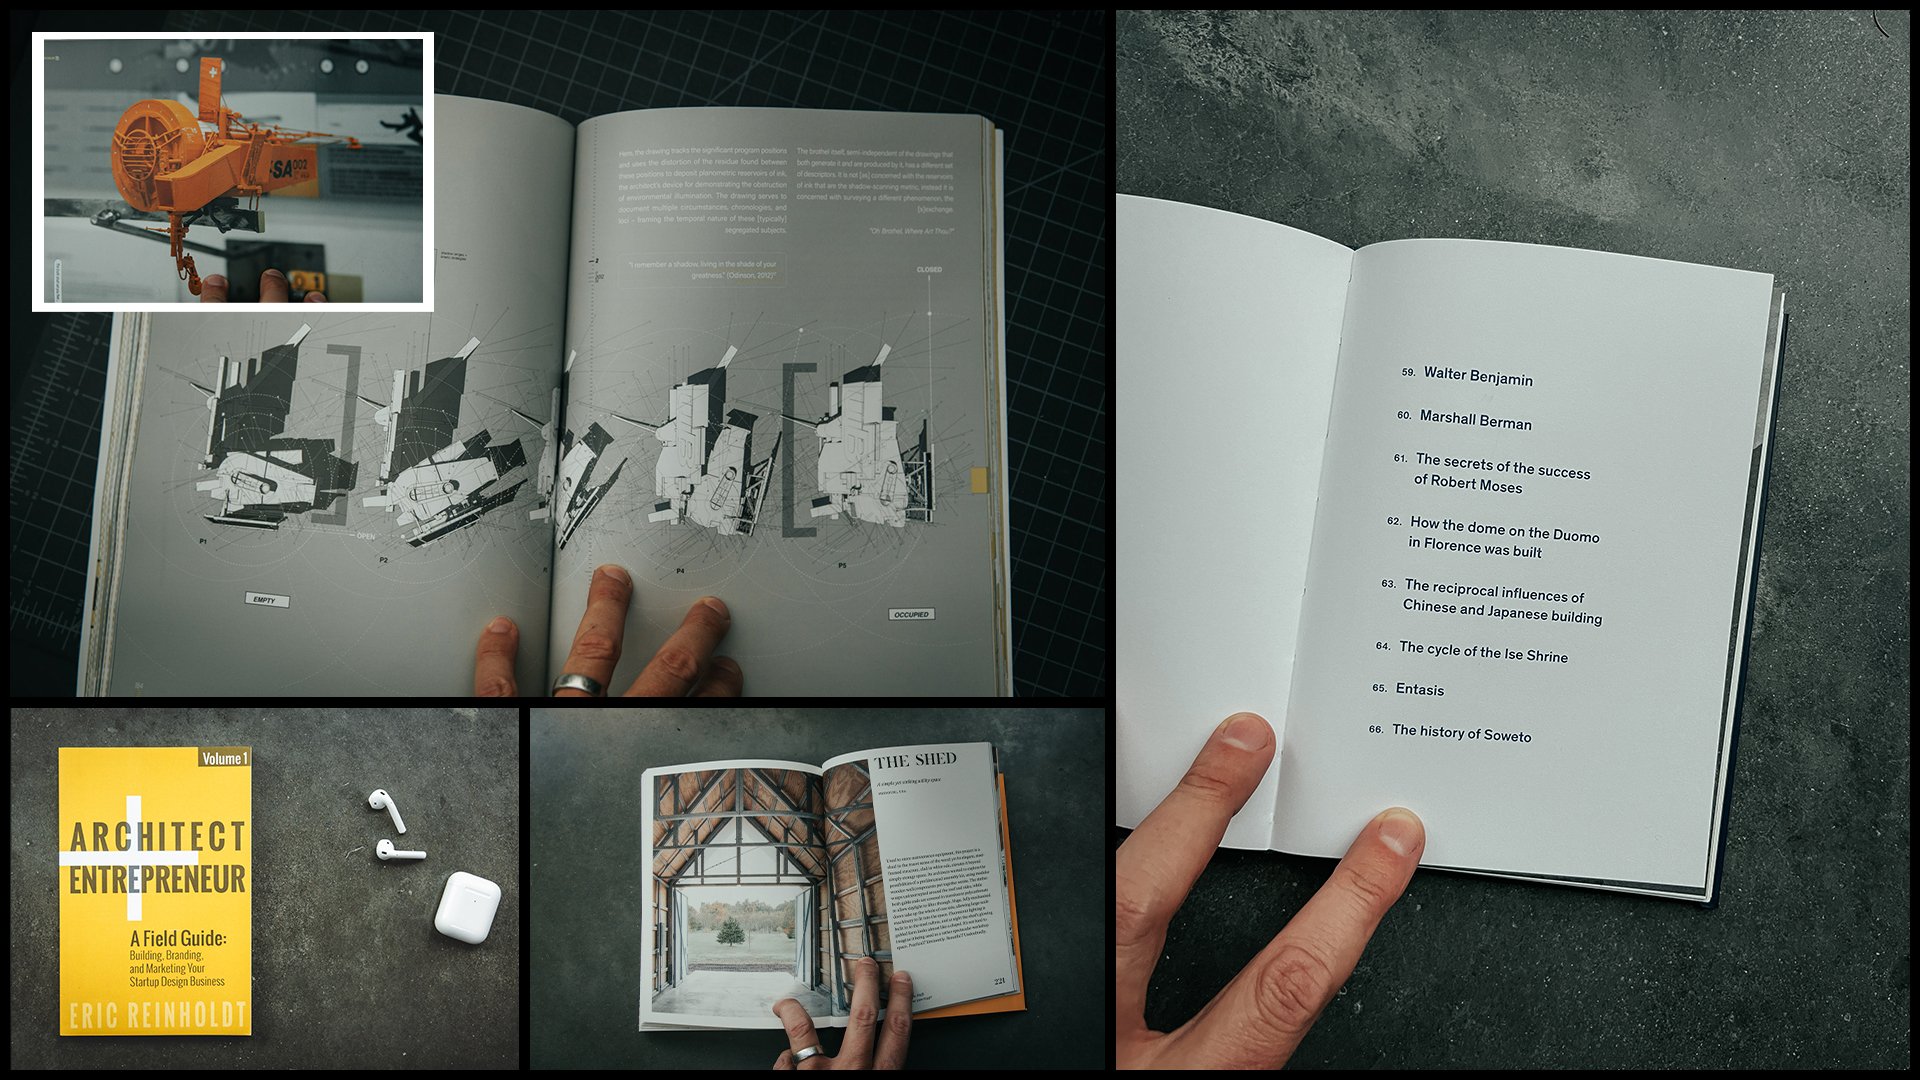
There are more of course and a few small improvements made each week will net massive results by the end of the year. If you’d like to shortcut the process, I’ve packaged up and included these documents in my Startup Toolkit, designed exclusively with the needs of design professionals in mind. Field-tested, beautifully designed and curated and on-sale through this Sunday (1/28/2024).

Architect Approved Gift Guide 2023

This year’s curated list of gift ideas is - in part - influenced by my shifting perspective having recently turned 50. Do you sense a theme? Please enjoy!

EDC

Ephemeral

  • Wine. You don’t have to be an expert to appreciate how a nice bottle of wine shared amongst friends connects past + present. It’s impossible not to savor both in the moment. Really loving Cabernet Franc single varietals lately.

  • Pair it with this book, Wine Folly The Master Guide for an accessible deep-dive into tasting.

  • Experiences. Things wither and fade, the memory of shared experiences persist.

    • To celebrate our milestone birthdays, my wife and I along with some friends splurged on a trip to the French Laundry in Yountville, CA. Touring Snøhetta’s addition to the original structure alone was worth the price of admission.

    • Side trip to Paso Robles for a Cave tasting at Eberle Winery (lower left). With more than 250 wineries and tasting rooms to choose from you won’t leave thirsty.

    • My wife and I love combining shows + travel: Pantera, LoG, Megadeth, InFlames…these are just a few of the shows we took in this year. More in the queue for 2024 as we become empty nesters.

  • Die with Zero by Bill Perkins is a great read to accompany this category.

    “The utility of money changes over time, and it does so in a fairly predictable way: starting sometime in your twenties, your health very subtly starts to decline, causing a corresponding decline in your ability to enjoy money. The ability to enjoy experiences based on health is limited as everyone's health declines with age.”

Tech

  • DJI Mini 4 Pro Fly More Combo - Integrated screen on the controller is a massive upgrade from the Gen 1 model I started with.

  • Procreate - Intuitive, beautifully minimal UI, effortless and so close to the real thing you may throw out your old sketchbooks.

  • 11” iPad Pro (128GB) Sketching on glass was hard to get used to. Now, I use it every. single. day.

  • Procreate Custom Canvases - Blueprint canvas shown with my custom “Prismacolor pencil” brush

  • AOIKTYE Keyboard for Procreate - use with Procreate to speed up your workflow.

  • Black Stylus for iPad - Because…black, IYKYK

  • Sketchboard Pro - a larger surface for your hand to rest while you’re sketching and allows you to actually sketch to the edge of the iPad rather than zoom/pan. The angled surface improves ergonomics and saves your back, no more hunching over your desk.

  • Insta 360 Camera (One X2 shown, $299) Incredible time saver for site walk-throughs and documenting interior spaces at the rough-in stage. Makes it easy to reference later when you find yourself asking, “Where exactly did they run that plumbing line?”

Storage

Smart, beautifully designed storage is my guilty pleasure. I’m sure I don’t need any more boxes or trays to store or organize things in, I just can’t seem to help myself.

Books

A few favorites from 2023 (architecture + non-architecture):

Art

Collecting and consuming art always fills the creative reserves and tops my list of things to do when traveling.

  • Tom Hegen - Exploring the relationship between man and nature from above. I’m lucky to own one of his framed prints.

  • Letterpress Anything - I try to support craftspeople practicing this dying craft.

  • I Know Joshua Smith - Miniatures: cool. Urban + industrial decay: cool. Miniatures depicting urban industrial decay = irresistible.

  • Architect Cards - Runcible Studios. Sign-up for Marilyn’s newsletter while you’re there, it’s filled with BTS, insider, hard-won, architect-knowledge delivered in an accessible style.


Flat lay of business assets included with the Start Your Design Business Bundle

Get Organized for 2024 with the Start Your Design Business Bundle

A few of the links above are affiliate links which cost you nothing extra but may provide a small commission to me if you choose to purchase using them. Many thanks for your support!

Architecture School in a Box

Before I enrolled in architecture school in the late summer of 1991 (has it been 32 years?), I received a long list of “required tools + supplies” from my university. As it turns out, I spent a lot of money on things I never used. As architecture schools greet new students this fall, I thought it would be fun to revisit that list of “must-haves” after having practiced architecture for 30 years. What’s stood the test of time in my practice? If I had go to architecture school again, this is what I’d bring.

Storage

I’ll admit, I’m a sucker for everything Yeti makes and their GoBox 30 is no exception. It’s just about perfect for studio storage with an included removable tray and a center divider to subdivide the 11”W x 18”L x 9” interior. Left undivided it can handle all the irregularly shaped tools and supplies we’re about to fill it with. It’s large enough to hold all your supplies, but it’s small enough that it’s still portable. Just under the lid there are three mesh pouches, Yeti calls this the ‘pack attic’ which adds another layer of organization to the box for storing a tablet, a laptop and sketching tools. The lid has eyelets so you can lock it to your studio desk.

I know this will last a lifetime, but there are certainly cheaper options and you might opt for a tool chest or tackle box as a lower cost alternative; they just won’t hold quite as much stuff.

(pre)Design

Before we can begin design we start with a period called predesign where we understand the design problem and conduct research. So, first on my list is a camera to document existing site conditions, for precedent studies, travelogues, and later for documenting construction progress. A wide angle zoom lens is versatile enough to capture both exterior and interior spaces as well as details. I find using a camera improves my visual acuity, it sees things in a way I’m not able.

Next, a 25’ tape measure is a tool I use in practice every day. As I’m drawing I use it to gauge how tall or wide an element should be, to measure existing spaces and structures, I use it in client meetings to show mounting heights, and on-site to verify dimensions. Understanding scale and proportion are key skills we rely on in this profession, a tape will help you learn to become spatially and dimensionally aware.

The essential reading and research in architecture school these days is all done digitally. But as you progress, you'll want to build a reference and an inspiration library. And I just like having physical books nearby as I'm designing, and I use them to reference details and standards during the design process.

Design

“Sketching is thinking,” as they say and initial concept development (for me) always happens in my sketchbook. You want a sketchbook that fits easily in your hands, something that's portable so you’ll always have it with you. I like a wire-bound one because it lays flat on the desk and choosing one with a grid allows you to sketch to scale by assigning each grid a unit of measurement.

Your sketchbook is where you document all of your ideas and of course, you'll need pens and pencils to do that. For ink, I use three pens: for thick lines I like the Pentel Sign Pen, for medium lines it’s a Sharpie Ultra Fine, and for thin lines, I like the Pilot Precise V7 and V5.

I prefer to sketch in graphite, the Kuru Toga remains my all-time favorite. It has a geared mechanism at the tip that twists the lead as you write so you always have a sharp point. Don’t forget to throw in some extra leads and some erasers. A small click eraser is great for precisely erasing things on the page.

If you want to add a splash of color to your drawings, it's nice having some colored pencils (I like Derwents) and markers for shading and shadow. Copic markers are the premium choice because they’re alcohol-based they allow you to blend on page. When you're choosing colors for all of these, choose things that match with architectural materials (wood, metal, glass, stone) or site colors (vegetation, etc.) - browns, greens, yellows, and blues.

I keep everything orgranized in a pencil case, my current favorite is made by Bellroy. The seaming allows it to lay flat and propped open on your desk, and the loop allows you to hook it to your backpack easily, grab and go.

You also want to pick up a few rolls of tracing paper. This is just an inexpensive translucent paper we use to lay over an existing drawing and iterate and refine our designs. You'll use a lot of this in architecture school. I like the 12”x50yd format in white by Bienfang.

presentation + modeling

Manual drafting tools are relics of the past; we don’t use these in practice today as everything is drawn digitally. Your school will dictate the how much hand drafting you'll be doing. So, although I look at my old tools with some fondness, they're nothing that I've used in my 30 years of practice.

You will, however, need an architectural scale: an Imperial and a metric one (location dependent of course). Download the guide for my recommendations.

Physical model building is a part of many design professionals process and it will always have a place in mine. Check out the videos and posts linked below for more information on the model making tools I use in practice.

Digital Tools

I use my iPad every single day. I use it to sketch in Procreate, for client presentations, for accessing drawings and specs on site visits. Learning to incorporate an iPad or a tablet into your workflow is going to be a skill you'll need as you graduate into the profession.

It's not, however, a replacement for a laptop. Because technology is always changing, check my laptop buying guide which I regularly update. Every school is going to have different requirements and they’re informed by the level of task you require (drafting is very different to real-time rendering). It's probably not going to be Mac-based, even though that’s what I use as a sole practitioner. Most of the software that we use as architects run on a PC. Be sure to check with your school.

Links to all the suggested tools, tech and accessories are included in the FREE resource download. Click the button below to download it.


Notion for Design Professionals

We all want to use our time efficiently and minimize effort spent on the administrative side of our design practice. Searching endless folders or open tabs for links to products you swore you found last week, trying to recall the milestones you agreed to or where the current Gantt chart lives and share it with the team isn’t a good use of anyone’s time.

I use Notion for all of this and more.

Notion has served as a second brain for me for a few years now; it’s the best “all-in-one-productivity and project management tool” I’ve found for both personal and professional documentation. It’s intuitive, capable and infinitely flexible; a blank canvas that can be almost anything you want. The open-ended structure is a strength when you know how to use it, but can be a little intimidating when you're just getting started and unsure of how to set up your workspace.

If you’re unfamiliar with it, watch the videos below to get set up; continue reading if you’re already using it see how I’ve set my workspace to run my design practice.

Getting Organized

Every Sunday I plan my Weekly schedule which is simply a favorited page that resides in the upper left corner of my workspace. I use the Maker’s Schedule + Manager’s Schedule as the structure for the week to keep me on-task. Also notice the annual objectives (set in the video above) are just a click away and serve as a reminder of the bigger goals and priorities I’m working toward each year.

I used to live in my inbox with the window open and collecting emails all day long. Every notification lured me back to the inbox, wasting my time and distracting me from the deep work that needed doing. The work that would push my business and projects forward. Maybe you can relate?

Using Notion has changed that. Now, I live in my “Week of” board which makes explicit the priorities I’ve set on Sunday rather than my inbox which is filled with the priorities of others.

Week Of Schedule Page (click the image to enlarge)

Below the schedule, I keep two to-do lists, one related to home the other for the business and a task table which is linked to my calendar. This is a great place to catalog recurring tasks you might otherwise neglect: like your annual architecture license renewal, LLC document filings, annual reports, etc. I also use it to schedule my regular monthly invoicing, which is something I’ve been getting better at over the years. I invoice every client, every 4 weeks, no matter what (setting a reminder in the task table is really helpful when you have multiple projects running).

Sharing Inspiration Images with Clients or Team

Embed images from site visits

When entering the task on the table, you can use tags to assign it to a project, a person, or anything you choose. Then, on the project page, you can copy this table and filter the view to show only those tasks related to the project, or a team member, or any other tag you’ve set up. The tables are called ‘databases’ and are the key to unlocking the true power of Notion. If you’re running a team, each member can utilize a custom dashboard showing only their projects, tasks and deadlines.

This summer I’ve had an intern working in the studio and I build out the weekly task list each Sunday for the week ahead so it’s clearly laid out for them when they arrive on Monday. I can include links to SOPs and all the project files and information they need in one place. This saves both us time and limits questions (“Check your Notion dashboard”).

Task Table

Filtered Task Table for a Team Member

Any project specific commitments can be embedded directly in the weekly schedule by pasting a link to the project page or, even links to specific blocks from any page. In the schedule above you can see I made a site visit on Wednesday afternoon and the To-Do list for that project is hyperlinked right in the schedule. Clicking on it brings me to the project dashboard and the in-progress items for each stakeholder are immediately visible. Each toggle by the stakeholder can be clicked open revealing the outstanding items, documents and anything related right there.

Below that is a task table with a filtered view of the tasks related only to this project.

Project Dashboards

Dashboards are simply a collection of the various building blocks available to you in Notion: text, images, hyperlinks, images, videos, tables, quotes…the list is long. I create one for each project, and once you have a format you like you can turn it into a template to use for all projects (download my template to see the one I use).

When starting a new project this template brings over all your office standards in one click. My project template has an embedded a project brief, meeting notes templates, site visit templates, design and documentation checklists, code and site analysis information, client and contractor onboarding information, links to questionnaires, task tables, and more.

Don’t let this overwhelm you, all of this can be built out, customized and added to over time to suit your needs.

Creating custom dashboards for clients with all the project information you want to share - current drawings, checklists for next actions, contracts, permits, invoice due dates, and project wikis - empowers you and your clients/collaborators to seek out the information they need rather than picking up the phone, emailing, or worse - texting you - to ask! Simply share the project dashboard and teach them to check there for updates.

Project Specific Task Table

Checklist Example

As design professionals, our work involves handling an abundance of information. From site and field documentation, to client and contractor requests for changes, to design ideas and inspirations; all of the administrative tasks of project management can easily crowd out the exciting work that drew us to this profession, which for most of us is design.

I've found that Notion has provided a framework that's easy to keep updated with to-do checklists, preconfigured systems, a place to collaborate with clients, consultants and contractors, and a place for me to collect and organize all of the administrative minutiae in one place. No more stickies lining my monitor's perimeter, or bookmarked links in random folders; when it's project-related, I have a place to paste it and keep track of it.

Download my template and watch the videos above for more details on how it can help organize your professional practice.


Still not convinced?

A few more Reasons I use notion

In the past I’ve used Trello, Asana and Evernote to run and organize my business operations. While Evernote was searchable, it was messy. Trello and Asana were as customizable as I had wanted. And implementing templates and systems with each was hit or miss. These are some of the strengths of Notion and considerations when choosing a new tool:

  • Easy to use + implement

    • Onboarding with Notion is simple; a very low learning curve. Advanced features unlock more potential, but take longer to comprehend and integrate. It can grow with your needs.

  • Systems Oriented

    • Templated work will save you time managing your projects + administrative tasks. Notion allows you to create custom templates for almost anything you can imagine: projects, notes, files, tables, etc.

  • Collaborative

    • Sharing Projects + Pages with clients and collaborators is easy and allows everyone to see the most up-to-date files, checklists and information. You can assign tasks and comments to others by right-clicking on any object, assigning a due date and custom requests.

  • Searchable

    • Notion allows you to find the information you’re looking for quickly and reliably, listing every instance of your search phrase while typing. Evernote used to be amazing at search but the more I loaded it up, the less functional it became.

  • Customizable

    • Collating various media is important for our work as designers: images for reports + inspiration, video embeds, hyperlinks, product ideas + references, notes, checklists, tables…Notion has them all. Simply click the + to add. Dragging blocks around is intuitive so you can create the structure that suits your needs.

  • Graphically Pleasing

    • With a minimal interface, Notion can be what you want. Add images, banners, colors, etc. Out of the box, it just looks good and if I’m sharing this with clients I want it to be representative of my brand.

Using AI as Design Tool in My Architecture Practice

I’ve been practicing architecture for almost thirty years now and although my design process has evolved over that time, it’s one I’m wholly comfortable with. It’s efficient, it’s safe, and I know following it will yield good work. I’ve noticed too that it can produce similar-looking results as I return to familiar forms, plan layouts and details that have worked in the past. And this is a perfect use case for generative AI design tools - like Midjourney - to help break the frame and help me quickly explore options I may not have previously considered.

Copying others is a good way to start a career. Copying yourself is a disappointing way to end one.” - Kevin Kelly

Using Midjourney, is strangely addictive. You enter a prompt and watch as four hyper-realistic images ‘hatch’ before you, resolving like an old Polaroid photo as the algorithm compiles the pixels. It feels a lot like gambling. Each prompt promises a new chance to get lucky. The results are captivating images of seemingly perfect buildings and it’s easy to mistake them for finished work which they’re not. Accepting these first results would deny the true power of Midjourney as a tool for ideation. Remixing, upscaling and blending images recaptures the autonomy of the designer to shape the outcome and preserves the capabilities of Midjourney to quickly deliver many iterations of the same idea.

Watch the video to see how I’ve been experimenting with it in my practice.

Heading to MidJourney without an idea or a concept guiding your efforts means you’ll likely spend a lot of time creating seductive images of buildings that have no place in a design process. Images without substance. For me, the design process starts with a sketch and an idea. I head to Midjourney to solve a problem I had before heading to Midjourney which is quite different than using it to cycle through an averaging of the imagery that the algorithm has ingested.


Midjourney is a text-to-image generative AI app that uses Discord as the prompt interface and creates a four panel image spread based on a text prompt. Entering something simple like: “iron lace by Tadao Ando ––ar 16:9” produces this image:

A short prompt like this allows Midjourney the freedom to be inventive. It recognizes Ando is an architect and produces a building with his characteristic elemental form language. Importantly, the algorithm has ingested many photographs of his work which tend to be dramatic, sweeping one or two point perspective views with water features and concrete and you’re receiving an average slice of the hybrid of those and the ‘iron lace’ images it’s been trained on. The ––ar 16:9 is an aspect ratio modifier that delivers a wide angle view.

To wrest more control from the AI, you may be inclined to create longer, more precise prompts which, in my experience, can produce mixed results. The recipe below balances precision with room for Midjourney to be creative.

Prompt Recipe:

Once you get beyond the clunky Discord interface used to create the images. The key to unlocking Midjourney as a creative assistant lies in controlling the output through specific prompt language. Words closer to the beginning of the prompt will have more weight in the final result and you’ll want a basic understanding of the parameters before getting too far, Midjourney keeps an updated parameter list here. Now, on to the prompt recipe:

Trying to recreate someone else’s visual style in Midjourney is less interesting to me than the process of experimenting with the tool to produce the kind of image that’s useful to my design process. For example, I’m more interested in creating building forms that don’t look anything like their antecedents. I often force Midjourney to produce buildings without common attributes, like windows or doors, by using the modifier “no” (––no windows ––no doors). I find the results more interesting and useful to me.

Aberrations

What I love about using generative AI for ideation is that it introduces error and randomness into an intentional, too-highly controlled process. It’s similar to analog processes like model-making or sketching, where an error presents an unexpected opportunity. New ideas often come from noticing flaws, where something is strange, misplaced, or missing altogether. Exploring these aberrations can push the design forward. The circled corner of the abstract barn image I created suggested I might consider eroding a heavier base and tucking the work program below the living program vertically separating it rather than the initial idea to separate it horizontally.

Finding a secret sauce of your own making will take some experimentation, just remember that AI is a mirror for your own creativity. Overly constrained thinking will yield similar results. Plying it with interesting prompts it’s become an indispensable office intern who has helped to reinvigorate my design process with fresh ideas and new perspectives.

This Architect Doubled His Income. Here's How.

Every Friday afternoon, I meet with students enrolled in my Architect + Entrepreneur Course to discuss their progress, professional challenges, and help guide their next actions. This is how I met Henry Gao. When he enrolled, his skills were being underutilized by his employer, and he was struggling to make ends meet in one of the most expensive cities in the US, San Francisco. Unsure if the risk of setting off on his own was the right thing to do, I reminded him it wasn't an all-or-nothing decision. He could keep his job AND start a side hustle as a low-risk next step.

Twelve months later he's more than doubled his monthly income.

Imagine, doubling your income in that short span?

Henry Gao, SF based Architectural Designer in his studio

Henry's story is part of a growing trend of young architects prioritizing work-life balance and earning more. Designing a creative life of your own making is an unattainable ideal, a dream never realized. In this latest installment of the modern practice series, Henry shares exactly how he did it.

By leveraging principles of entrepreneurship and finding ways to divorce time worked from fee earned, Henry was able to carve out time to sketch and learn architectural photography. He explored new digital tools and a method for using them in practice. And, importantly, he began sharing what he learned with others. The iPad workshop below is one of his ‘white space’ experiments. He discovered an unmet need in the profession and he’s using it to teach others, supporting his family with the proceeds and using that to buy even more creative ‘white space’.

DIGITAL WORKFLOW FOR DESIGNERS

This free, 3-Part Workshop is an intro to Henry's iPad for Designer’s Masterclass (which I'm enrolled in + highly recommend).


Interested in replicating Henry’s success? Here’s your shortcut.

Architect + Entrepreneur Course

When I started 30X40 Design Workshop in 2013 I was focused on building a non-traditional studio. I wanted to design homes, but as a creative person with many interests, I wanted a business that would allow me to explore them all. I made a very simple shift in the way I practice and this course explains how you can make that transition too. You’ll learn how to make the same creative white space Henry did so you can do more of the things you want to do. It's absolutely possible to design a business that serves your financial needs, supports your family and also feeds your creative intellect. And, it doesn't matter if you live in a city, a suburb or a remote island - like I do - when you apply the principles of entrepreneurship to reinvent a conventional practice model you'll earn more and have more time for the things you enjoy.

Whether you’re just getting started or you’ve been at this a while and you’re not where you’d thought you’d be, you’ll find valuable lessons here. I share what saves me time and makes my business more money each month. The curriculum provides a framework and a set of actionable steps that will help you put in place the systems required to design a business that works for you. You’ll have the freedom to choose what you work on each day, a purpose driving you forward and the time to spend on the things in life that really matter: your personal relationships.

Without the freedom to chose what I work on each day, a purpose driving me forward and strong personal relationships I don't consider myself successful. How you judge success may be different. Maybe your metrics are financial, maybe you want to run an international team, or win the Pritzker or travel full-time. There are no right answers, only ones that are right for you. This course teaches you to work with intention, toward goals that matter.

Interior Design with an Architect's Eye: My Process

As this project enters its twenty seventh month in construction (!) the crew have begun finishing the interiors. The supply chain delays of the pandemic, a prolonged labor shortage, unlucky and unfortunate delays have made for an epic build.

I’m working with the most patient clients in the universe it turns out.

February is roughly mid-winter in Maine and a good time to turn attention inside!

Not all architects consider interior design as part of their scope of work, but for a residential architect it’s at least half - and an essential part - of what I do. I want a singular holistic vision and a reflection of the architectural design solution applied consistently throughout. There are, of course, varying degrees of influence we can exert. I’m hardly a Frank Lloyd Wright fan, but I always admired his ability to design every last detail in his clients’ homes. From window glazing to tableware, linens, art, and accessories. He designed every piece of furniture and, fixed their positions, to curate the overall experience, both inside and out. Although most people have limited budgets and patience for this degree of design integration (especially after 27 months in construction), for architects it remains an aspiration.

My interior design process is a combination of design and curation. Some elements, such as door and window details, cabinetry, hardware selection, plumbing, and lighting fixtures, need to be designed and integrated, while others, such as furniture, accessories, and textiles, can be left for curation.

In the video I share my interior design process and the story (mood) boards I create for my clients. It starts with a concept and ends with a detailed focus on each space. The concept here is drawn from the colors, textures, and light patterns in the natural surroundings. You’ll see how materials, texture and color combine with the architecture to mimic the unique boundary condition this home occupies between forest and sea.

Designing a home involves many decisions, from furniture and color choices to lighting and accessories. Every aspect contributes to the overall look, feel, and function of the space. Without a concept guiding our decisions, it’s easy to simply collage and combine images we like of disparate ideas. The sum total can feel disjointed.

A concept provides:

  1. Cohesiveness: A strong concept ensures that all elements of the design work together in a harmonious and cohesive manner.

  2. Clarity: A concept provides direction and helps define the overall aesthetic and style of the space, which can be especially helpful when making design decisions.

  3. Functionality: A concept can help dictate the functional aspects of the space, such as furniture arrangements, lighting, and storage solutions.

  4. Emotion: A concept can evoke emotions and create a desired atmosphere or mood in the space, making it a personalized and meaningful environment.

  5. Impact: A well-designed concept can make a lasting impression and create a memorable experience for those who use and interact with the space.

Architectural Material Palette

Most people lack the ability to articulate precisely what they want in a space and Pinterest can unify our vision. My clients and I use Pinterest to collaborate and establish a common design language once a concept is agreed upon rather than to define the design vision or stylistic overlay. We don’t linger there though, I prefer to further cull the images and develop a story board presentation (see images below). We want to create our own unique work, derived of our own ideas not simply a collage of rooms taken from dozens of other spaces. I find using story boards in the process helps my clients see the home as their own unique design.

It’s our job as interior designers and architects to make visible the invisible, latent forces in a place. This home is sited on an island, six miles out to sea and there the weather, the changing light, the seasons; everything is about contrast. The home sits on the boundary between two very different environments, the forest and the sea and it controls one’s experience of each. I want the interiors to be the canvas that makes this contrast visible.

As we look at the floor plan there are natural places that might be more like the forest, more sheltering, darker, and lower in scale. The obvious places are the entry area, and the bathing spaces. And then there are the main living spaces which are larger, brighter with taller ceilings and sweeping views. In the bedroom and supporting spaces we can alter the balance between light and dark, mixing the two.

Material Palette Flat Lay

Materials

Contast as a concept is versatile and can operate on many levels: tonal (light and dark), textural (smooth and rough), emotional (refined and casual, high/low) and so on. Given this is a small home, we want to limit the material palette so, I’m proposing to use natural wood, painted plaster, and stone as the primary materials. I’ll be accenting these with metal, leather and some fabrics.

Be sure to watch the video for more details on the material selections. Here’s the palette I’ve chosen:

  • Floors

  • Walls/Ceilings

    • Snowbound, Sherwin Williams

    • Illusive Green, Sherwin Williams

    • Attitude Gray, Sherwin Williams

    • Iron Ore, Sherwin Williams

  • Cabinetry

    • Stamped Concrete, Sherwin Williams

    • Argos, Sherwin Williams

    • QS White Oak, WOCA Extra White Oil

  • Counters

    • Ipanema Reserve Soapstone


Below is an excerpt from the working presentation I reviewed with my clients. Download the presentation template here.

Building a 30-Minute Study Model

The digital tools of architecture practice are always changing, but I think most architects will tell you that analog tools - sketching and model making - are an unchanged part of their design process. I find making things by hand - the craft of it - forces me to slow down, to think and to explore. It’s often a failed experiment that pushes the work in a new, unexpected direction.

The design process always begins with a sketch and the idea I’m exploring with this new project is how the home can amplify the specific conditions of the site, from the topography to the weather and the changing seasons. The sketch is purposefully open-ended and left open to multiple readings. It’s not a fully formed idea and so to further explore the concept I construct a study model. I use it to study the building forms and site relationships and it’s essentially a three-dimensional sketch.

In the video watch as I turn the conceptual sketch into a working study model which I'll then use as a presentation and design tool for an upcoming client meeting.

Finished Study Model

Material List:

  1. Model base: 1/4” tempered hardboard (Masonite) on 1” thick corrugated cardboard

  2. Building Volumes: 1/16” Basswood Sheets

  3. Barn Doors: Basswood Profile Sheets + Guitar String Detail

  4. Interior Massing Blocks: Jenga + Cast Acrylic Samples

  5. Roof planes:Quartz Zinc’ Sheet

  6. Ground planes:Anthra-Zinc’ Sheet (water), ‘Quartz Zinc’ Sheet (parking surface)

  7. Decks: Skinny Sticks + Match Sticks

  8. Trees: SuperTrees

Tools Used:

  1. Sketchbook: TRACE Sketchbook (for more on my sketching tools, see this page.)

  2. Ruler: Alumicutter - proven to save fingers.

  3. Architect’s Scale

  4. Utility knife: Olfa L2 + blades

  5. Allex Stainless Steel Scissors - quick cuts on a variety of materials: paper, chipboard, wood

  6. Cutting Mats: 18x24 + 12x18

  7. Modeling Tweezers - immensely helpful for all modeling tasks

  8. Hot Glue Gun - for quick + dirty modeling tasks

  9. Elmer’s Glue-All - purchase in bulk, rack over to a small bottle to save time while gluing.

  10. Machinist’s Square

  11. X-Acto Plastic Clamps - an extra set of hands

  12. Gorilla Tape - for mounting metal pieces (like the roof planes)

Model in Process

What's In My Bag - Architect Essentials

Time spent on construction sites has unquestionably made me a better architect and improved my design process. During construction, I visit the job site as often as I can, it’s the best way to avoid surprises and keep the lines of communication open with the construction team. In the video below you’ll see how I prepare and pack for these field visits and all the gear I bring with me.

Pre-Planning

Before I head out, I always have an organized plan for the visit because the job site can be a busy place and this ensures I don’t forget anything while I’m out there. I use Notion for this as it syncs with all my devices in real-time. I have checklist templates for each stage of design and construction. Each includes a list of everything I need to bring and remember to do while I’m there. My general rule is to build templates for every repeatable process in the business and Notion makes it easy to create SOPs (Standard Operating Procedures).

With my checklists and meeting agenda done, I check-in with the drawings and previous meeting notes to familiarize myself with the work I’ll be reviewing and I update my iPad with the current PDF version of the contract documents: the drawing set, schedules and specifications.

The type of visit and stage of the project determines whether I’ll bring one or two bags. The backpack will always travel with me, it has all the essentials and I’ll bring along the tote for bulky or difficult to pack items.

Let’s start with the backpack.

BaCKPACK

I like camera bags for site visits and leisure travel and LowePro make some of my favorites. This is the ProTactic 450AWII and at 45 liters it’s definitely not a small bag, but it hits that perfect sweet spot for me. It’s large enough to fit a few extras but not so large that I can bring all the gear I own. It forces me to make some strategic choices while packing.

It has a clean, low-profile, semi-rigid exterior shell covered in MOLLE webbing which gives it a tactical vibe and I picked up a bag of MOLLE clips to fasten things to it as-needed. It came with a padded hip belt which I removed, and a few accessories which I can velcro to the shell (a tripod foot cup, water bottle holder and a small bag) but I prefer the clean exterior especially when I have to slide it into an overhead airline bin.

Most of what I’m carrying with me isn’t camera gear, but the reason I like camera bags is because of the padded interior dividers that I can easily change to suit whatever it is that I’m carrying. For site visits I like having separate compartments to keep things organized and protected and for travel I can set it up to carry my camera gear, a few tech pouches and some personal items, it makes a great day pack.

Cameras**

I have three cameras that travel with me, the best quality images and video come from my mirrorless DSLR, the Canon EOS R has been my go-to camera for a few years now. For lenses, if I have to choose just two for my site visit kit, I’d choose the Canon EF 16-35mm f4L IS for it’s wide field of view. And, for details I’d opt for the Canon EF 100mm f2.8L IS Macro. These allow me to capture most spaces I encounter on a typical job site - from very tight interiors and broad exterior facades to intricate details.

I also bring along a Pelican SD Card Case and a few extra batteries.

**(More on my camera gear here)

I recently added a 360 camera to my kit, the Insta360 OneX2 can be set up in the center of a space, connected to my iPad and in a few seconds I can record of construction progress for an entire room. It’s been a huge timesaver. I’ve also been using it to record memos as I’m walking through a space and, because the videos can be recomposed later in post, I use it to view areas I may have missed during my visit or export them to send to the client for discussion and general progress updates.

For aerial photography, terrain mapping, inspecting hard to reach places, and social posts I like having a drone with me. I still use the Gen 1 Mavic Pro from DJI, but if I were buying new today, I’d opt for the new Mavic Mini for its (even) smaller form factor and because it includes a controller. My current setup needs both a dedicated controller and an iPhone connection to fly.

Photos and video are an invaluable resource and I’ll often refer back to them as I’m writing my field report, or reviewing payment requisitions to verify the stage of completion of the work. I’m always glad to have a visual reminder of everything behind a wall finish - blocking, plumbing, gas lines - once it’s covered up.

Tablet/laptop

Inside the padded back panel is a sleeve that fits up to a 15” laptop, which I’ll usually bring for longer trips ( I use the 14-inch MacBook Pro ). For site visits, the 11-inch iPad Pro (+ Apple Pencil) serves as my daily driver. Most often I’m using the camera and Procreate to work through details in real-time on-site, or working through the meeting checklists in Notion and, of course, I keep all the updated drawings, specs and schedules there too. It’s impressive just how much space the iPad has actually freed up in my bag.

Tote

The tote bag I’m using is the Yeti Camino 35 and it’s a massive upgrade from the old LL Bean canvas bag I had been using. The large compartment has a zippered pocket on each side and two pop-out pockets at each end. Similar to the camera bag, I like the organization this affords. The molded EVA bottom stands on its own so it’s easy to load and unload and the puncture resistant shell is ultra-rugged and, because it’s completely waterproof, I can hose it out after use. When I’m camping, I can use it to haul water from a stream and the intermediate cross bars gives you different carrying options which is especially nice with heavier loads. They’ve even thought of details like a closure hook to keep larger items contained.

I use this bag more than I ever thought I would. Most often I’m carrying heavy material samples, reference books or catalogs to and from the job site. It also holds my water bottle, my tripod and it’s especially useful when I’m doing work on undeveloped sites holding my 100’ tape measure, flagging and reference documents. Its’ utility extends beyond the job site: I use it for car camping, the beach, and kayaking trips too and, the size perfectly complements my backpack giving me just a little additional overflow space.

It comes with a hefty price tag ($150) though, so you may want to mark it as your own. I made a little velcro-backed nameplate which I cut out of a scrap piece of zinc and mounted a custom sticker to for mine (see the video for details).

EDC (everyday carry) + PERSONAL ITEMS

Scattered throughout the bag are my everyday carry items. In the translucent pouch on the back flap, I always carry a sketchbook with me. Currently it’s the TRACE sketchbook with a subtle white reticle on 90# vellum. The translucent pages are great for iterating ideas and take ink, pencil, even Copic markers without bleeding. I also use the BLANK Sketchbook with the subtle dot grid, debossed cover + elastic closure. If I’m traveling and unplugged, I tend to prefer analog sketching to digital and it serves as a travel diary.

For site visits I’ll always bring a 25’ tape measure and a roll of painters tape. If it’s early in the design process I’ll also bring a 100 tape and surveyor’s flagging. I use them for checking dimensions, confirming layouts and marking areas that need follow-up. If I’m meeting with a client, taping out a seating arrangement on the floor or testing various shelving heights or TV sizes can be immensely helpful. You’ll notice in the video that I printed up a few sheets of stickers with my business name on them and I use them to tag my gear. This avoids disputes with popular site tools (like tape measures) and ensures all my things land back in my bag at the end of the visit.

To keep things connected and charged I have a 30000 mAh solar battery charger with ports for all my devices, and a tech pouch to keep cables organized. The SD card case by Pelican helps me stay organized too, when a card is full I put it in the case upside down so I don’t overwrite it.

The bag has a tiny pouch for SD cards, but I prefer to keep mine in a Pelican Case so I’ve repurposed it to hold an Apple AirTag. My iPhone is set to immediately alert me when I wander too far from the bag, or someone walks off with it.

EDC Links:

  1. Braun Watch - I replaced the band with a rubberized one.

  2. Bellroy Wallet - the magnetic closure is fidget-friendly

  3. Northwall Multitool / Key - Box opener, prying tool, screwdriver. I use this frequently, it’s tiny and TSA compliant.

  4. Coast PX15R Flashlight - Fits the tactical vibe of the bag and it’s rechargeable. High power, focuses between flood and spot, + clip.

  5. Kuru Toga .5mm Mechanical Pencil + Lead

  6. Tombow Click Eraser - for precision erasing

  7. Apple AirTag - cheap insurance to keep track of your bags + valuables.

  8. Vintage H. Chapin & Son #12 Boxwood Folding Ruler

  9. Bellroy Pencil Case - More details on everything in my sketching kit here.

  10. Derwent Color Pencils

  11. iPhone 13 mini + MagSafe Leather Case

Mentioned, not pictured:

Some of the links in this post are affiliate links. Clicking on them and purchasing costs you nothing extra, but I receive a small commission which helps support my work on YouTube. Thank you!

So you want to be an architect?

Thinking about a career in architecture? Wondering about the math required, or how much you’ll earn? Are your drawing skills questionable? Joining me to answer these questions (+ more) is my friend Bob Borson, architect + creator of The Life of an Architect blog + podcast.

Some timestamps to guide you:

  • 00:00 What do I do with the rest of my life?

  • 00:30 An architect’s salary discussion

  • 01:03 Other ways to think about compensation

  • 02:05 Compensation Calculator (by region, job, etc.)

  • 03:37 Happiness vs. Compensation Chart

  • 03:57 I’m terrible at math, is this the right career for me?

  • 04:27 Math we use in daily practice

  • 07:27 I can’t sketch or draw, is this a problem?

  • 08:03 Why sketching is important (even if you’re not great at it)

  • 10:10 Not everyone in this profession is a designer

  • 10:50 Can I be an architect with no formal training?

  • 12:00 Trade school vs. University

  • 13:10 Linear vs. Lateral thinking

  • 13:36 Designing houses + interiors without a license

  • 14:29 Know this…

  • 15:26 Solving problems vs. Telling Stories

  • 16:40 What clients buy from architects

  • 17:16 I’m (insert age) is it too late to become an architect?

  • 18:25 The challenge of going to school later in life

  • 19:38 What skills will prepare me for architecture school?

  • 20:13 “This is gold”

  • 21:59 Metaskills

  • 24:29 What books do you recommend?

  • 28:38 Peter Zumthor + beards

The Life of an Architect blog was created in 2010, and for ten years Bob’s posts have been making the practice of architecture accessible + interesting to a worldwide, diverse audience. He exposes the reality of the design and construction process with style, a dry wit and without sparing the true grit and struggles that making architecture so often involves. He’s not afraid to reveal the mistakes and missteps made along the way, the messiness and imperfections tell the real story of our life as architects. If you’re looking for glossy photos, you’ll find very few here, this is the place to go if you like sketches, a little snark and cogent thinking.

If you’re not familiar with his work, you’ll find ten years of posts, images, and inspiration thoughts on his blog.


**Life of an Architect blog** https://www.lifeofanarchitect.com/

**Eric from 30X40 on LoAA podcast: https://www.lifeofanarchitect.com/056-starting-a-design-firm/

Longhouse Kitchen Refresh - Before + After

Mixing high and low finishes in our simple modern kitchen renovation, we created a refined, luxe style on a modest budget. In part two of the video series we set to work demolishing the existing finishes in our kitchen and begin the makeover process. See the before and after transformation in the video; for the finishes, materials, and details, keep reading.

Read More

Architect + Photographer

Studying adjacent disciplines has always yielded new perspectives and inspiration for my own creative work so I jumped at the chance to serve as a juror for this year's APA Architectural Photography Competition. I asked Mike Kelley, the founder of the APA, to join me to review my final selections, offer advice on what makes a great architectural photo and dig in to a wide ranging set of topics from the use of human scale, to lens choice, post-processing, color, composition, drones, and shooting techniques.

Read More

Moving Forward + Looking Back

In that quiet period between Christmas and New Year’s I always sneak an hour or two to reflect on the year as it draws to a close. I make note of what’s gone well and what hasn’t gone to plan in both my personal and professional life. I do this using Notion and this year I wanted to share my annual review process and let you in on the changes I’m making in the new year.

Read More

An Architect's DIY Kitchen Makeover

Living in a home you designed can be a humbling experience. When I designed our home - the Longhouse - in 2007, I treated it as an experiment. With a tiny budget and two young kids, humble materials + simplicity were solutions born of necessity. Fast-forward fourteen years and it’s time to update + address a few of the choices we made that haven't aged well.

See part 2 for the before + after.

In this DIY kitchen makeover I'm sharing the lessons learned + fixing my mistakes. I'm revisiting + updating the finishes, replacing fixtures + fittings, installing new cabinet fronts + hardware, organizing + decluttering, and even adding a few bespoke details we couldn't afford when we first built our home.

Every project begins with a series of sketches to flesh out my ideas ( the app I use is Procreate ) and I use these to discuss the project goals with my client: my (incredibly patient) wife. Having lived and cooked in this kitchen for many years, our wishlist came together quickly.

Project Goals

The counters were purchased in 2007 on an epic run to the nearest IKEA just south of Boston (6 hours away). They were an inexpensive, sustainable choice and we loved the look of them. For a time, we lovingly treated them with mineral oil and we never actually used them as cutting surfaces. Did they stain? Yes. Did they scratch? Yes. Did they yellow a bit? Of course. You can see (image below) the area that suffered the most next to the sink where we kept our dish drainer and mat. All of these things we knew might happen and we were accepting of them because we knew that if it bothered us too much all we had to do was sand to restore them to their original condition. In the absence of a budget for stone, we still think this was a good decision. Nevertheless, we wanted to refresh, sand and remove the water damaged area. The video illustrates best all my ideas for this area and, there are a few surprises I have in store with the island that I can’t wait to share.

Butcher block counter near sink

Original IKEA Abstrakt door

Replacing the door + drawer fronts was an easy decision given the condition of the yellowed and chipped veneer and we knew this would clean up the esthetic with relatively little effort. There’s an entire industry that’s grown to serve this market - a sure sign we’re not the only ones with this problem! We’re shopping for new hardware to pair with the doors too. More on that in the next post.

Thermofoil finish degraded

Corroded hardware

Corroded hardware

Upgrading the appliances and addressing the open shelving were related problems and our next priority. My wife and I have never cared for overhead cabinetry so, when we were planning dish storage we opted for open shelving. We thought at the time this would be a timeless, affordable and practical solution. The lower shelves delivered, they were functional and accessible, but the upper shelves disappointed. Our range hood was chosen for price and esthetics - in that order - over brand recognition (ahem, Eurohoods?) It made a lot of noise but that was about it. Cooking grease settled on the upper reaches ensuring the dishes we used less frequently needed washing before every use. And, with open shelves, let’s face it, not everything we own or use for cooking is something we want visible and on-display for the world to see.

Open Shelves

Grundtal shelving = difficult to keep clean

The shelving we used for dish storage looked industrial and amazing (IKEA Grundtal) at least for a while. The bars were difficult to keep clean and the spacing made them difficult to store smaller objects like glassware without tipping. The new shelving will be solid and keep daily use items like glasses and cooking essentials in easy reach be minimal. Many of the plates + dishes once stored near the range will find new homes in a new sideboard. We’ll be upgrading the range from a slide-in to a pro-style range and to keep grease at bay we’re installing a new, whisper quiet hood and ductwork.

One of the few places we chose to spend in the original kitchen design was on the island pendant light. We loved the look and quality of light it produced from the six MR16 halogen bulbs. This too suffered from collecting dust on its many surfaces and exposed wires. Over time the wire connectors have loosened and only three of the light reliably stay illuminated. Time for a new fixture here and we’ll also upgrade the downlights by the range to LED.

Sistemalux Modem Pendant

Loose connectors

Inspiration

We’ll be decluttering, organizing, changing fixtures and generally rethinking every detail of how we use the space to improve the function and esthetics. Humble material selection and thoughtful design can be the foundation for functional, stylish and luxe living even when you're working with a tight budget.

In the next part, we build and install everything and reveal the new look.

Fresh Inspiration from My Library

Books have always played a role in my design process. I recall many hours spent in the architecture library at university mining the shelves for new ideas. In daily practice one has to actively make space for seeking out fresh ideas and inspiration. I’ve found that some of the most inspirational books have nothing to do with architecture, they're in adjacent or completely unrelated disciplines. By consuming a variety of source material I find it easier to make connections and surface new ideas overlaying the work of others with problems I’m actively trying to solve in my architectural work. This is called bisociation, defined as : the simultaneous mental association of an idea or object with two fields ordinarily not regarded as related. A pun might be the simplest form of bisociation.

Here’s a list of the books highlighted in the video, in order:

Because my inspirations and collecting tastes are always evolving, I keep a record of what's inspiring me "NOW" on a dedicated page here on my site. When it's time to update it, I simply copy it so I don't lose record of it and can keep it as a running archive of how things have changed over time.