We pressed pause on the construction of the Outpost project in early 2021 and onboarded a new contractor to see us through completion. Although this isn’t the first time I’ve encountered this situation in my twenty five years practicing architecture, there are always new lessons to learn in these transitions.
Read MoreRevising + Updating the Drawing Set
A recent site visit + client request sets in motion a process every architect is familiar with: redesign + revisions. This is my process for solving real-world architectural problems, from sketching to updating the drawings and documents.
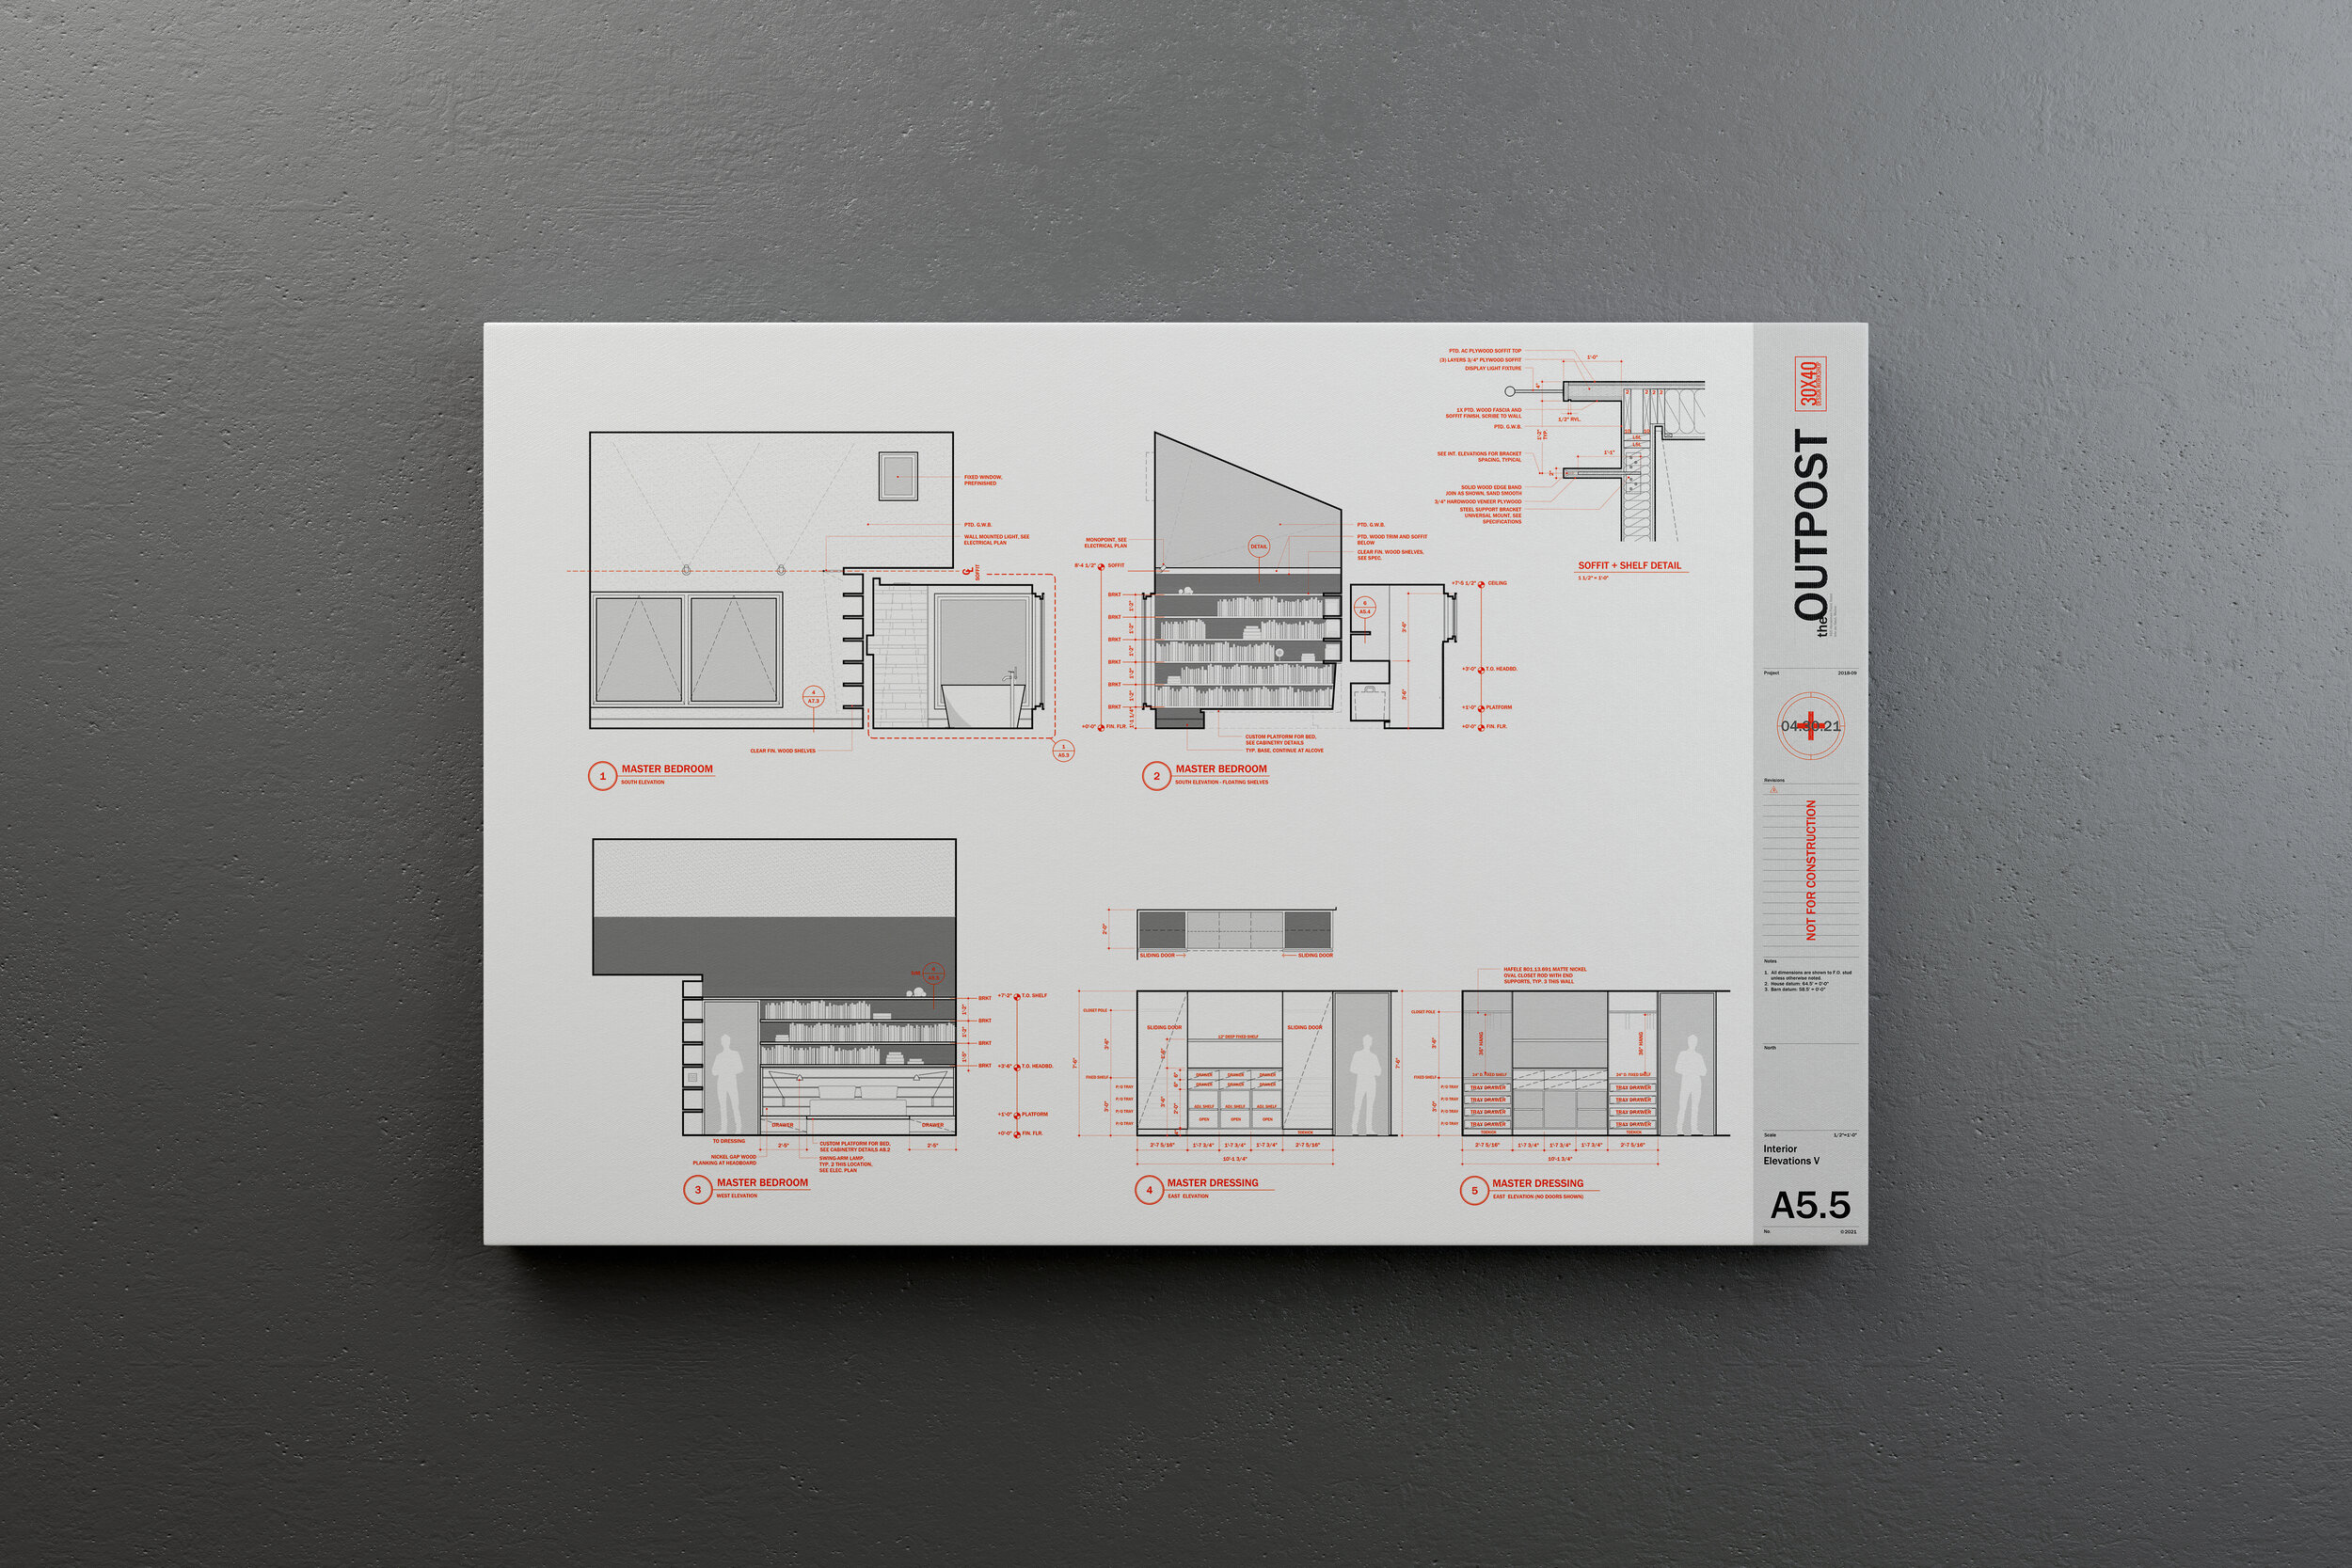
Revisions begin by clearly defining the problem and constraints governing the redesign. All design benefits from constraints, without them the possibilities are limitless. As we’re in construction the restrictions are numerous: there are budgetary, esthetic, physical, legal, and functional considerations. And, of course client preference is chief among them. I’ll often work through solutions that are less than optimal to illustrate shortcomings and to help move the design process forward. Below are a few examples of the initial solutions I developed.
Sketching Solutions

Material Palette for inspiration
A ladder clearly takes up the least space in the room, but it’s also the most difficult means of accessing the loft space. As my clients imagined cleaning it and bringing books to and from it, the use cases narrowed. Even though it may be possible to recapture extra space in a home, if it’s not useful or easily accessible, the cost-benefit is questionable.
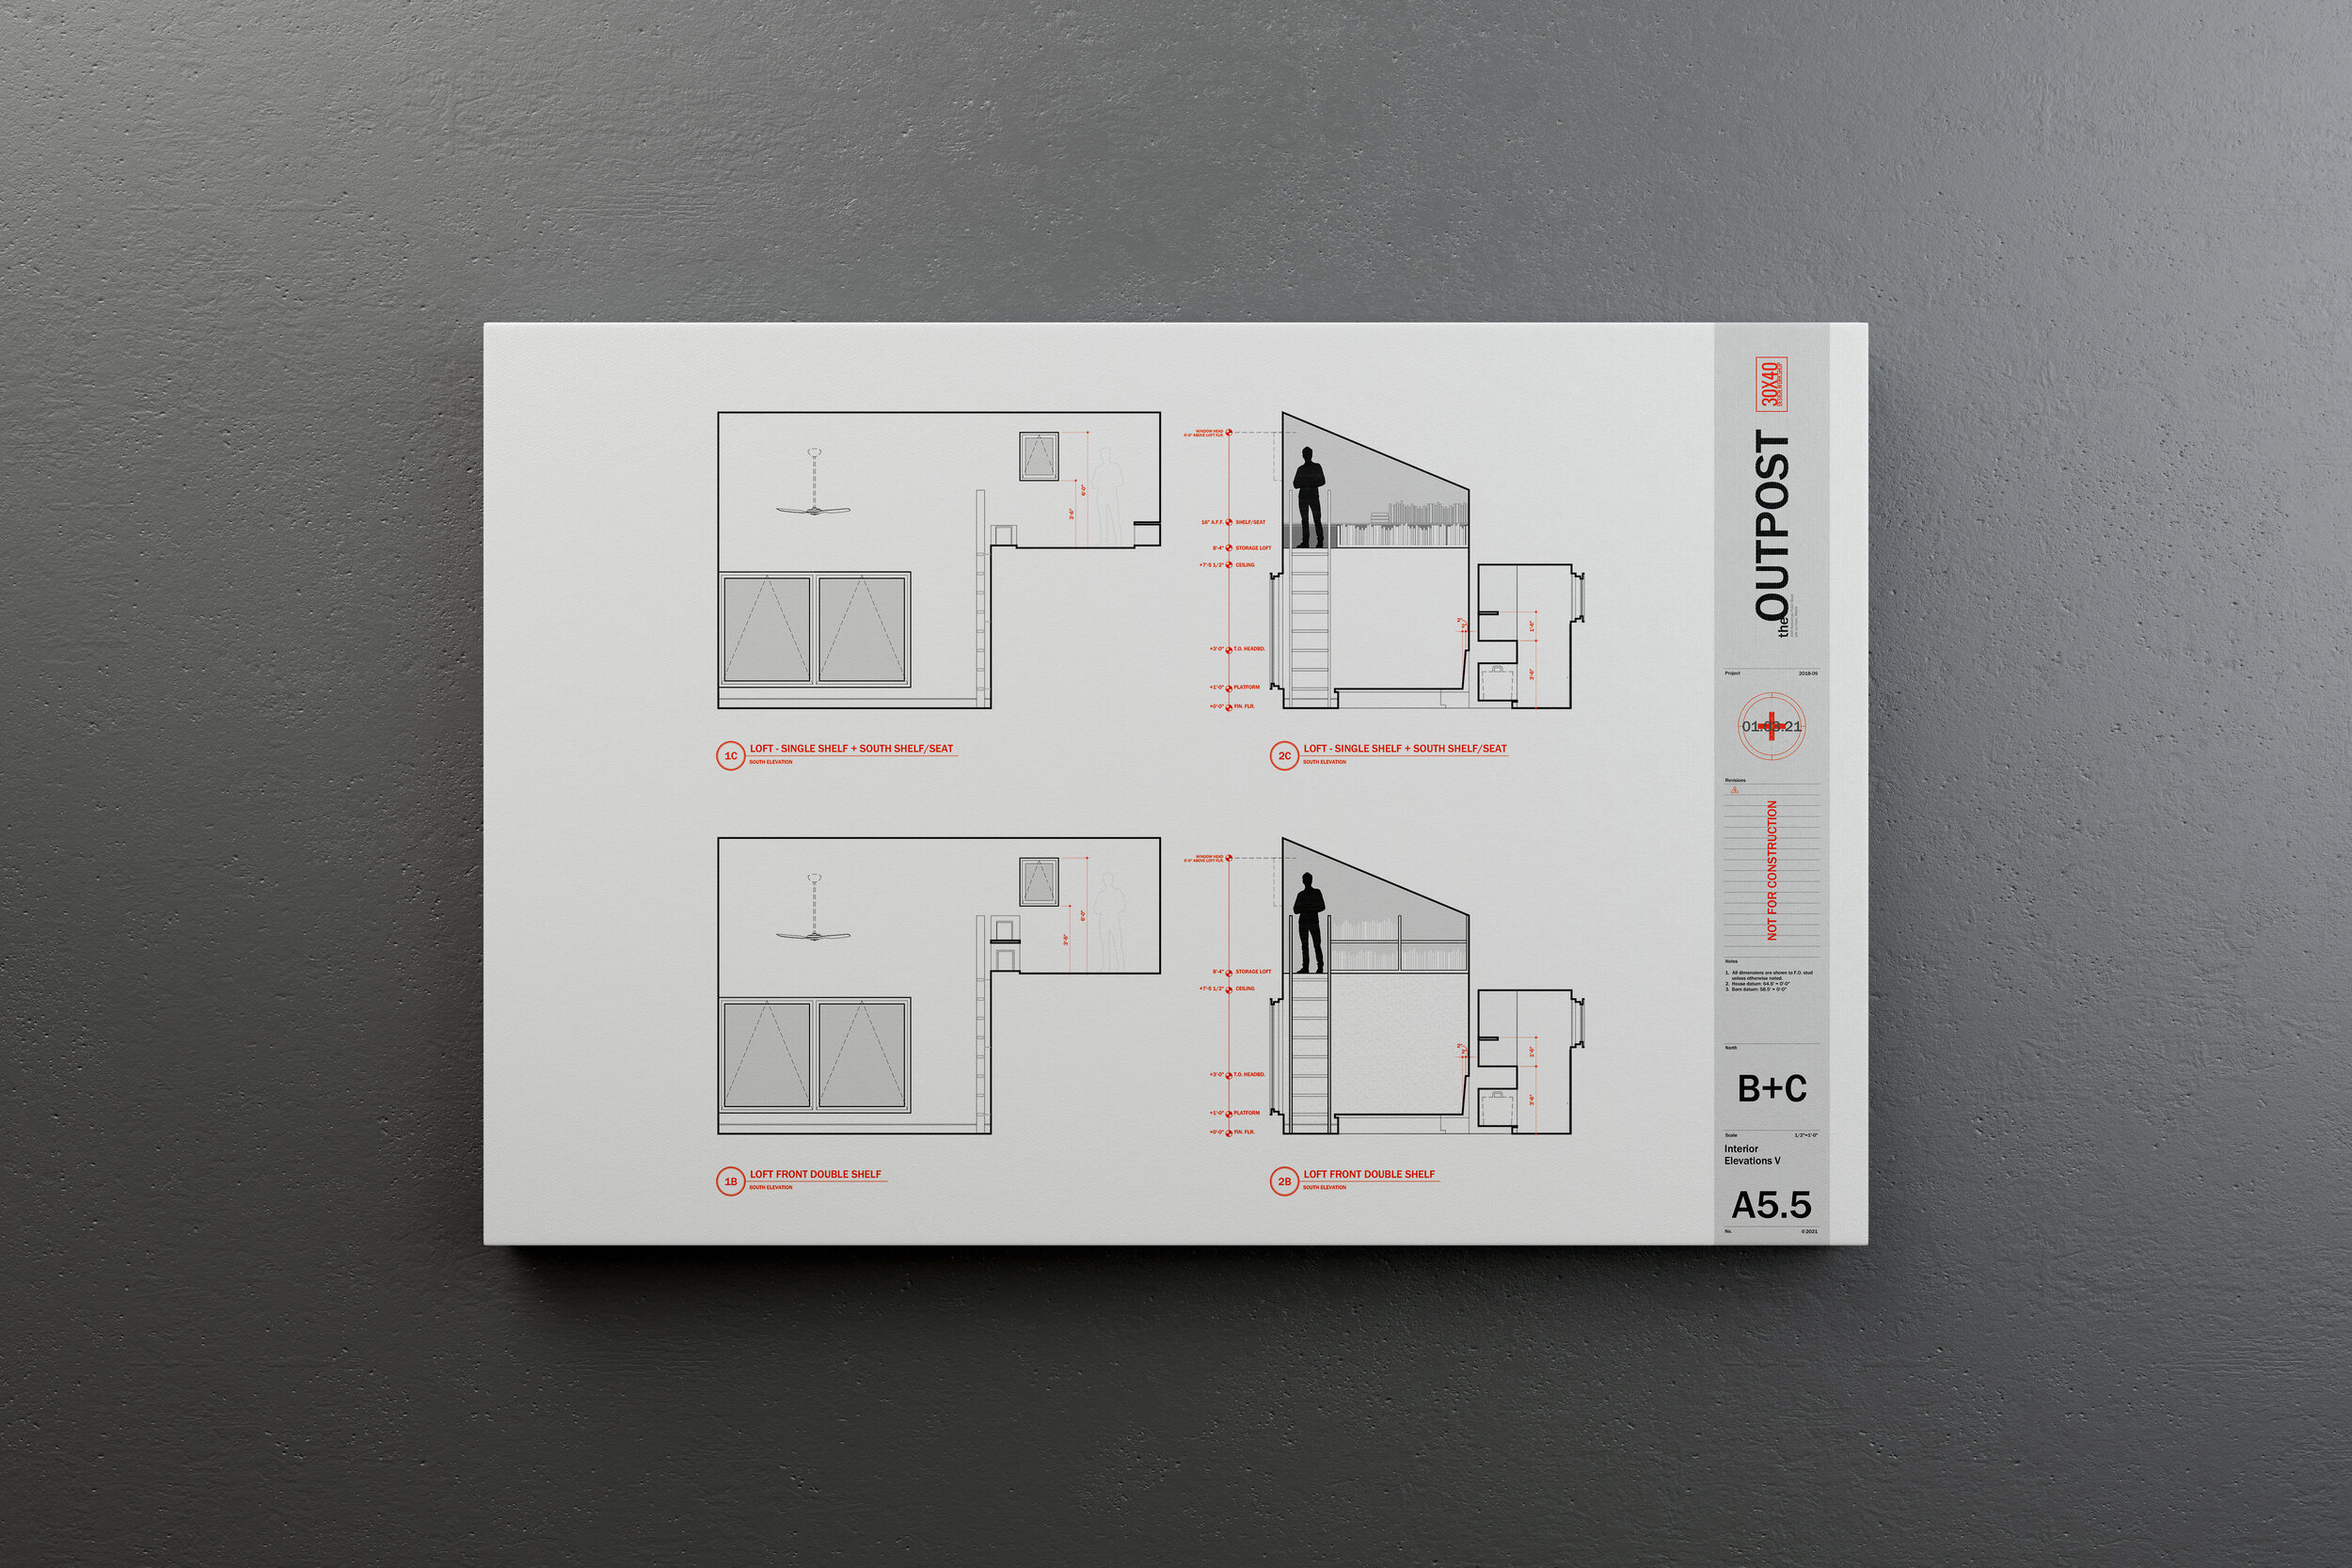
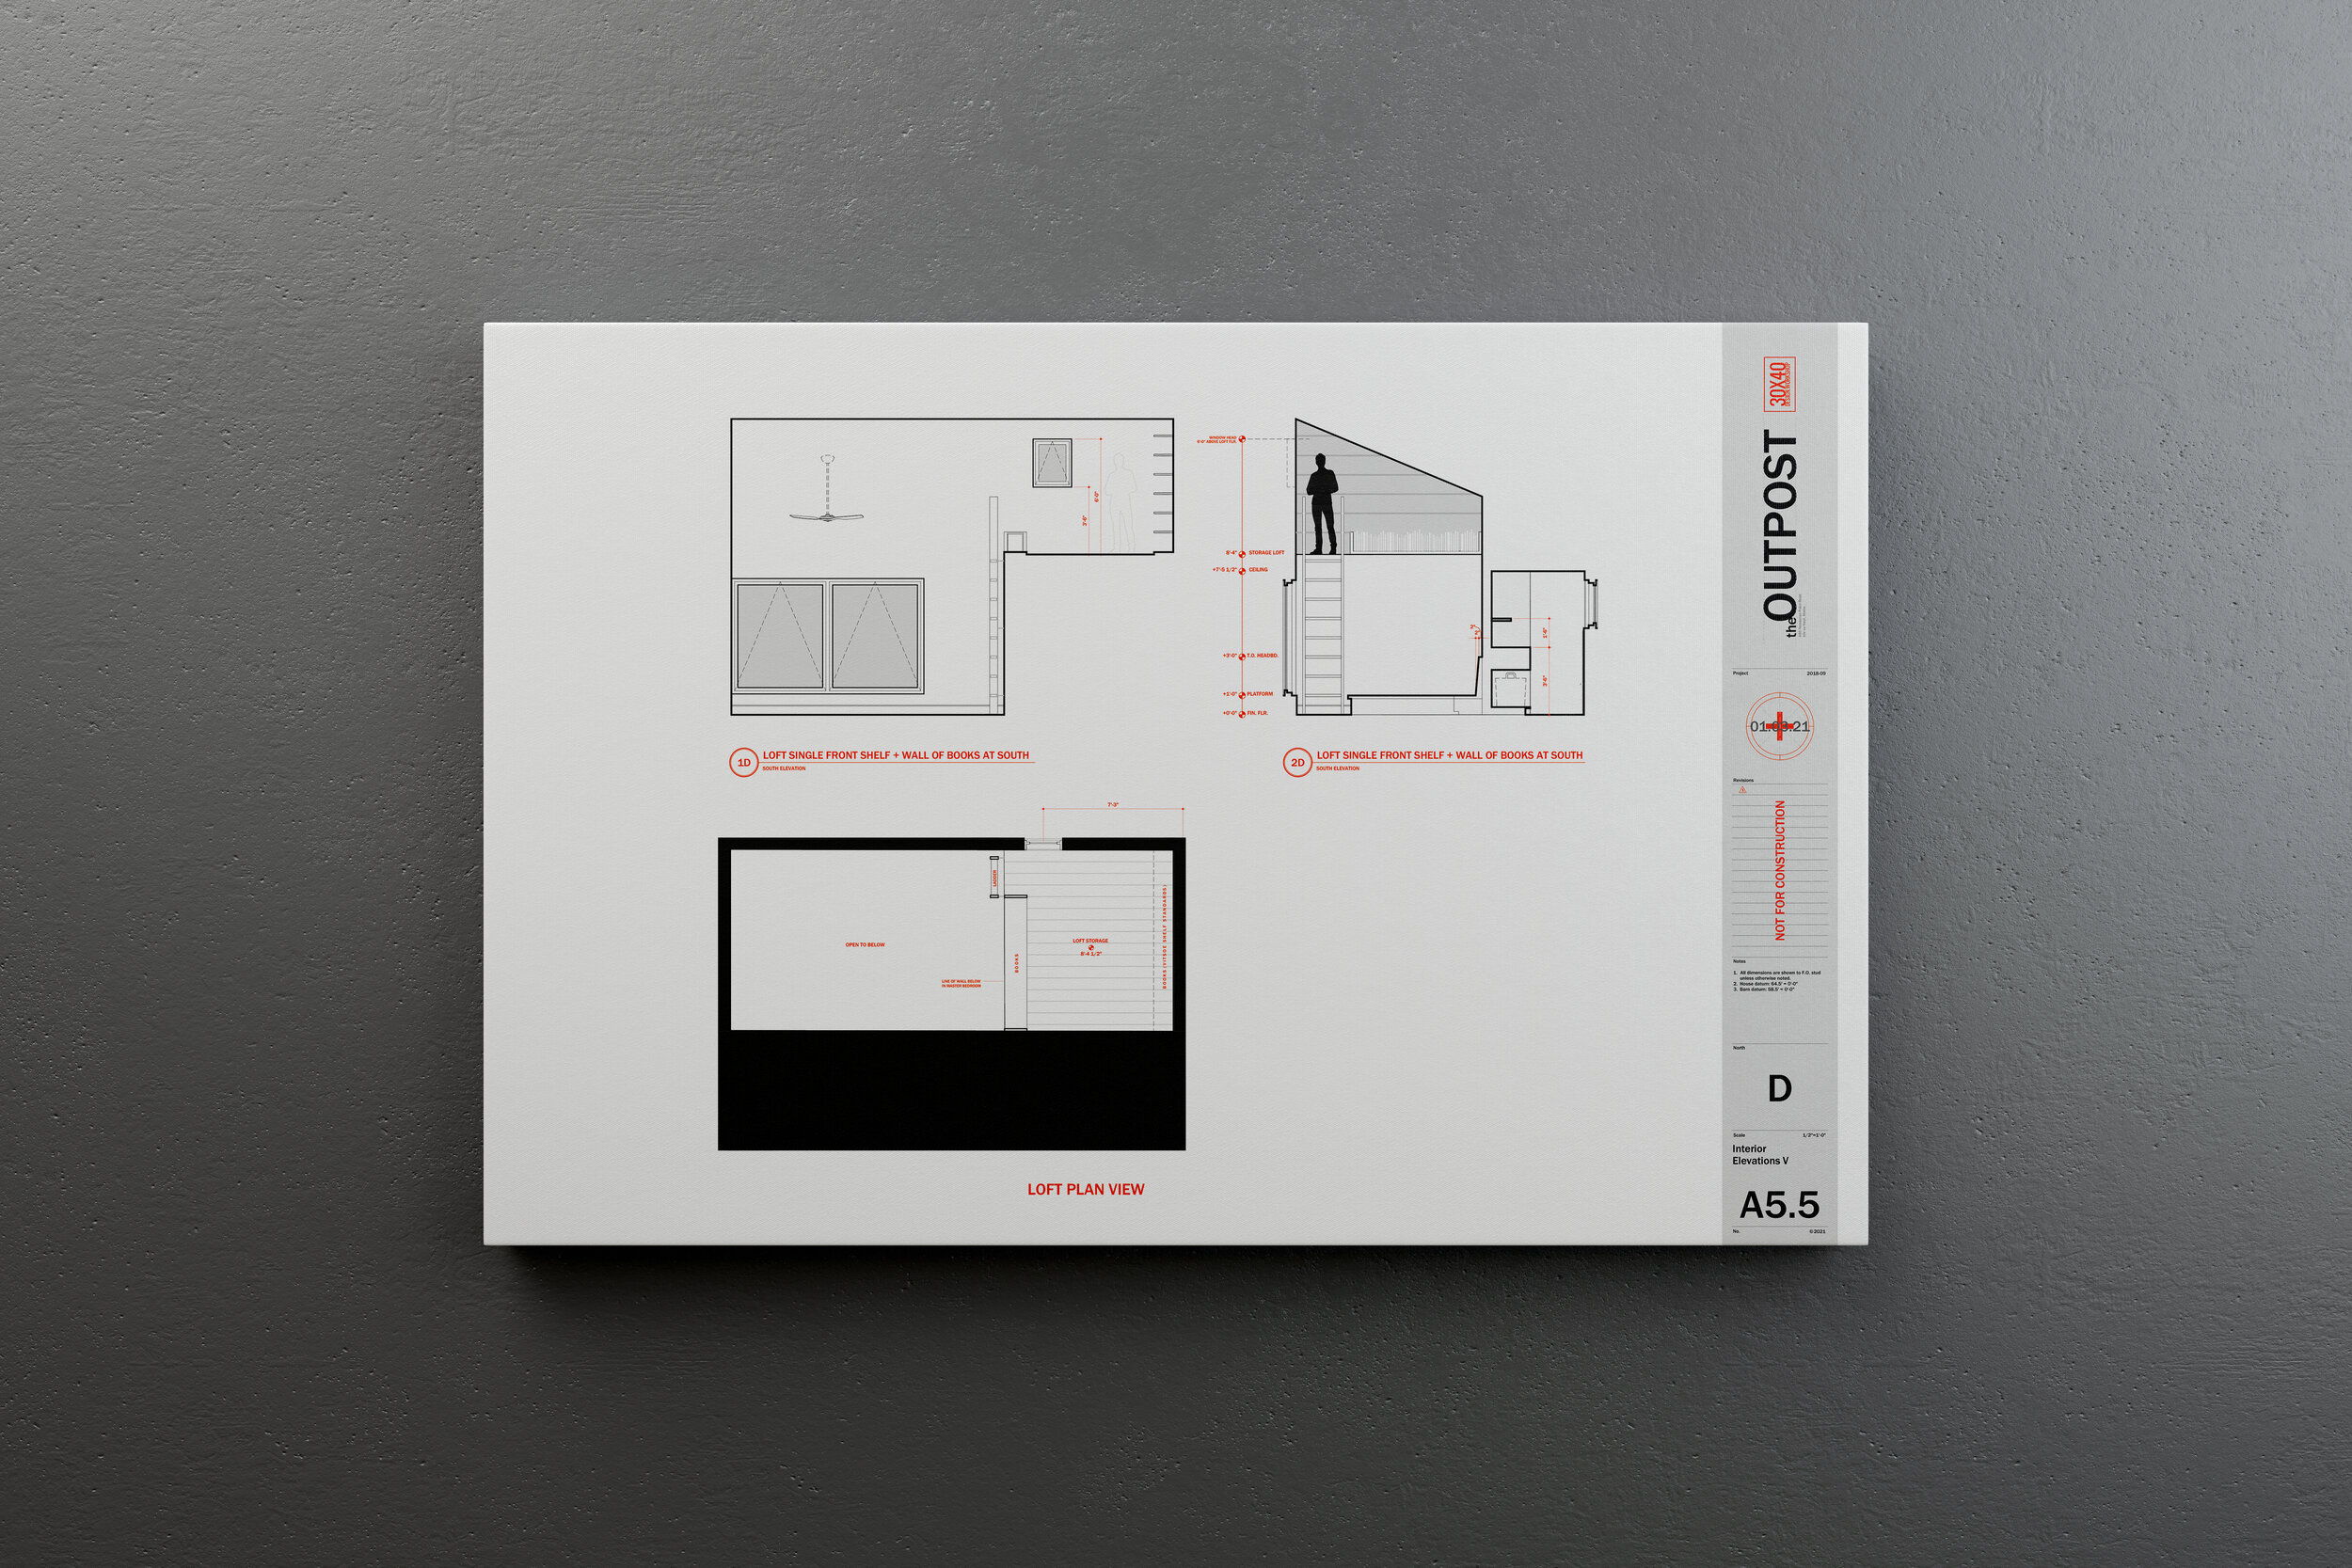
As we worked through the options, this need for book storage suggested a new opportunity. By shifting the pocket door entry to the north and creating an alcove for the books on the main level we solved a few problems at once. The books found a natural home within arms’ reach and this singular, sweeping gesture on the south wall of the room also created a soffit above for display, increasing the perceived volume of the room and it allowed us to add a small eyebrow window to let light in from above. The soffit and shelf repeated a motif we had used elsewhere on the interiors whereby we nest smaller volumes within larger volumes of space.
Idea becomes sketch. Sketch becomes presentation drawing. Presentation drawing becomes construction drawing. And now, we build!
Outpost Updates - July 2023
To see all the latest progress + the current interior design iteration check out the links below:
Latest Blog Post: Interior Design with an Architect’s Eye
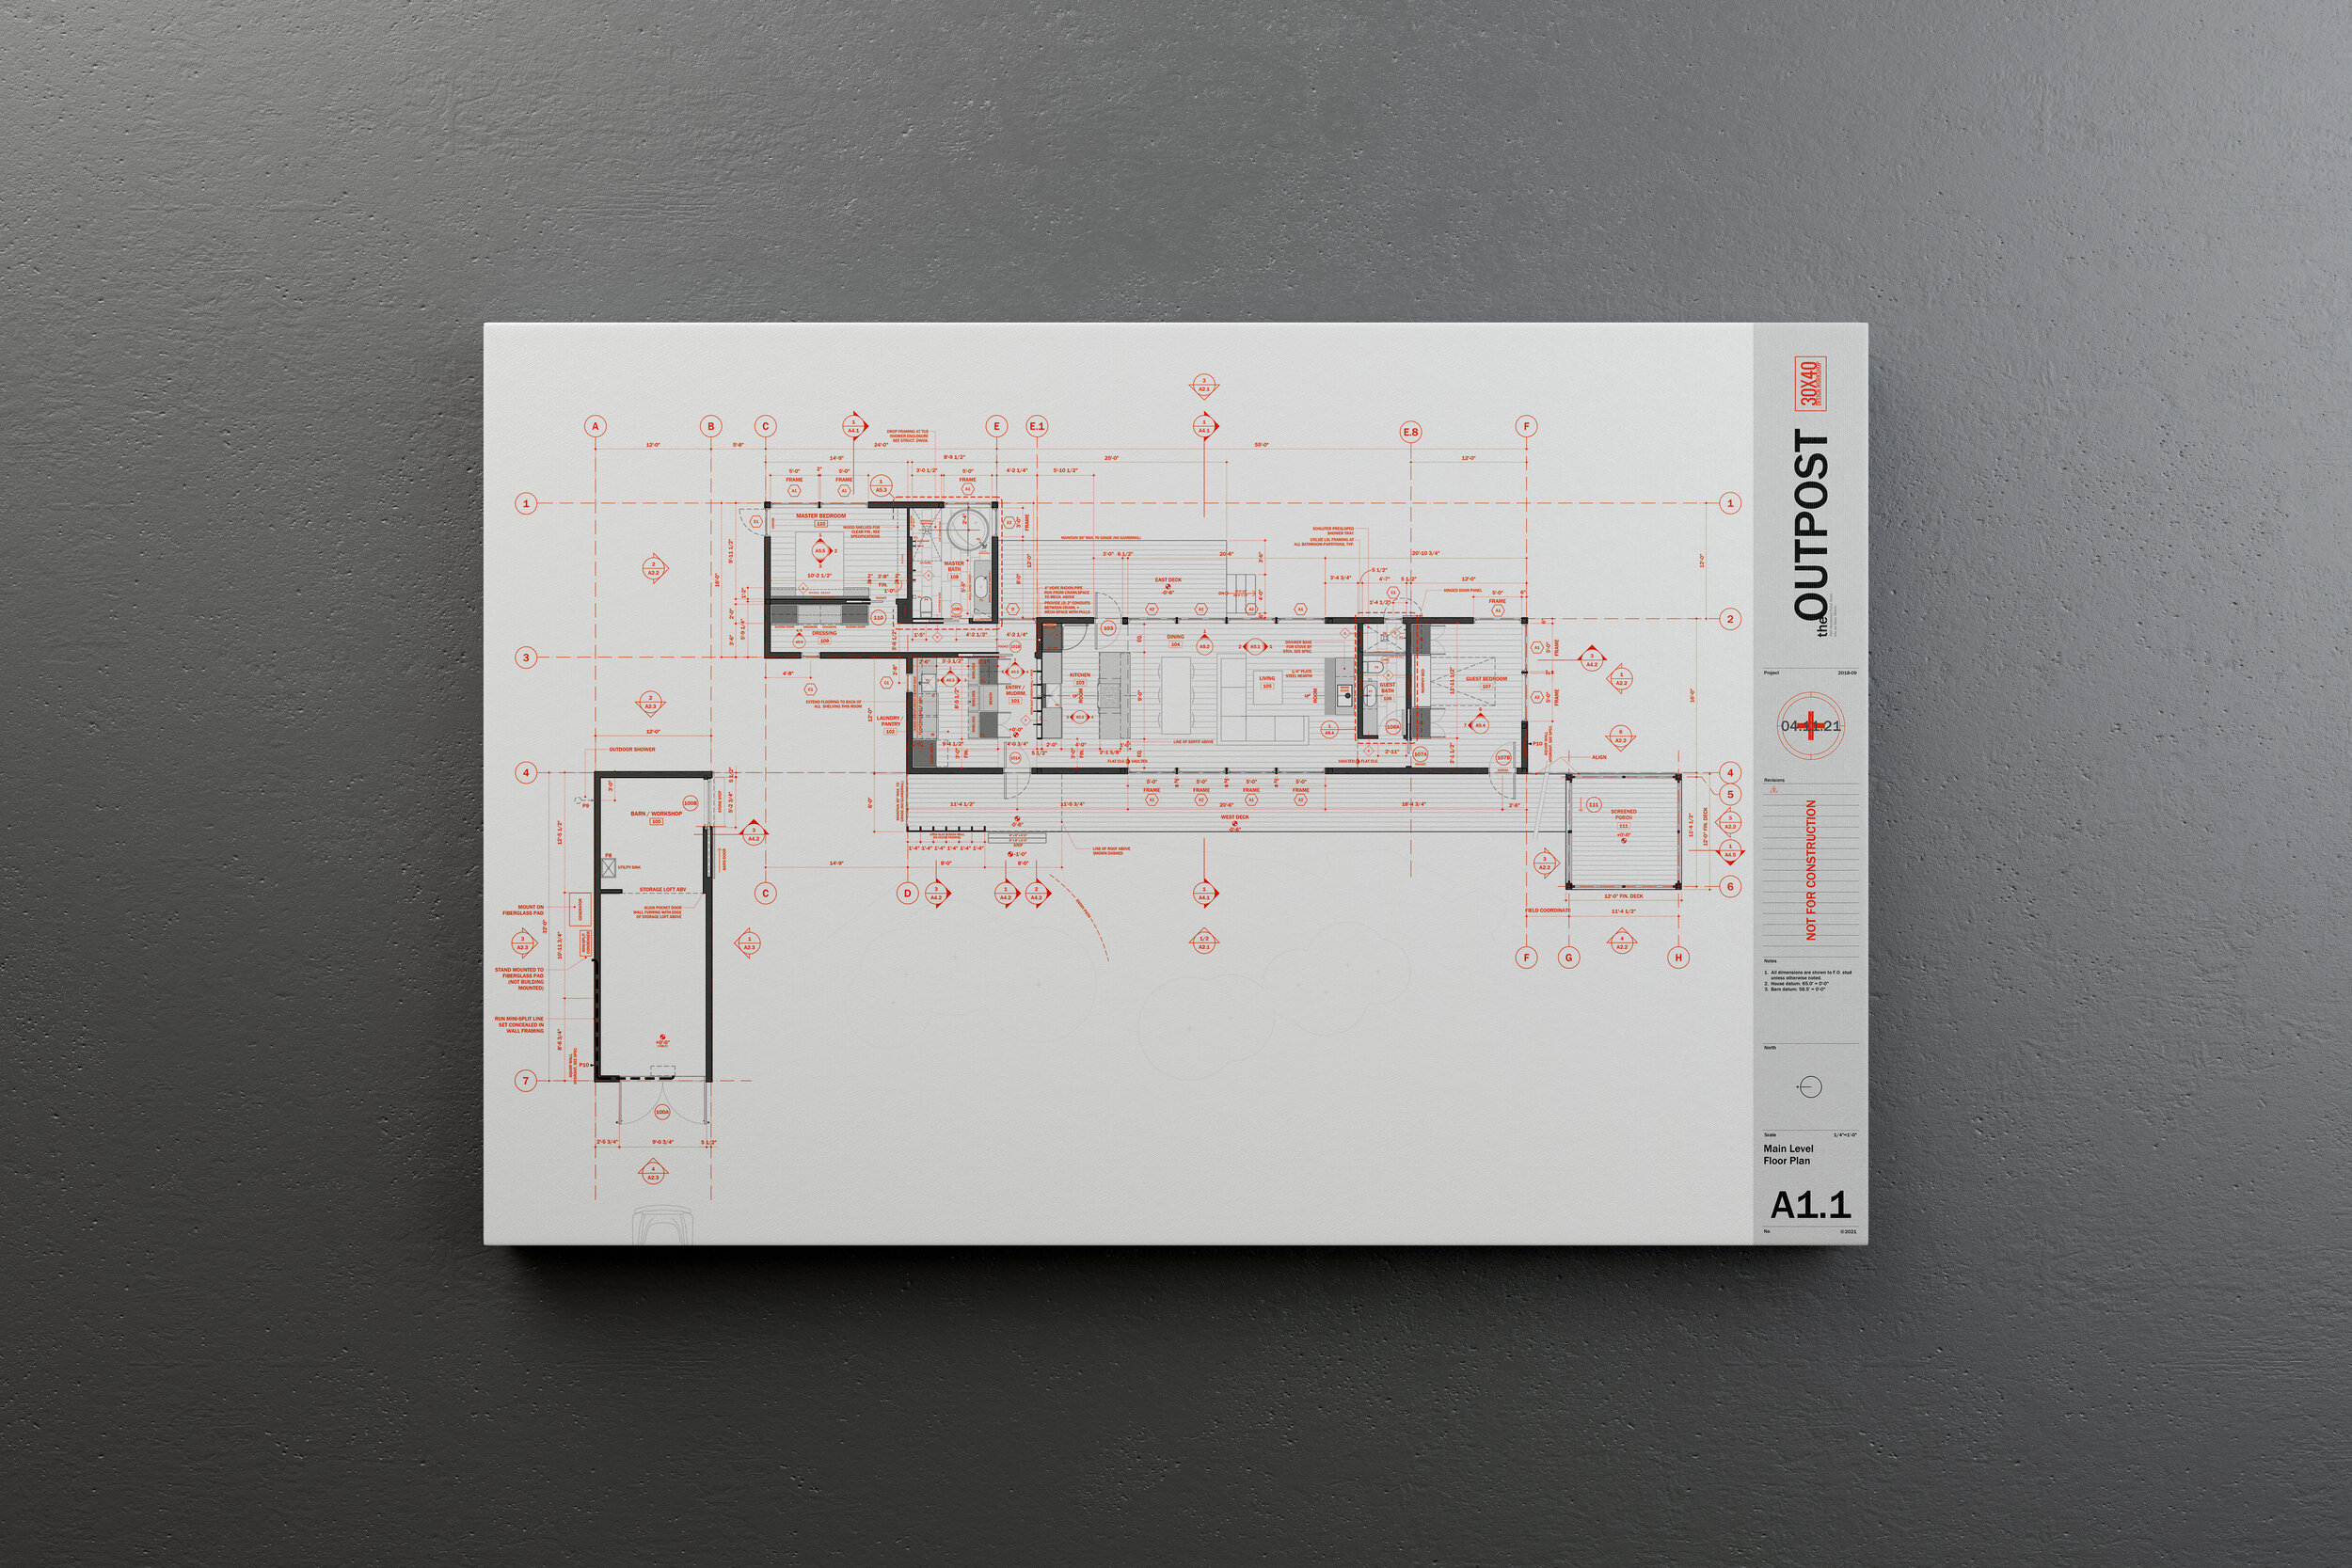
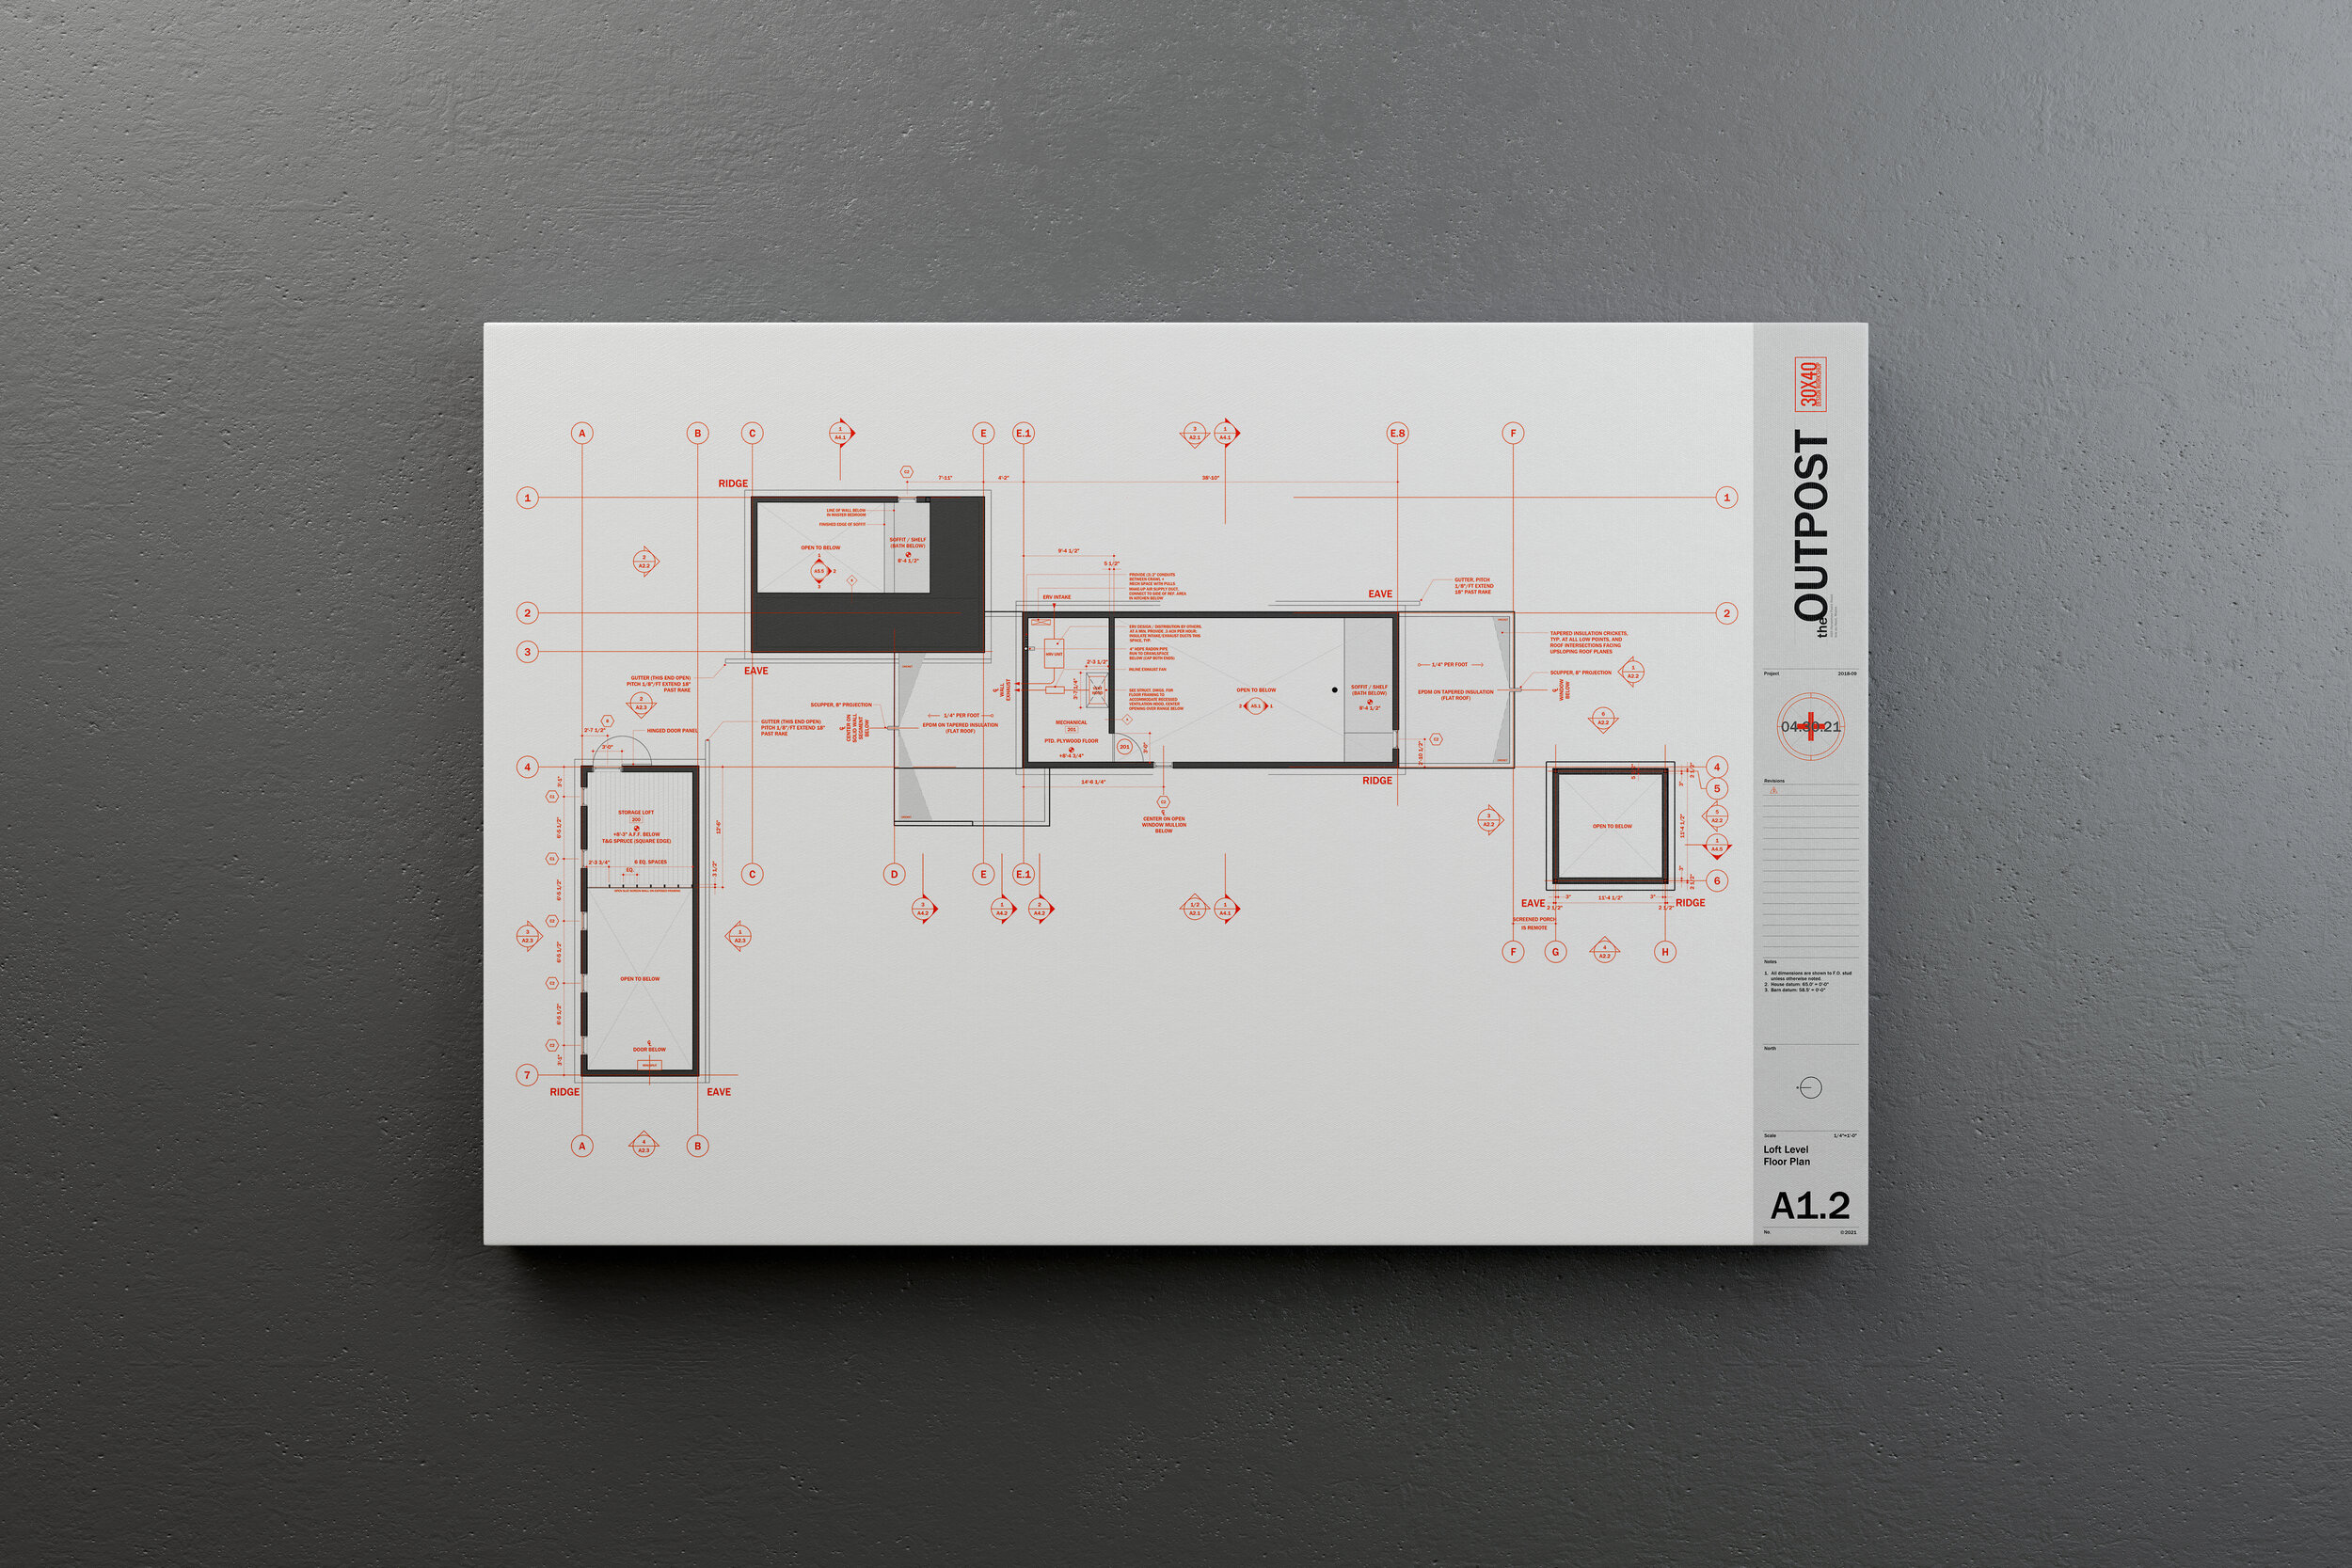
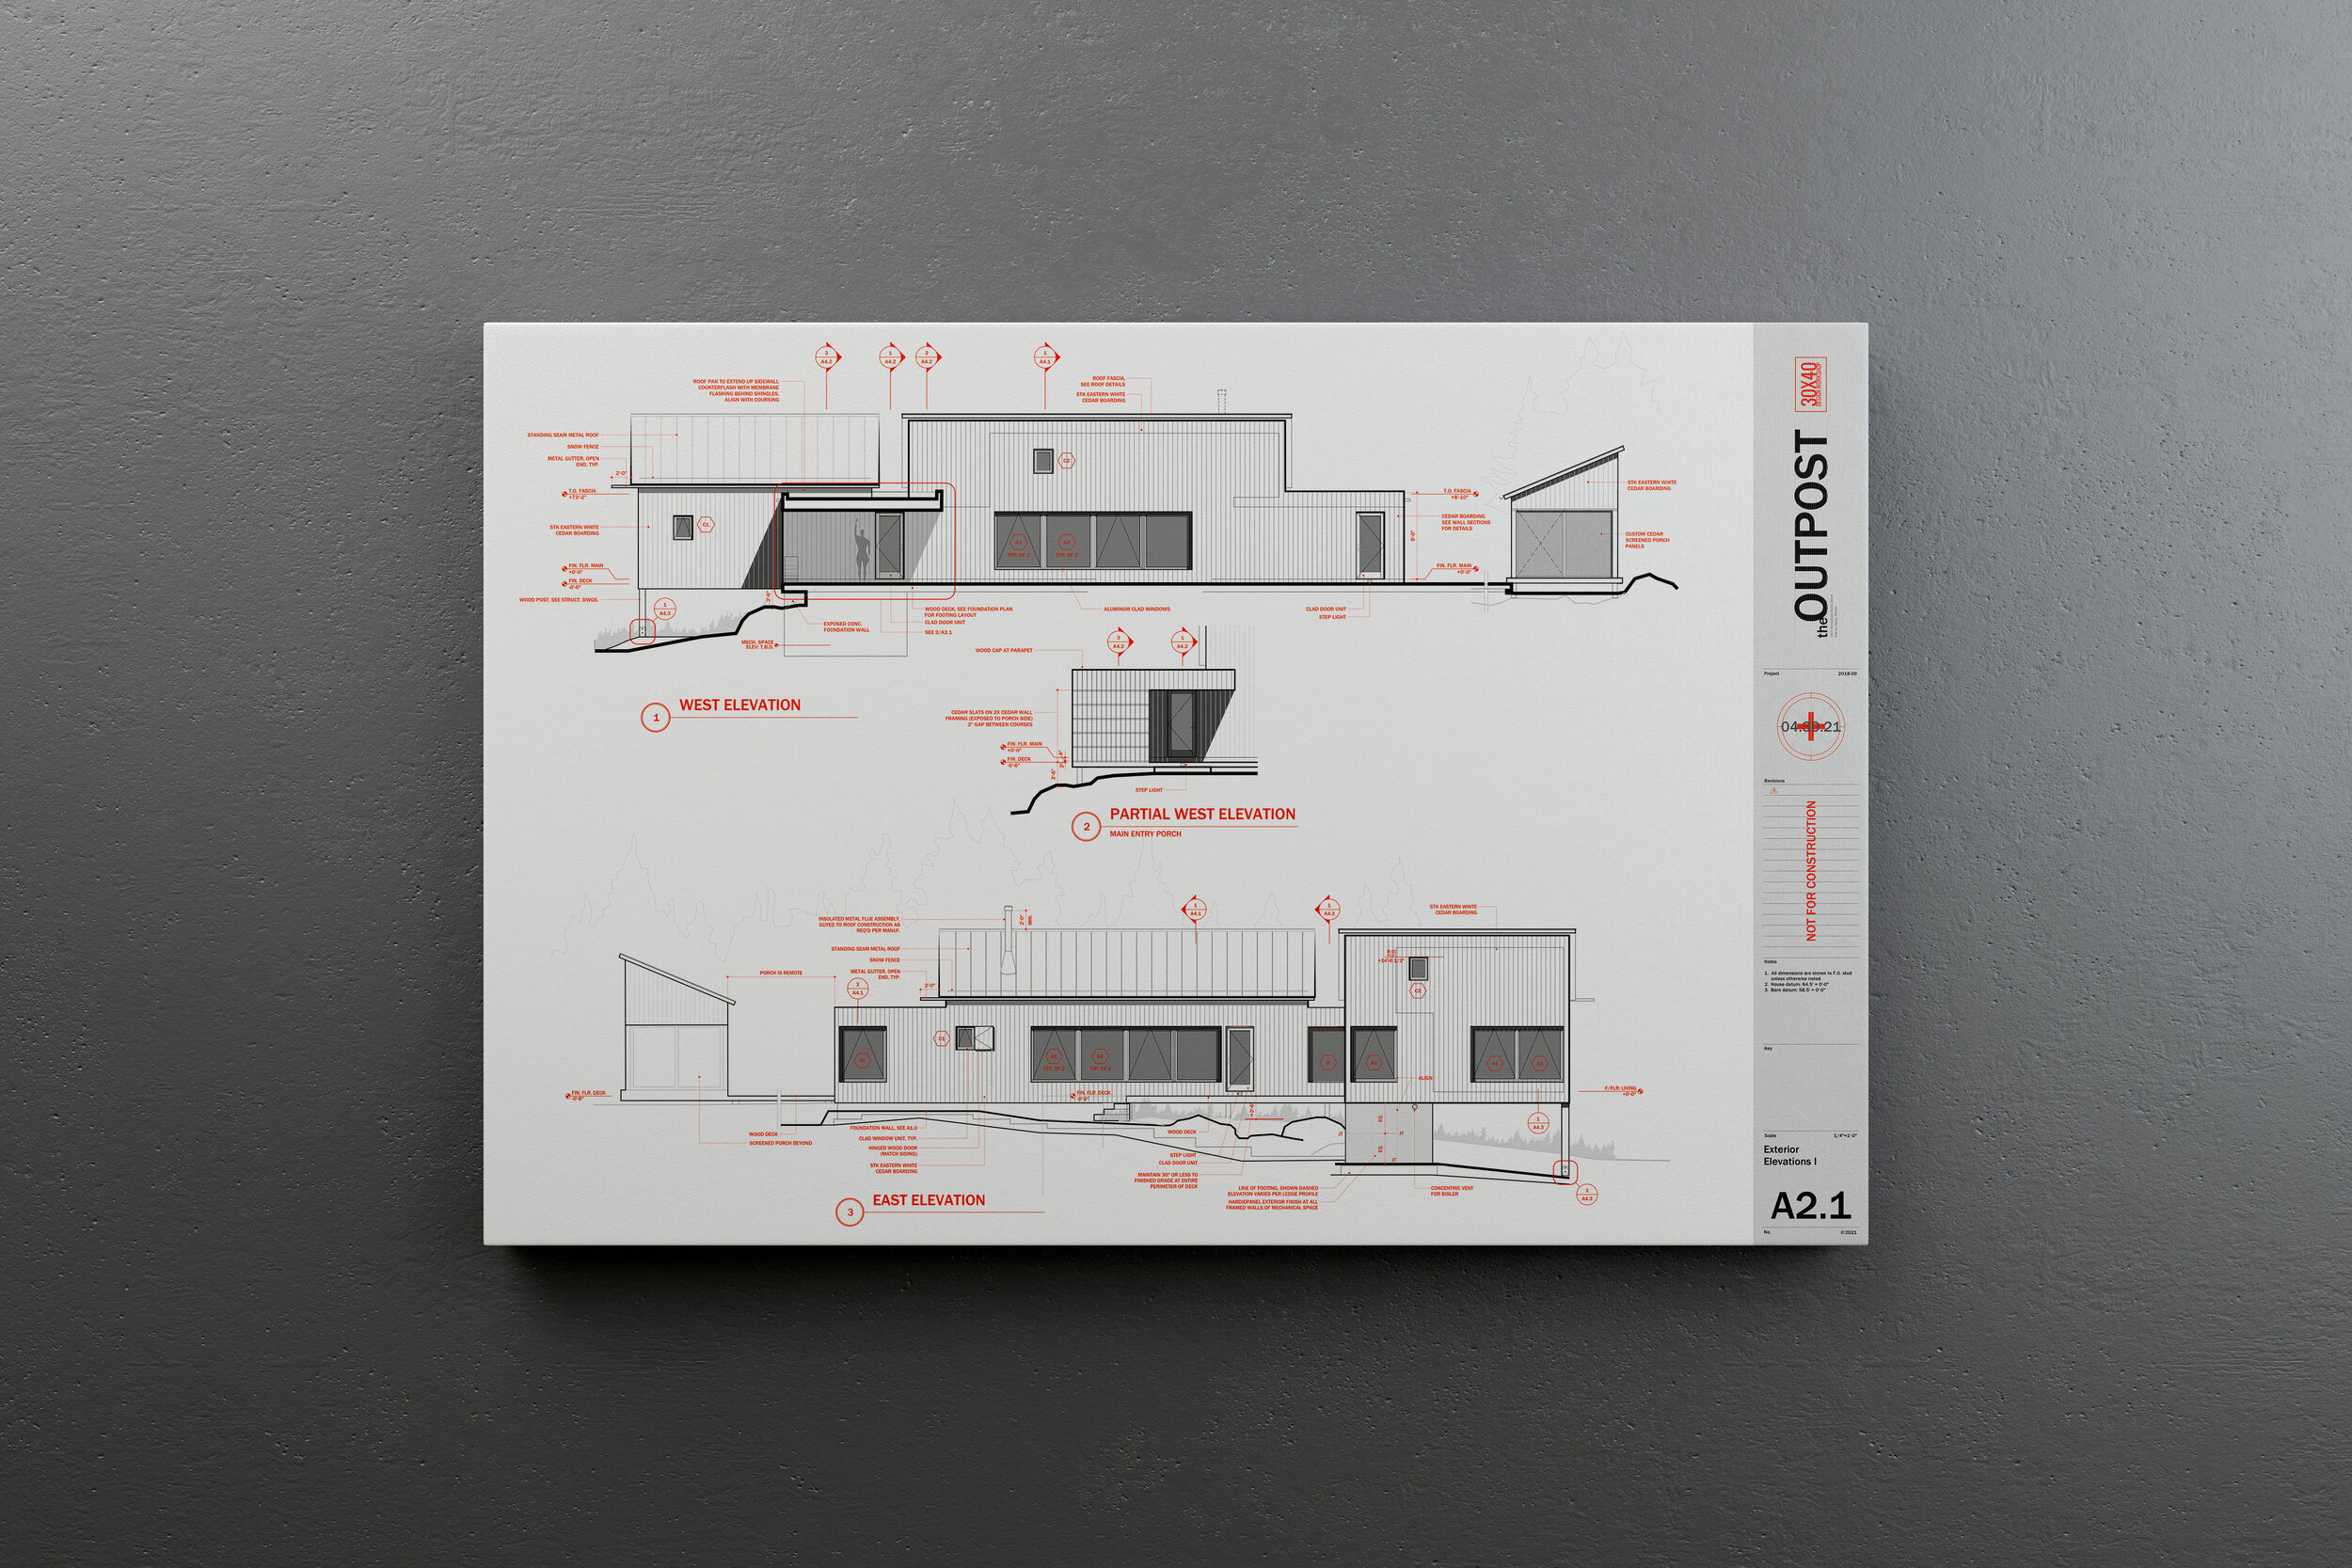
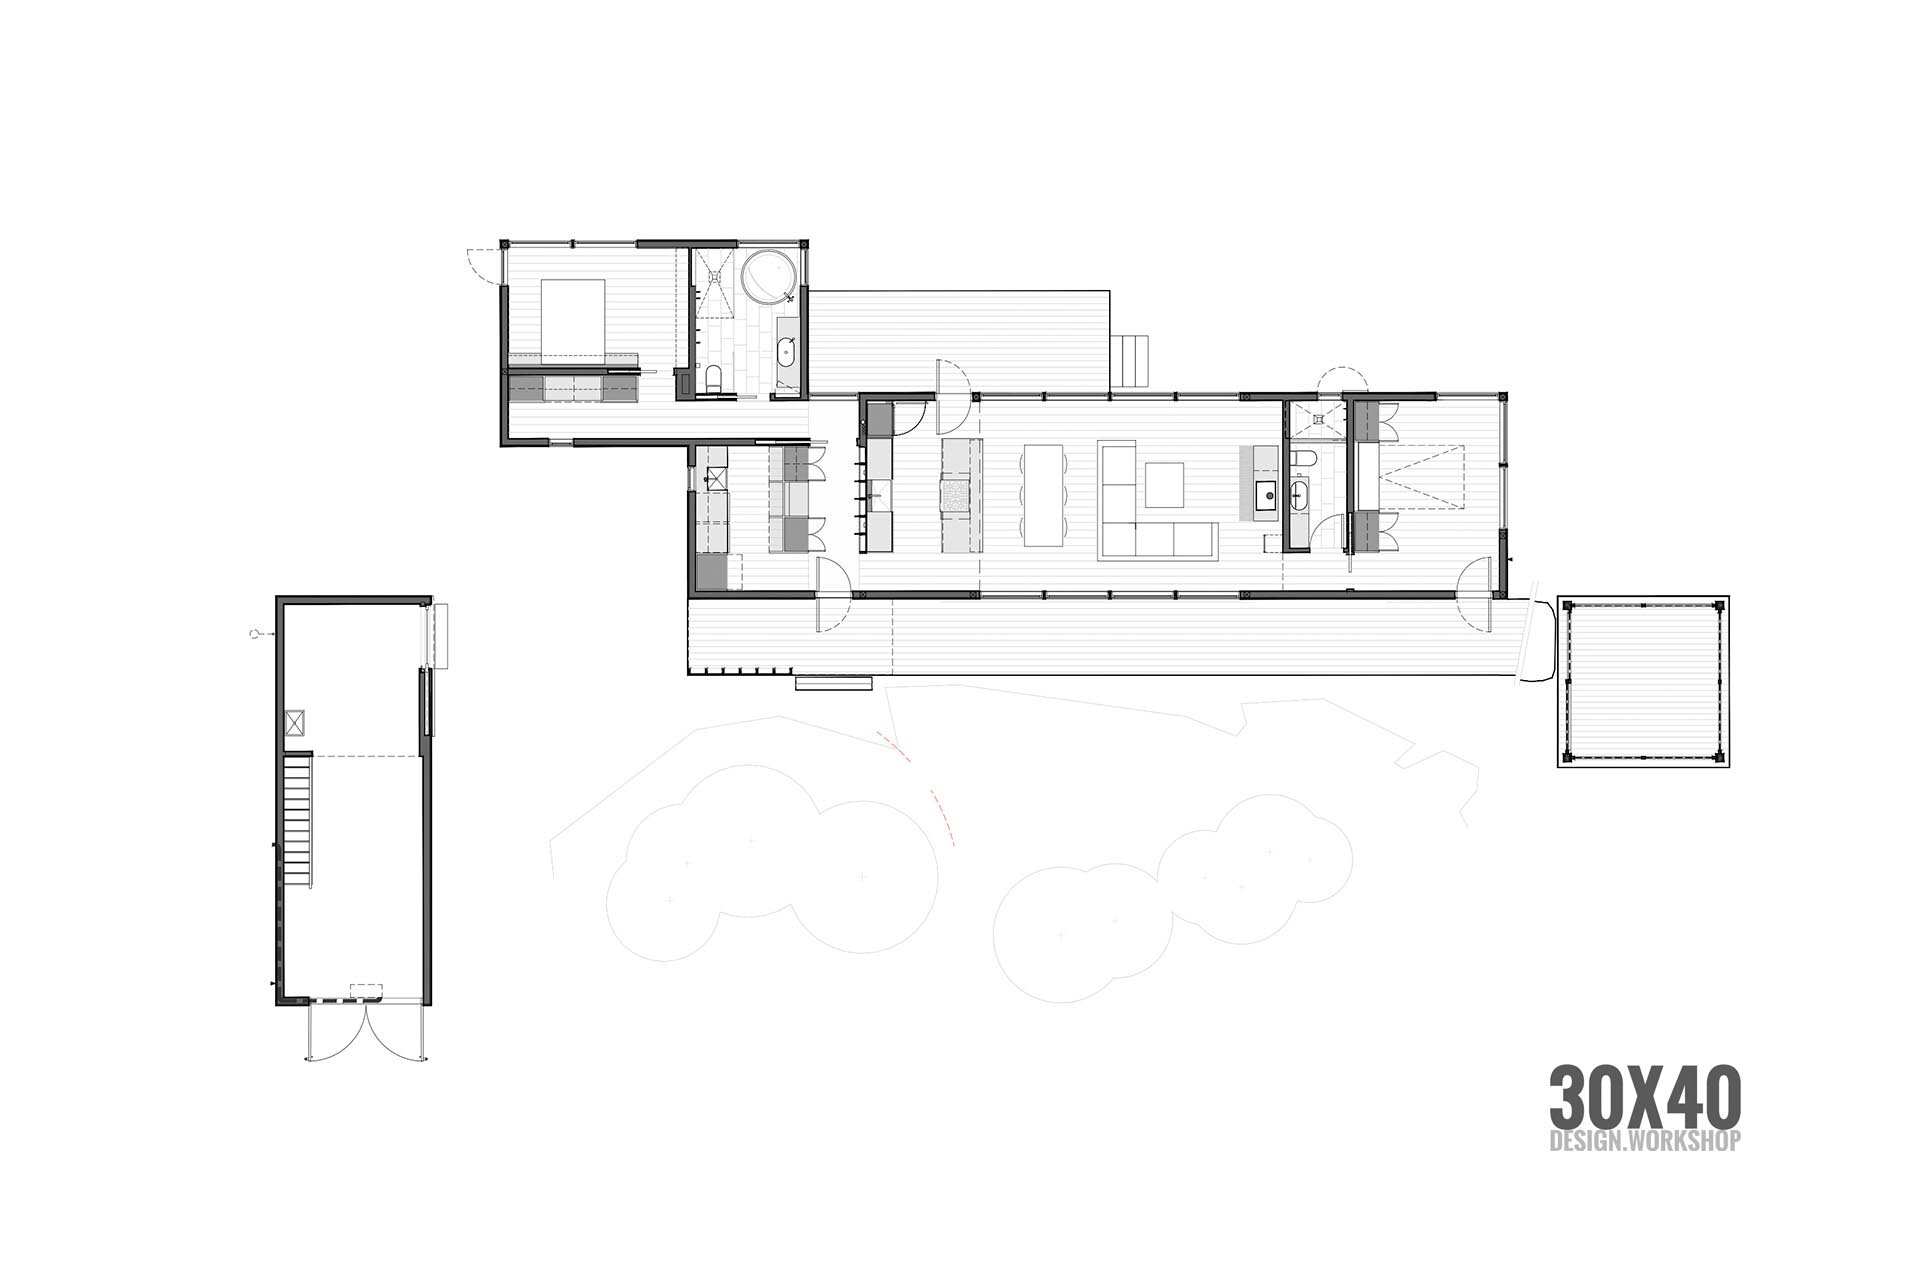
Download the floor plan: Architectural Floor Plan Working Drawing

Door Jamb Head Reveal Detail
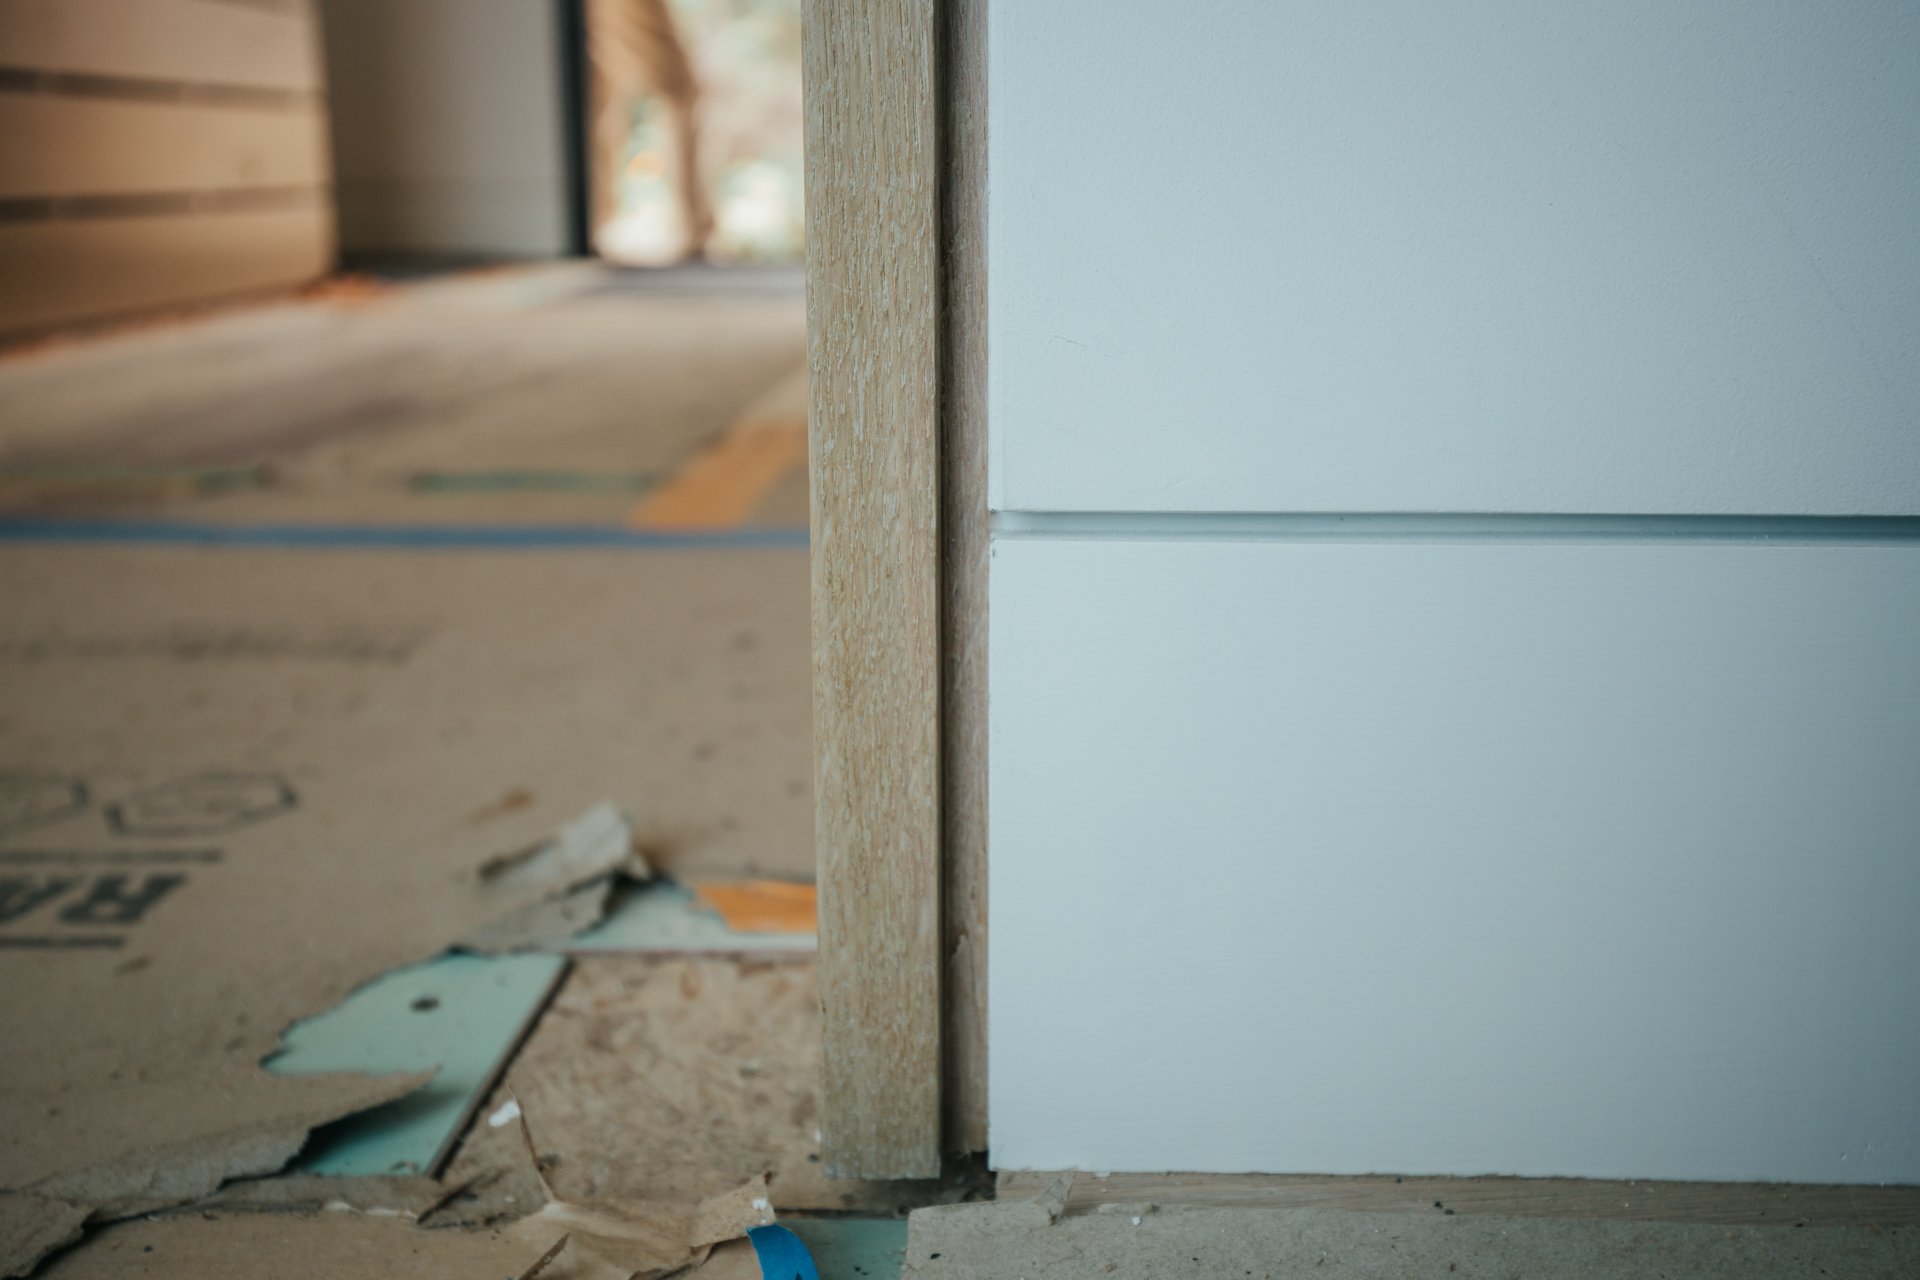
Door Jamb + Base Reveal Detail
Field Report: Framing the Island Outpost
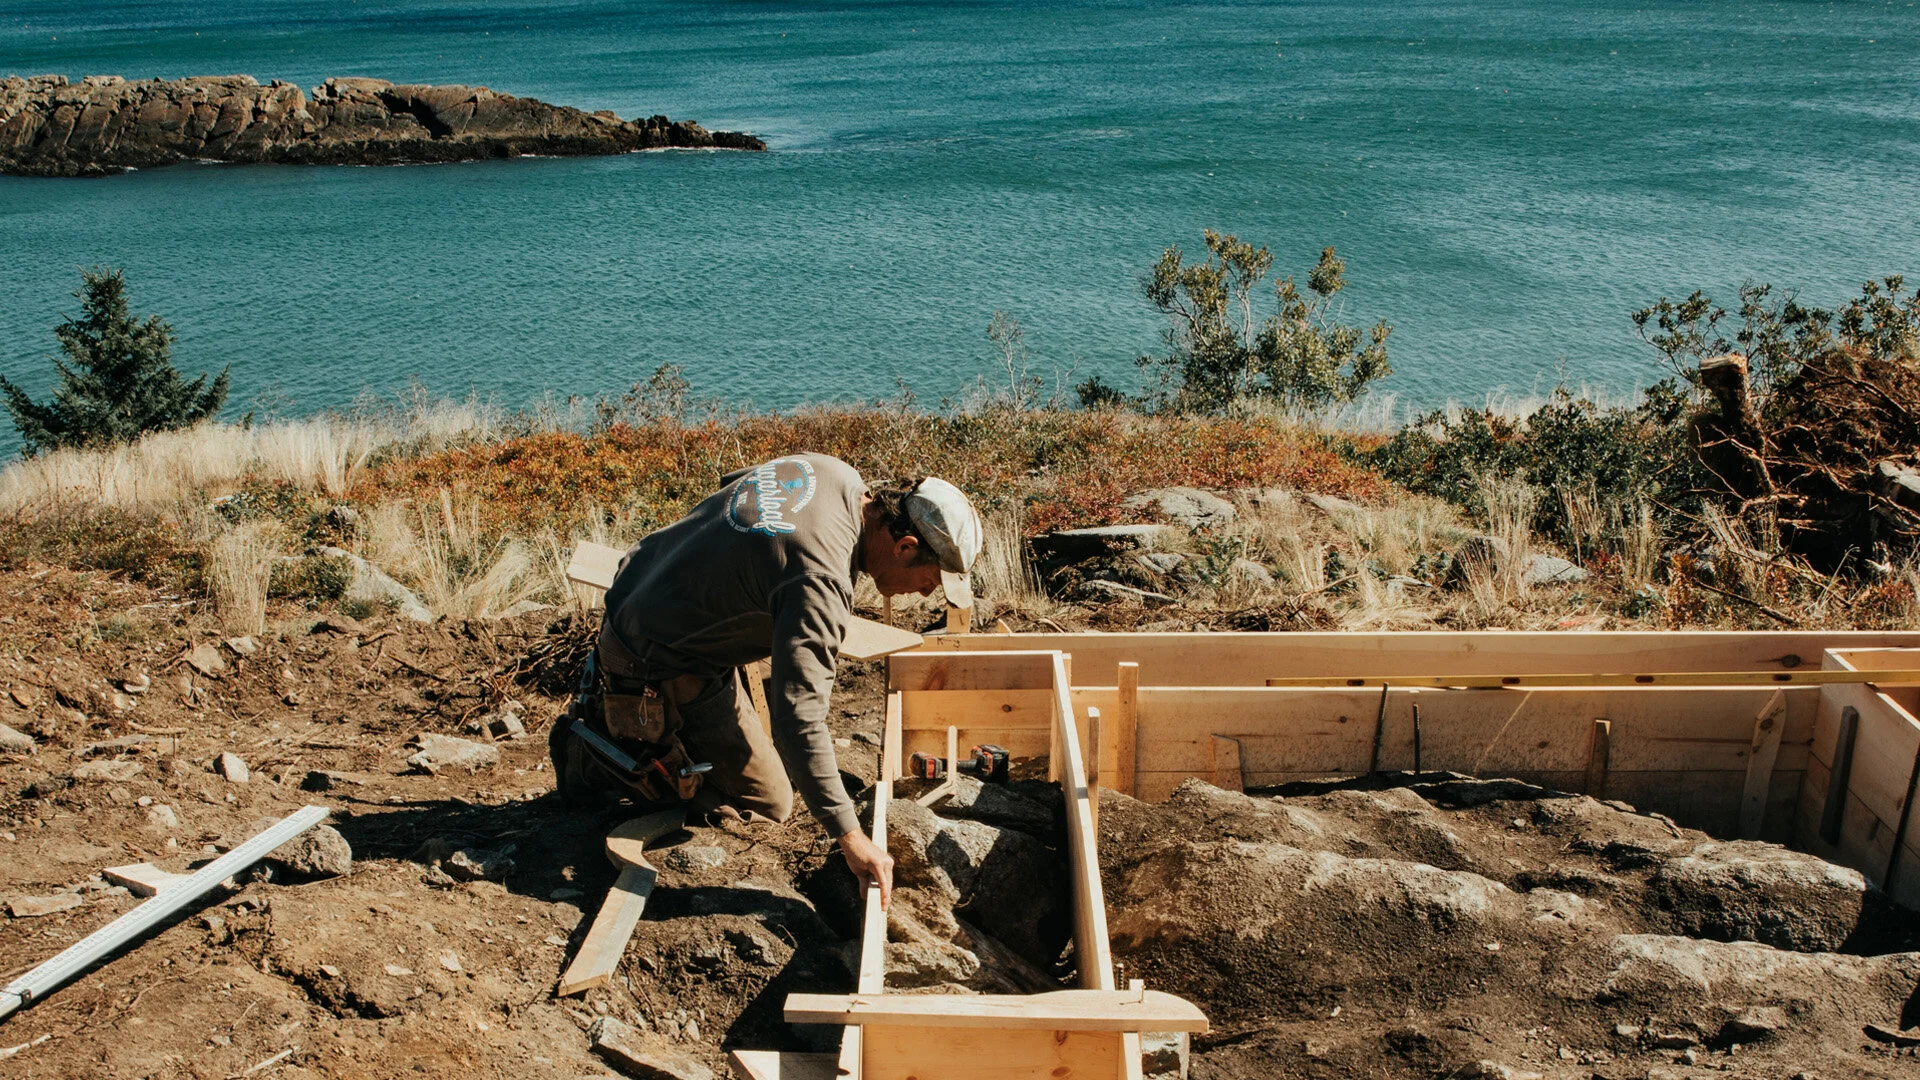
The Outpost project has entered the rough framing phase. This is the point where that initial sketch of an idea is rendered in physical form. For an architect, it's probably the most exciting part of construction and it's taken us many months to get here. Site and foundation work are time consuming and embody a lot of effort, but progress is often slow and much of the work remains hidden in the finished home. By contrast, framing moves quickly and there's much to coordinate between the trades: plumbers, electricians and mechanical subs.

The culture of HGTV has tricked us all into believing that construction happens in the space of a 30-minute show segment. But custom design + construction takes time to complete. And, custom construction on an island takes much longer (I'm learning). That's because building on an island is subject to an entirely different set of rules.
All things being equal, given the choice between plentiful, profitable work on the mainland and work on an island, most contractors have been choosing the work that's easier to access and execute. That's not something I had fully anticipated at the outset of construction and it's proving a difficult problem to solve. The building boom here in Maine has caused a significant labor shortage and that's hindered our ability to secure subcontractors willing to make the journey out to our remote site.
There are no hardware stores, or places to run to if you need an extra bag of concrete. Everything we build with comes from off-island and thus, bringing the necessary materials to the island requires a special weather window and, if it's a load delivered by barge, the right set of tides to land and leave the beach. Winter wind and heavy seas have conspired against us more than a few times too.
The work continues though and I'm thankful for the dedicated crew acting as my hands in the field to realize these ideas in spite of the wind and weather. So too, for generous, supportive clients - dear friends by now - who patiently watch as their home takes shape. To navigate these opposing forces and turn them to your advantage takes skill, hard work and the work of many. And, perhaps that's the reason the creative satisfaction in the end is so great.
My sincere thanks for watching and following along. It really is as much fun as it looks!
South end, guest bedroom looking north
Drive approach looking southeast - Feb. ‘21
North end, entry looking south
Western approach, looking northeast
Southwest end, looking northeast
Drive approach - March ‘21
Master suite looking northeast
View from entry looking east
Living space, looking north toward (future) kitchen
Sketching Details for a House (my analog + digital process)
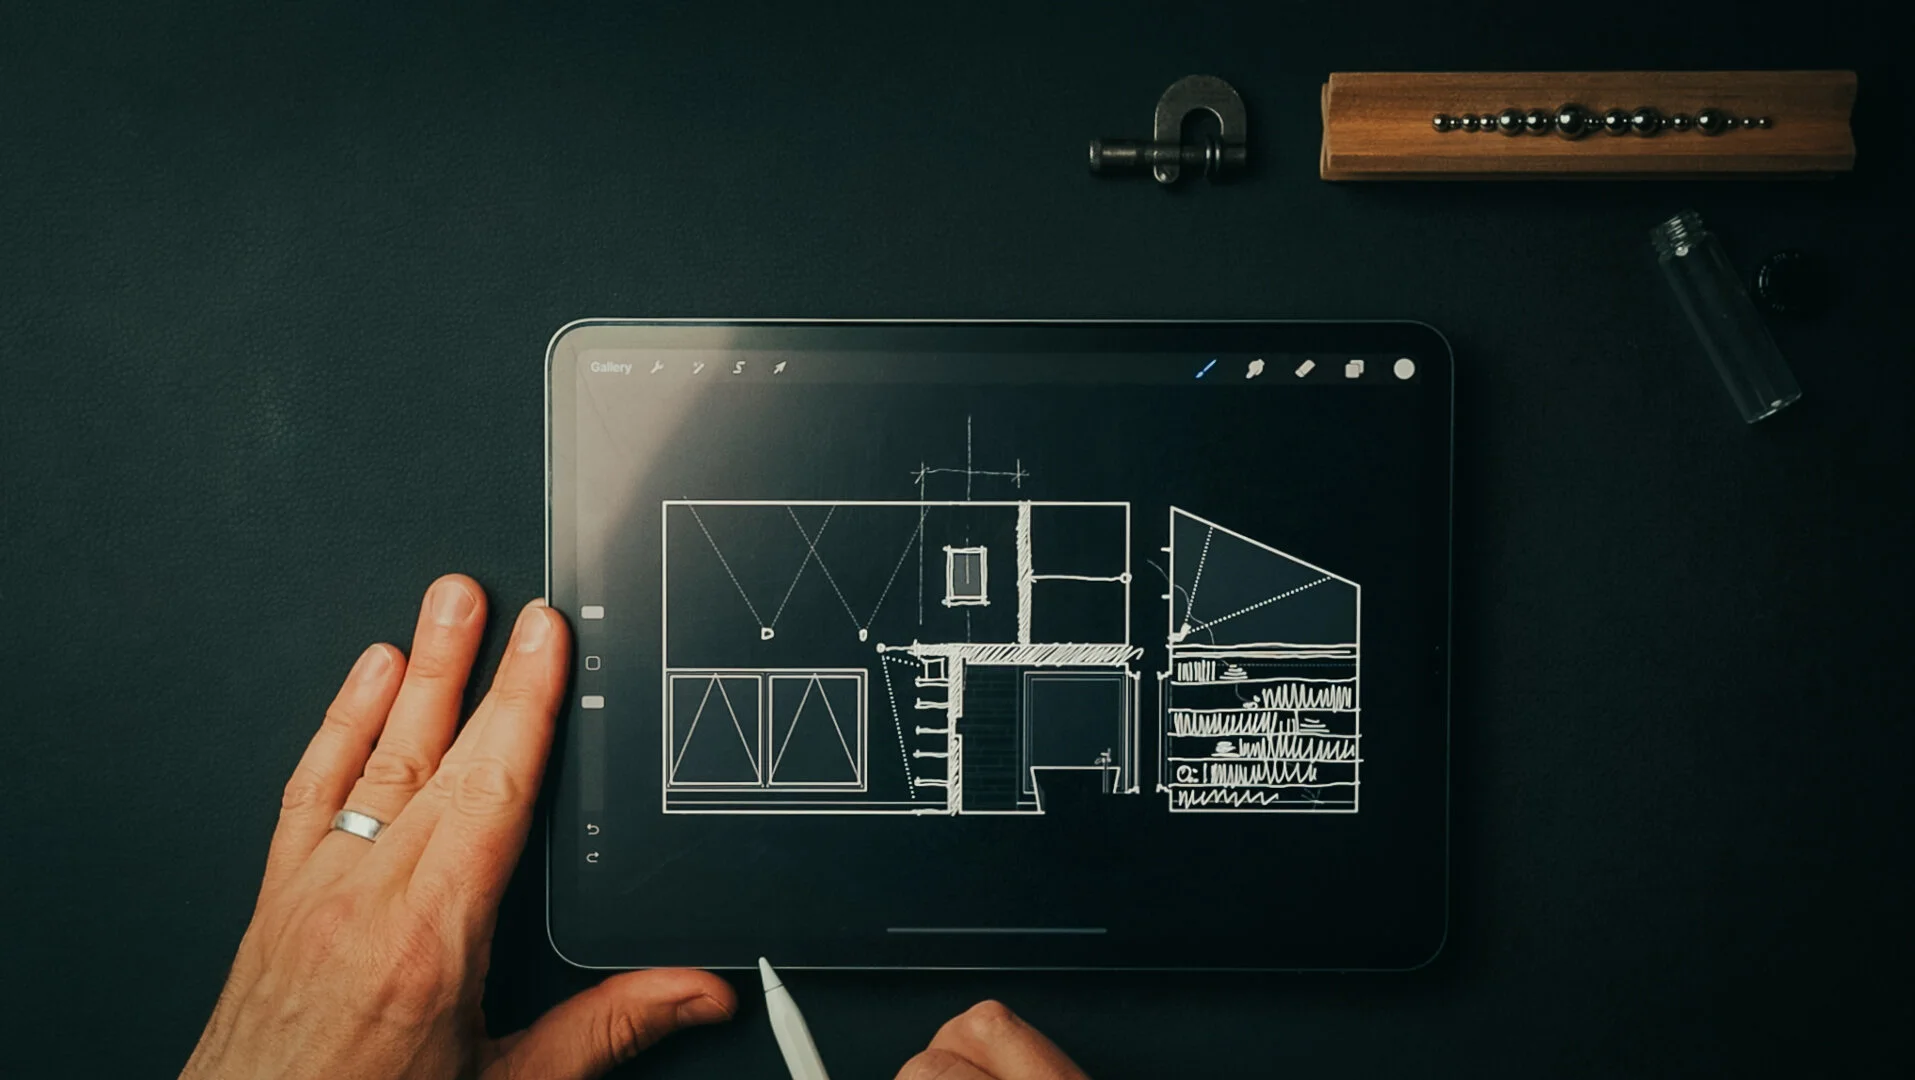
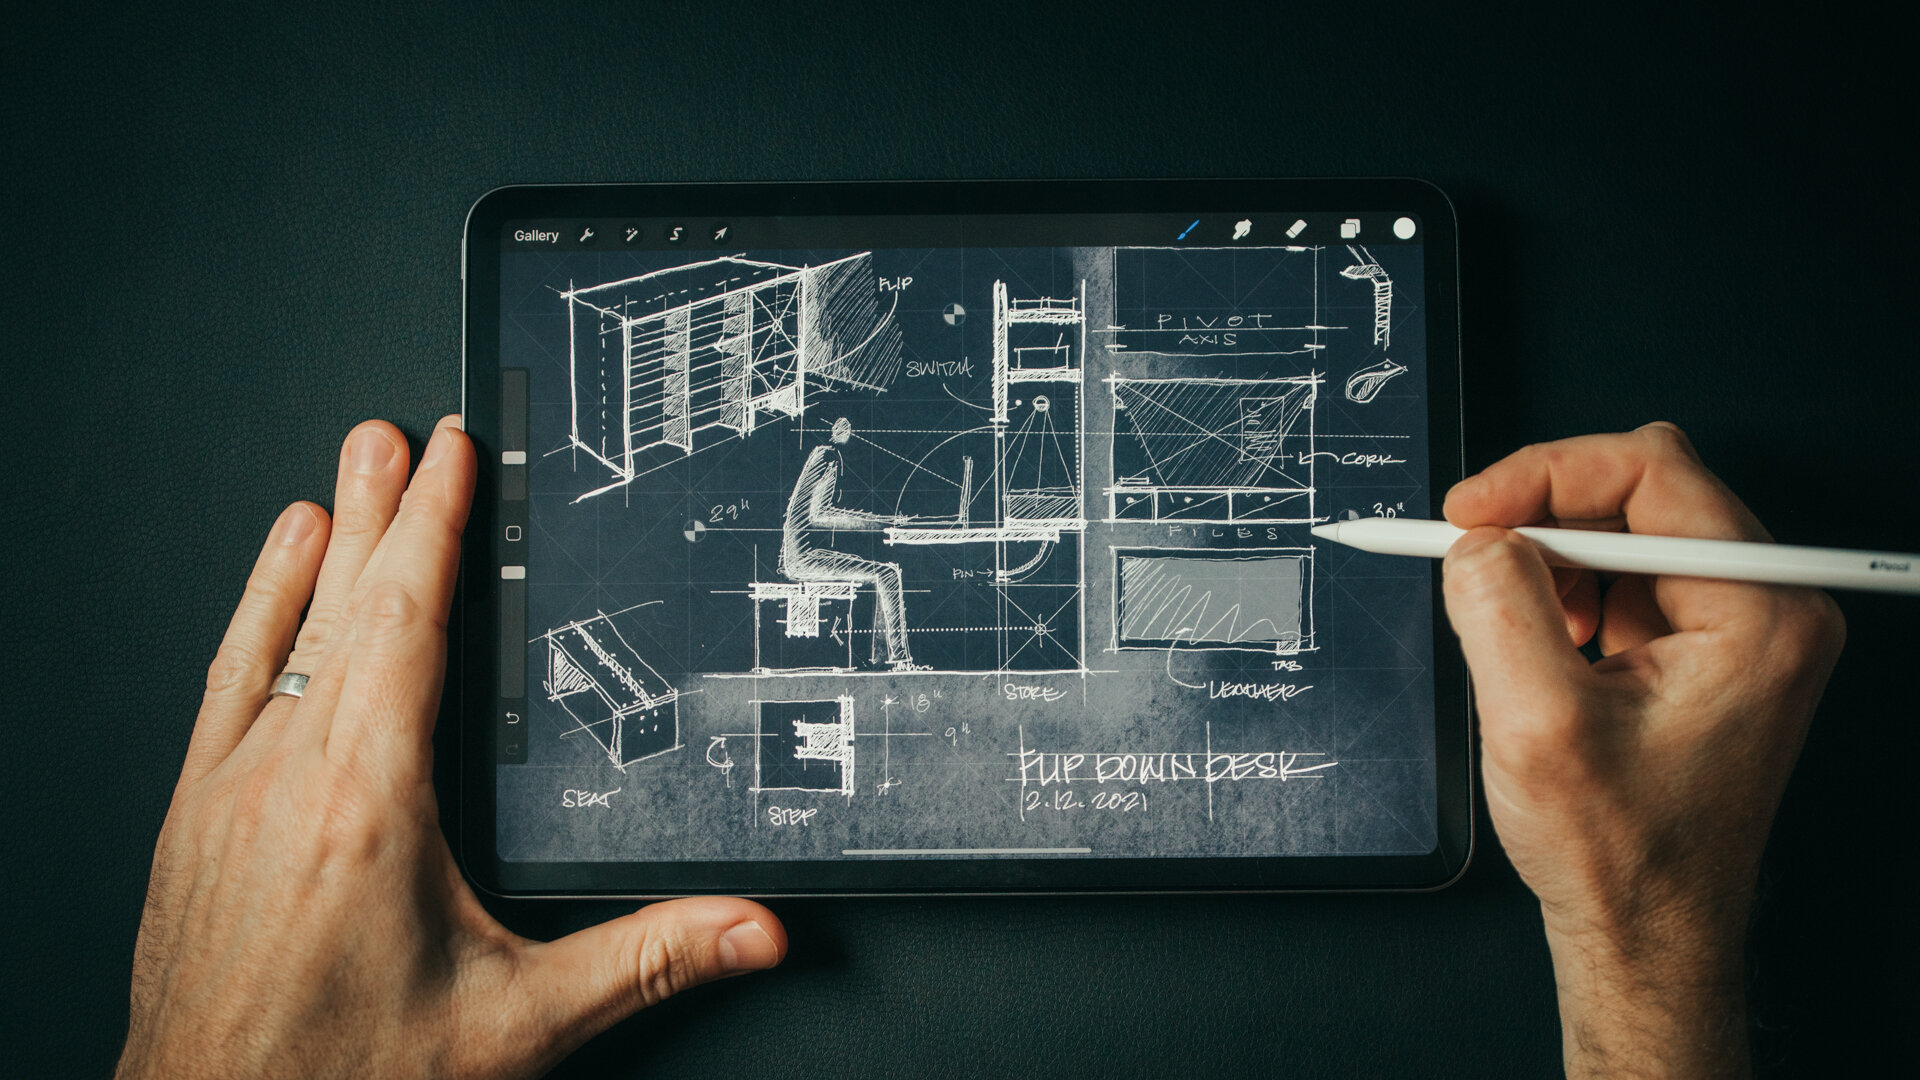
Sketch with me in this video as I design custom details for the Outpost project. Inventing bespoke solutions to design challenges is the reason I love designing homes. The places you brush up against and interact with each day are a chance to invent novel solutions to common problems like how to hang your coat in a mudroom or an informal flip-down desk to write a check. And, quite often, if I'm stuck on a design brief, I’ll zoom in and begin sketching a detail. There’s something about the scale and how manageable it is to solve simple problems that helps me move forward.
For me, this process always starts with a design brief and my sketchbook (or iPad). Once I’ve fleshed out a few ideas and a direction for the design I’ll move into the computer to draw it more precisely. Starting informally with a sketch allows me to be free and fast with ideas and it leads me to other threads I hadn't anticipated. You'll see this in the video as I chase down a few of the more absurd ones.
Before sketching I also like to compile inspiration imagery (like the military field desks you see in the video) and I make sure to have a ruler nearby as I'm designing. Relating to the human scale is an important part of detailing and a ruler helps you set proper proportions for drawers, desk height, etc.
A trick I use as I'm drawing is to really think hard about the daily patterns of life around the subject I'm designing. How would someone use this space? What would they have in their pockets, what would their daily routine moving through or around this space be like? Placing yourself there and asking what would make this experience better, or more "delightful" leads to novel insights. Delightful is kind of a corny word but it’s the best descriptor I can think of. It's the thing that makes you smile when you see it, and say, “Wow, they really thought this through! They really considered what it means to live here, in this place.”
The point of sketching is to chase down all the bad ideas, all the strange threads of thinking, including the absurd. Be open to thinking differently and the invented solutions may surprise you. It's important to not to put too much pressure on it, these aren’t beautiful drawings, they’re process, they show the steps from one idea to the next.


Tools Used:
Trace Sketchbook (designed by 30X40 **new for 2021**)
Project Materials


Material Palette:
Cork panel “Ebony”
Matte Black - hardware + light fixtures
White Oak Plank Floor - “Wheatfield” by Carlisle Wide Plank Flooring
Felt
Beach stone (sourced on-site)
Cocoa mat
White oak - Whitewashed finish
Leather, Antique natural (Edelman) - desk surface
“Anthra” Zinc
Easternmost wall - looking south
Construction Begins on the Island Outpost
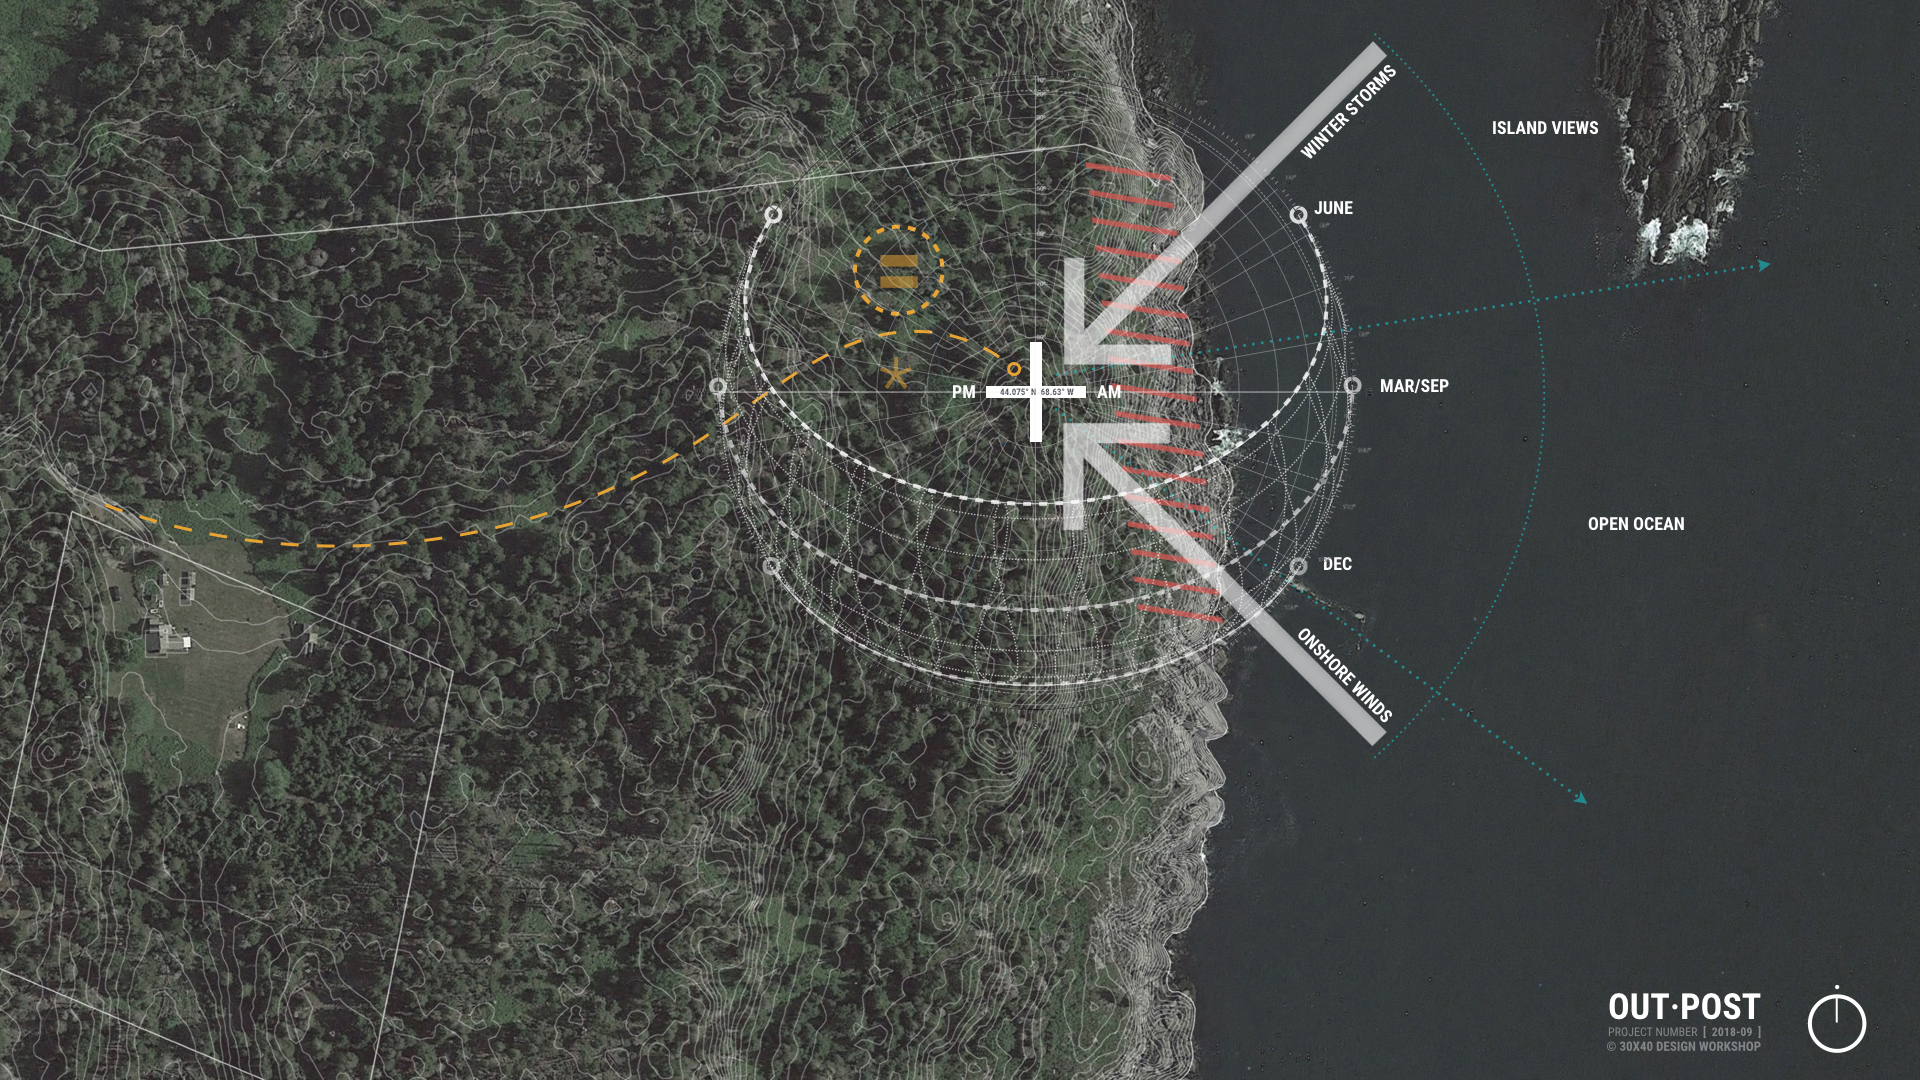
Foundation + site work has begun on the island Outpost project and we quickly encountered an important decision after removing the overburden of soil at the building site. In the video below you’ll see the drawings I prepare for the early stages of construction, learn how I choose an appropriate foundation system and join me for a typical site visit as I review progress.
We rely on the architectural drawings to order and organize information and ensure our design decisions are enacted in the field, but they're not fixed instruments as construction always presents unexpected opportunities + challenges. Our initial foundation strategy to use posts + piers and minimize the amount of concrete was thwarted by higher than expected bedrock (ledge) elevations. As a result we had to raise the main level finished floor and connected decks by 6” and we shifted the building eastward - toward the water - to better fit with the underlying ledge profiles. This is one of many reason I visit the site regularly to review + resolve the questions that invariably arise during construction.
Timestamps:
00:00 Building on an island
00:41 Foundation design considerations
01:51 Slab on grade
04:01 Post + pier
06:09 Frost wall + crawlspace
08:47 Making changes
09:40 Drawing the foundation plan
10:51 Locating the building on-site
12:00 What to include on the foundation plan
13:25 Checklists (in Notion)
13:46 Site walk + tour
15:24 An office with a view
16:14 “This is the worst one…”
Transit
Site Benchmark - main level datum

Foundation Plan - 1/4” = 1’-0”

Wall Section Detail - 1”=1’-0”
Importantly, the drawings must also take into account the sequence and order of operations on a construction site. The foundation resolves the gravity and lateral forces acting on the building into the bearing substrate below. It conceals the many utilities entering and exiting the building’s perimeter, keeps groundwater out, and serves as a semi-conditioned space to rough-in plumbing, mechanical and electrical systems. The purpose of the foundation plan is to collate and coordinate the locations of these systems on paper before our field work begins. It must also adequately describe the building’s siting in three-dimensional space on raw land. Note the use of vertical datums and elevation tags on the foundation plan which all reference the site benchmark set by the surveyor early in the construction phase.
Site overview - looking southeast
Luther (our GC) at work in his “office”
Footings scribed to ledge
It’s not unusual for the footing formwork to be scribed to ledge here on the coast of Maine where ledge is always within a few feet of the surface. Our footing - in this case - is acting as a level pad to set our wall forms on and these will all be concealed as we’ll backfill against them. However, there are some locations where the ledge and wall interface will be exposed and in those spots we don’t want to see a footing, so we’ll be casting our wall directly on top of the ledge, scribing our wall forms in the same way. To anchor everything we drill into the ledge and use steel rebar epoxied in place roughly 24” on center. Before backfilling we’ll waterproof and add our subsurface drainage to ensure a dry crawlspace.
Southeast Corner
Detail at Southeast Corner - scribed footing
South pour complete - October 15, 2020
There's nothing more rewarding as an architect than seeing your ideas realized in physical form. It's a complete thrill for me each and every time. I'm honored to be working with such an incredible team of collaborators. Without generous clients (and their willingness to share the process so openly) and skilled craftspeople to assemble the parts, none of this is possible.
More updates soon!
Lighting Design + Drawing Tutorial - My Process
We can build a home from a set of five drawings or a set of fifty, one provides a lot more control over the finished product. Whether your plan set is five or fifty, one of the must-have drawings is an electrical plan. Follow along in this video as I design + draw the architectural lighting plan for the Outpost project. An electrical plan is an essential drawing in every architect’s toolbox, it shows the fixture types, switching, receptacle locations, all the necessary electrical devices + equipment we need to plan for in our architecture. Designing it in coordination with the other essential building systems: architectural, structural, mechanical and plumbing affords us optimal control over the design.

Hidden elements in a project - beams, ductwork, vent stacks - can adversely impact the placement of the visible elements - light fixtures, for example - which is why we plan for them early in the design process. Drawing and overlaying each helps us to identify conflicts in the studio and on paper where it's much more efficient and cost-effective to make changes. See how the abstract concepts of ambient, task + accent lighting are accounted for and applied in the design of the Outpost, a remote, off-the-grid residential project here in Maine.
Resources:
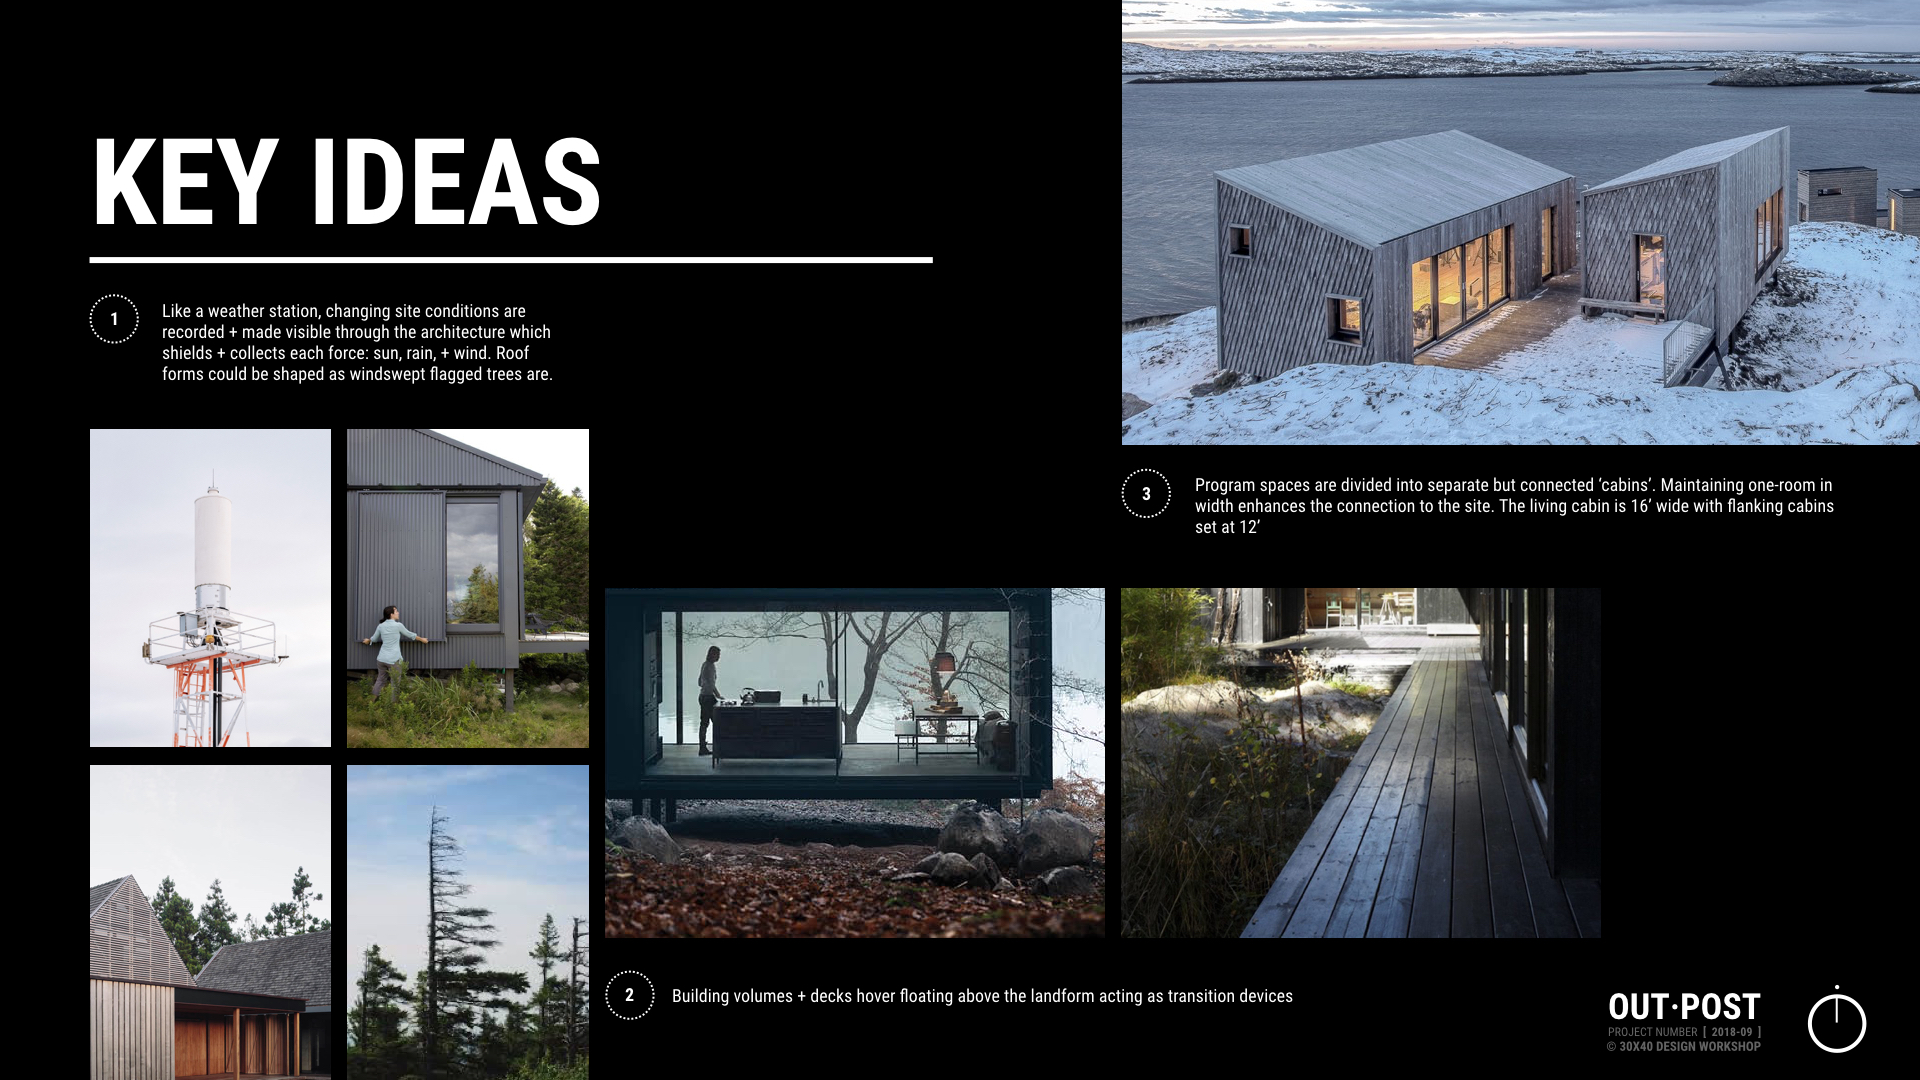
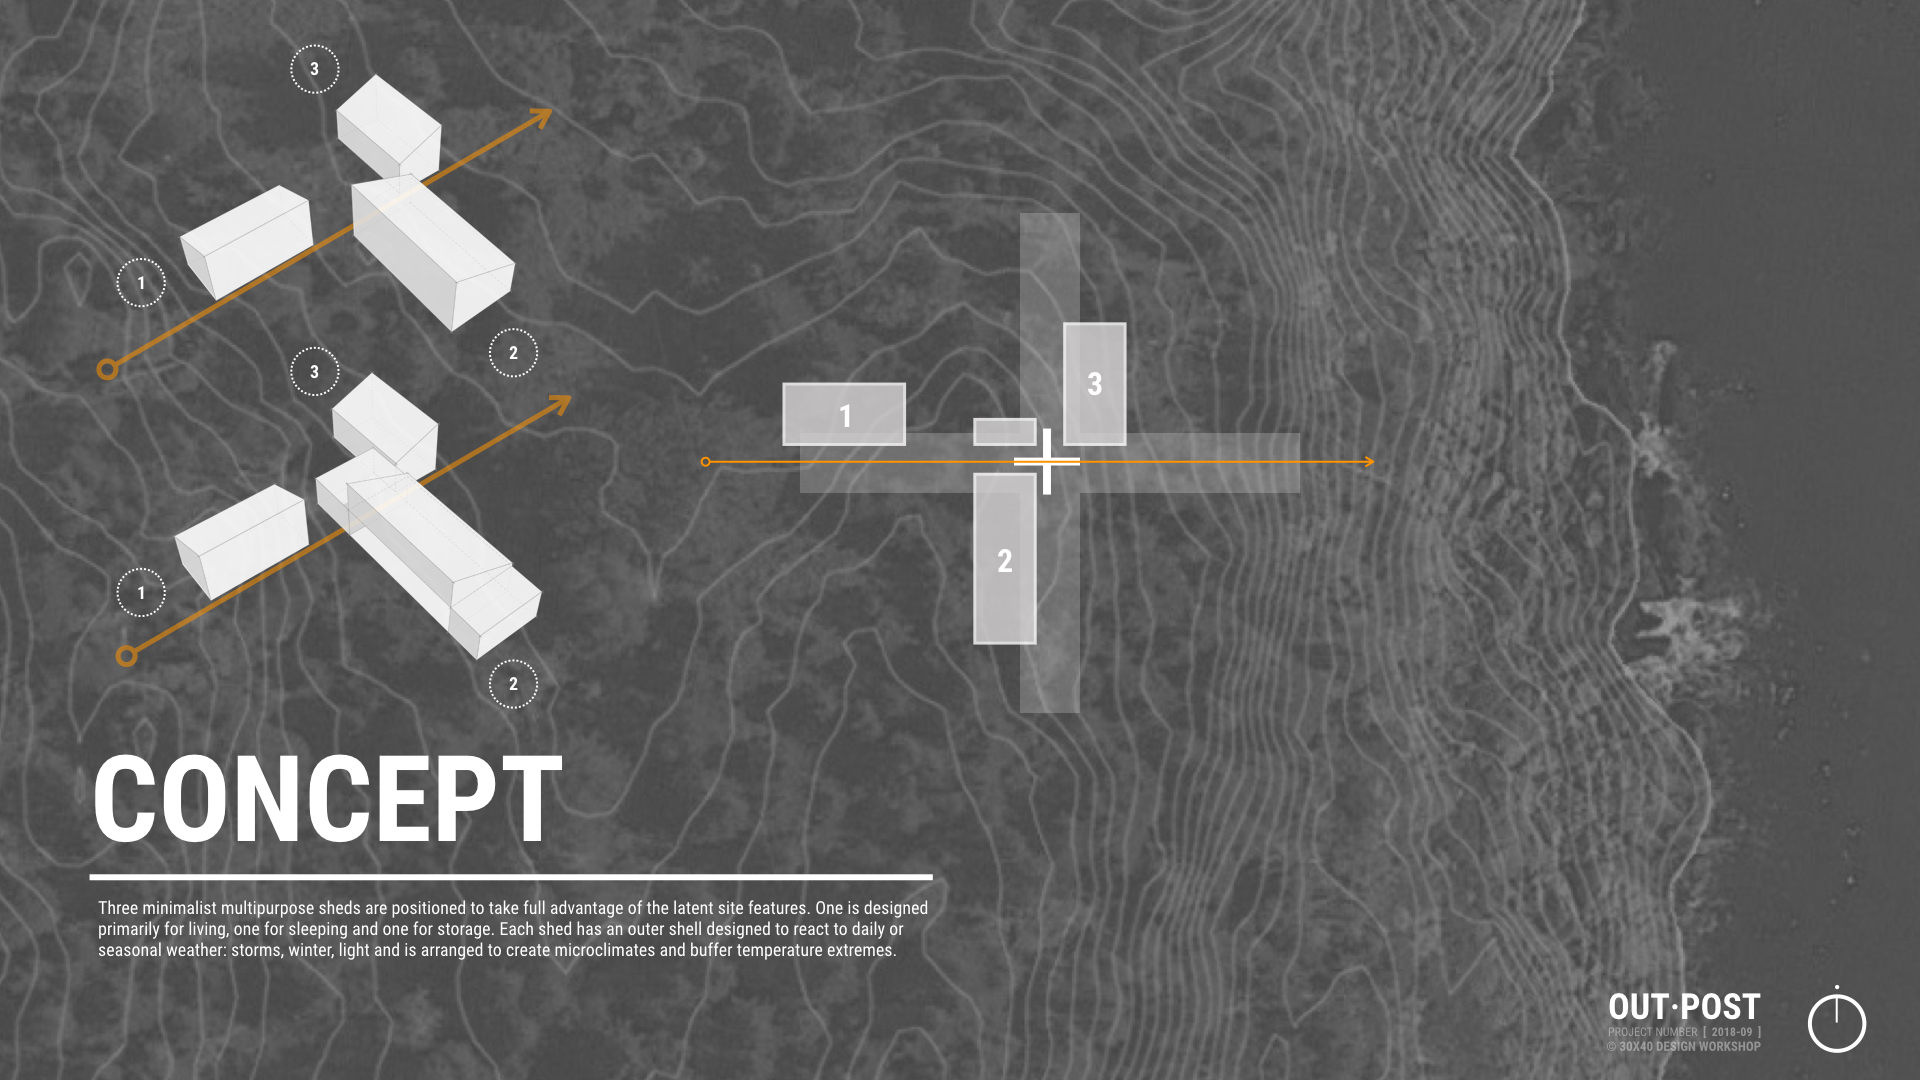
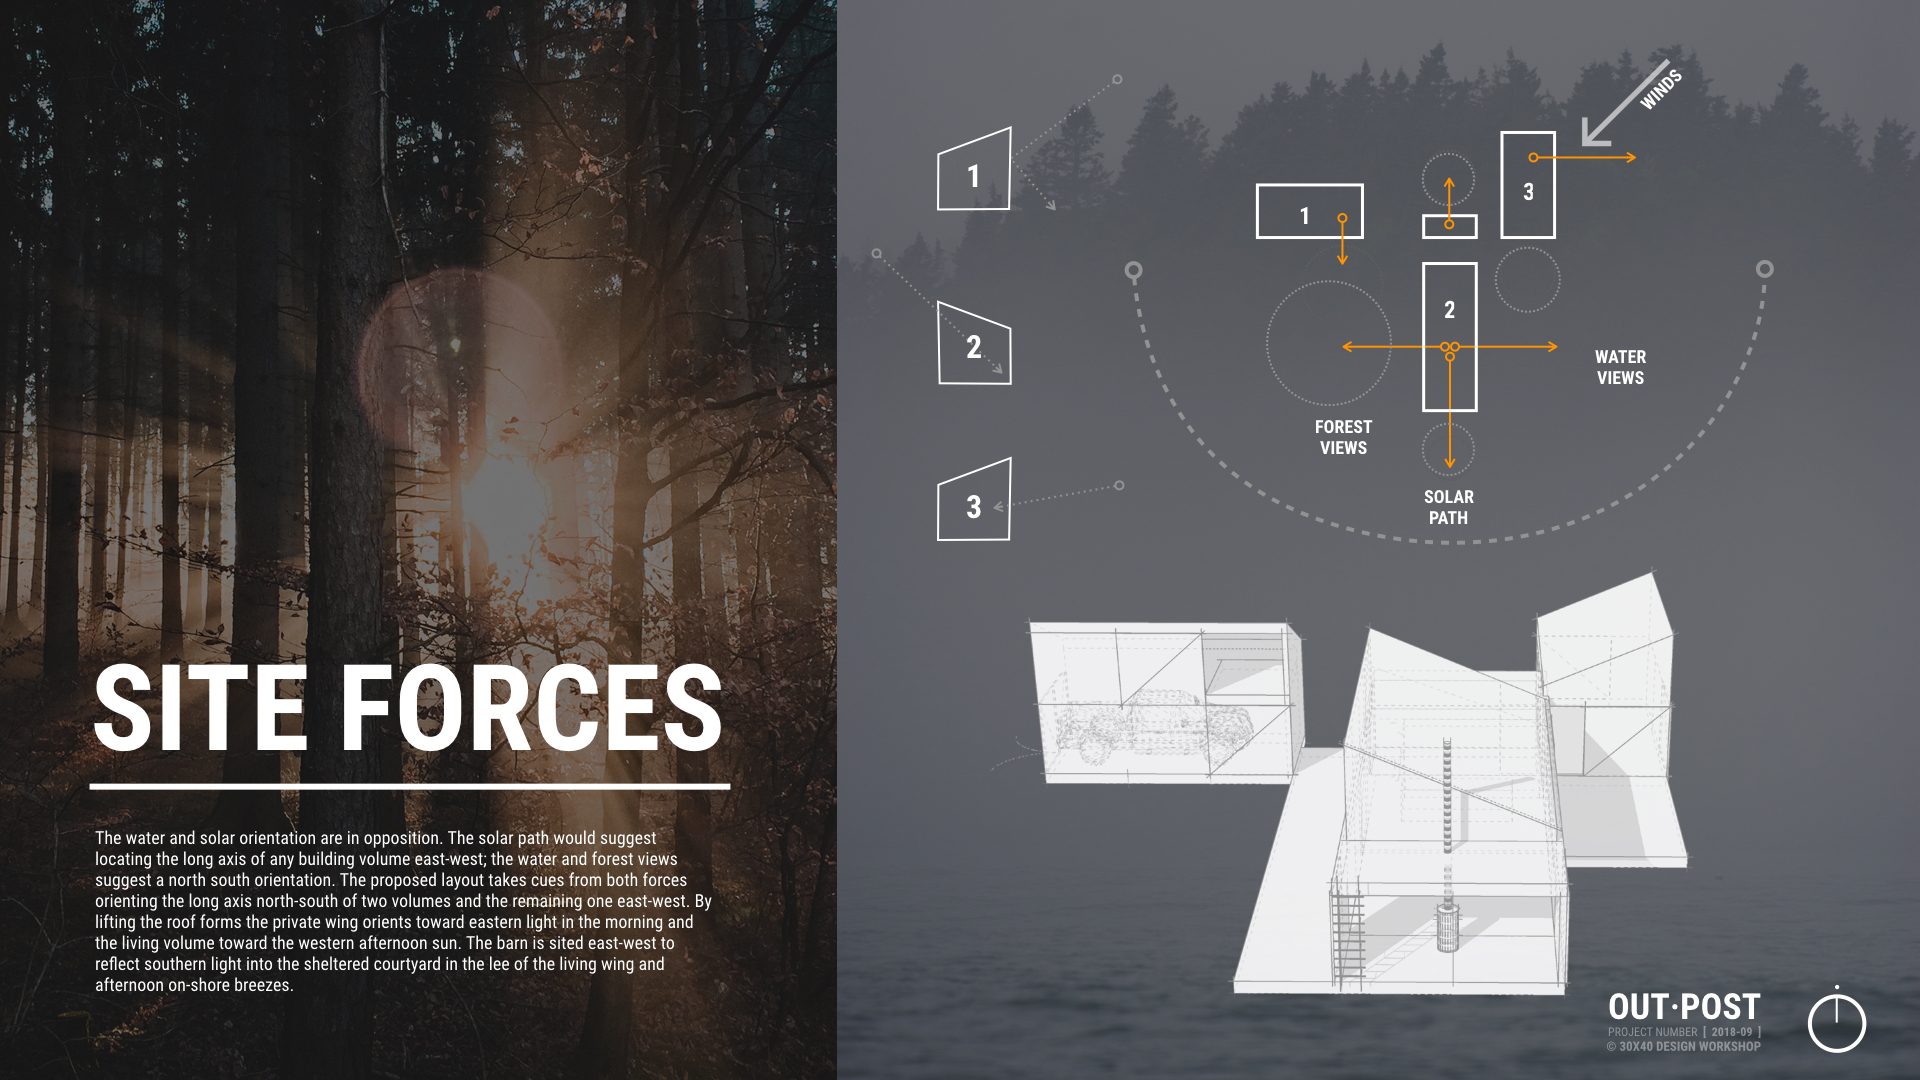
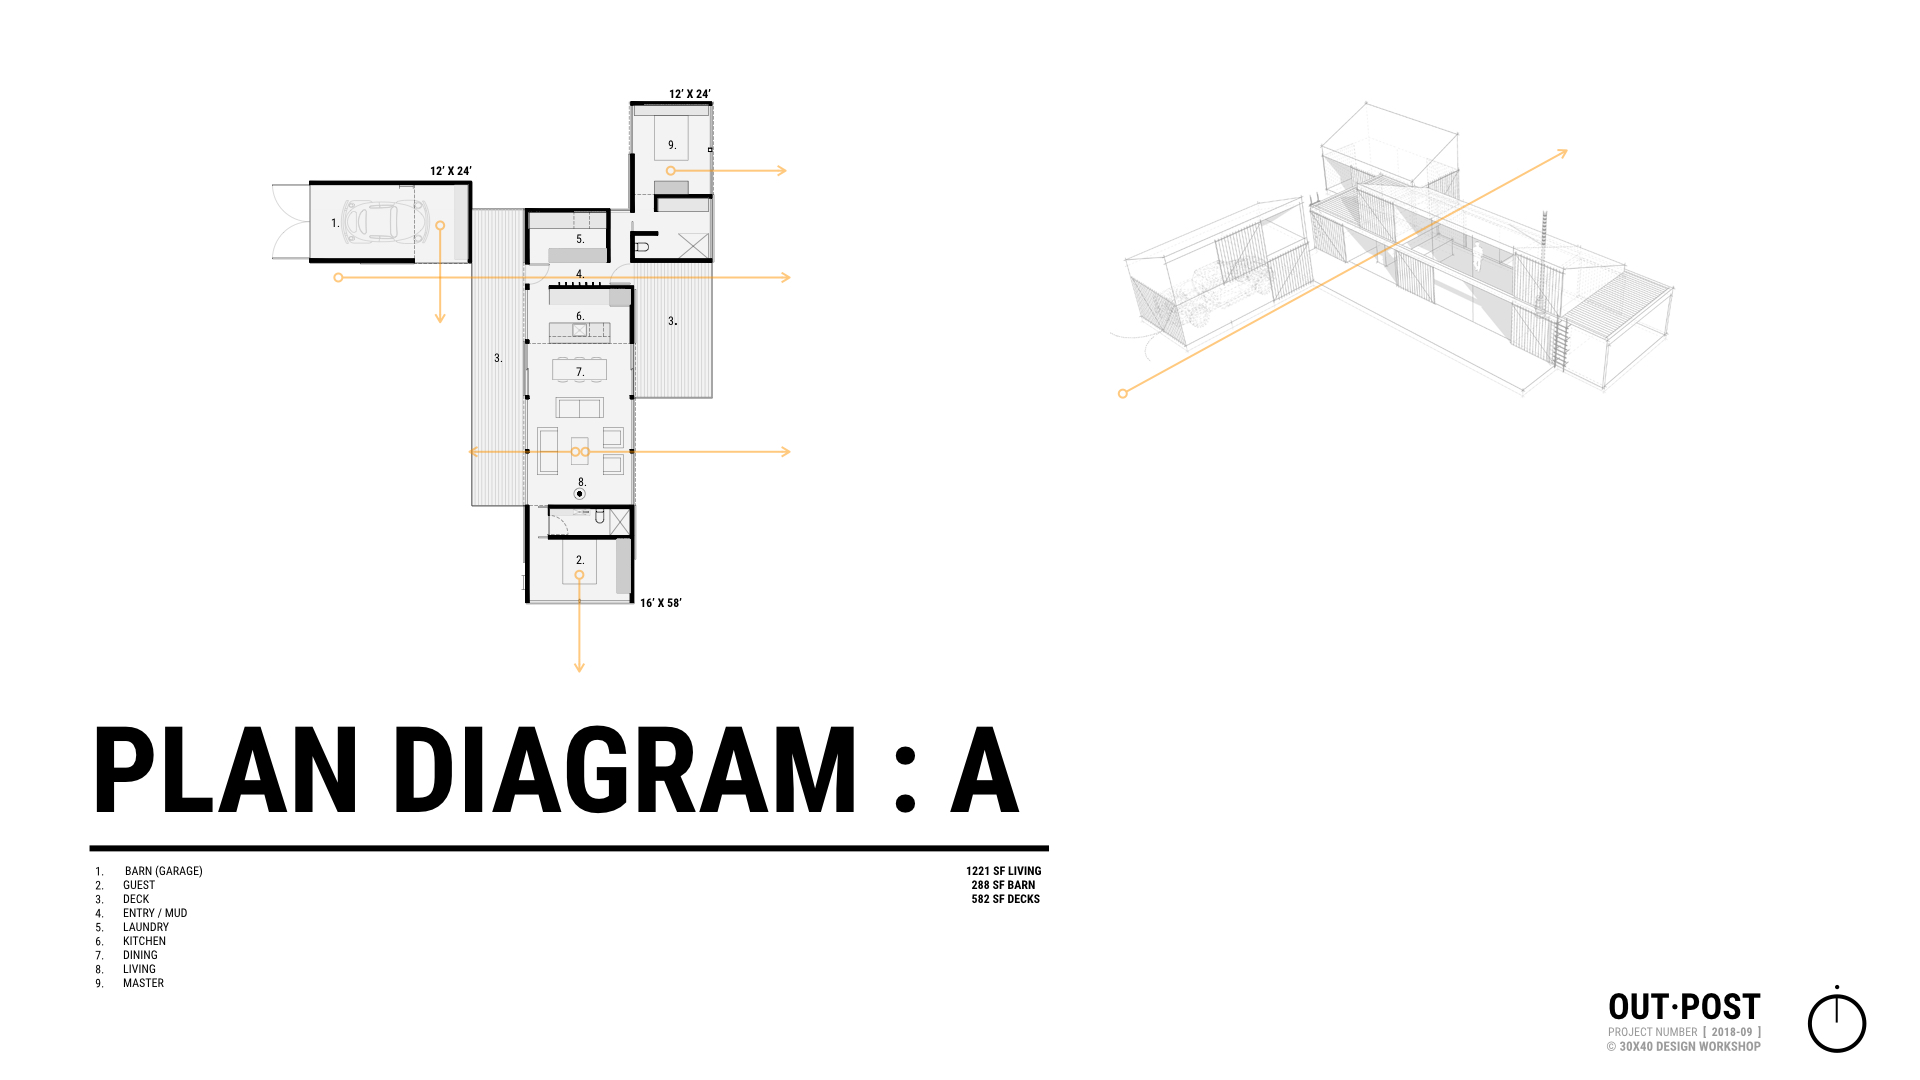
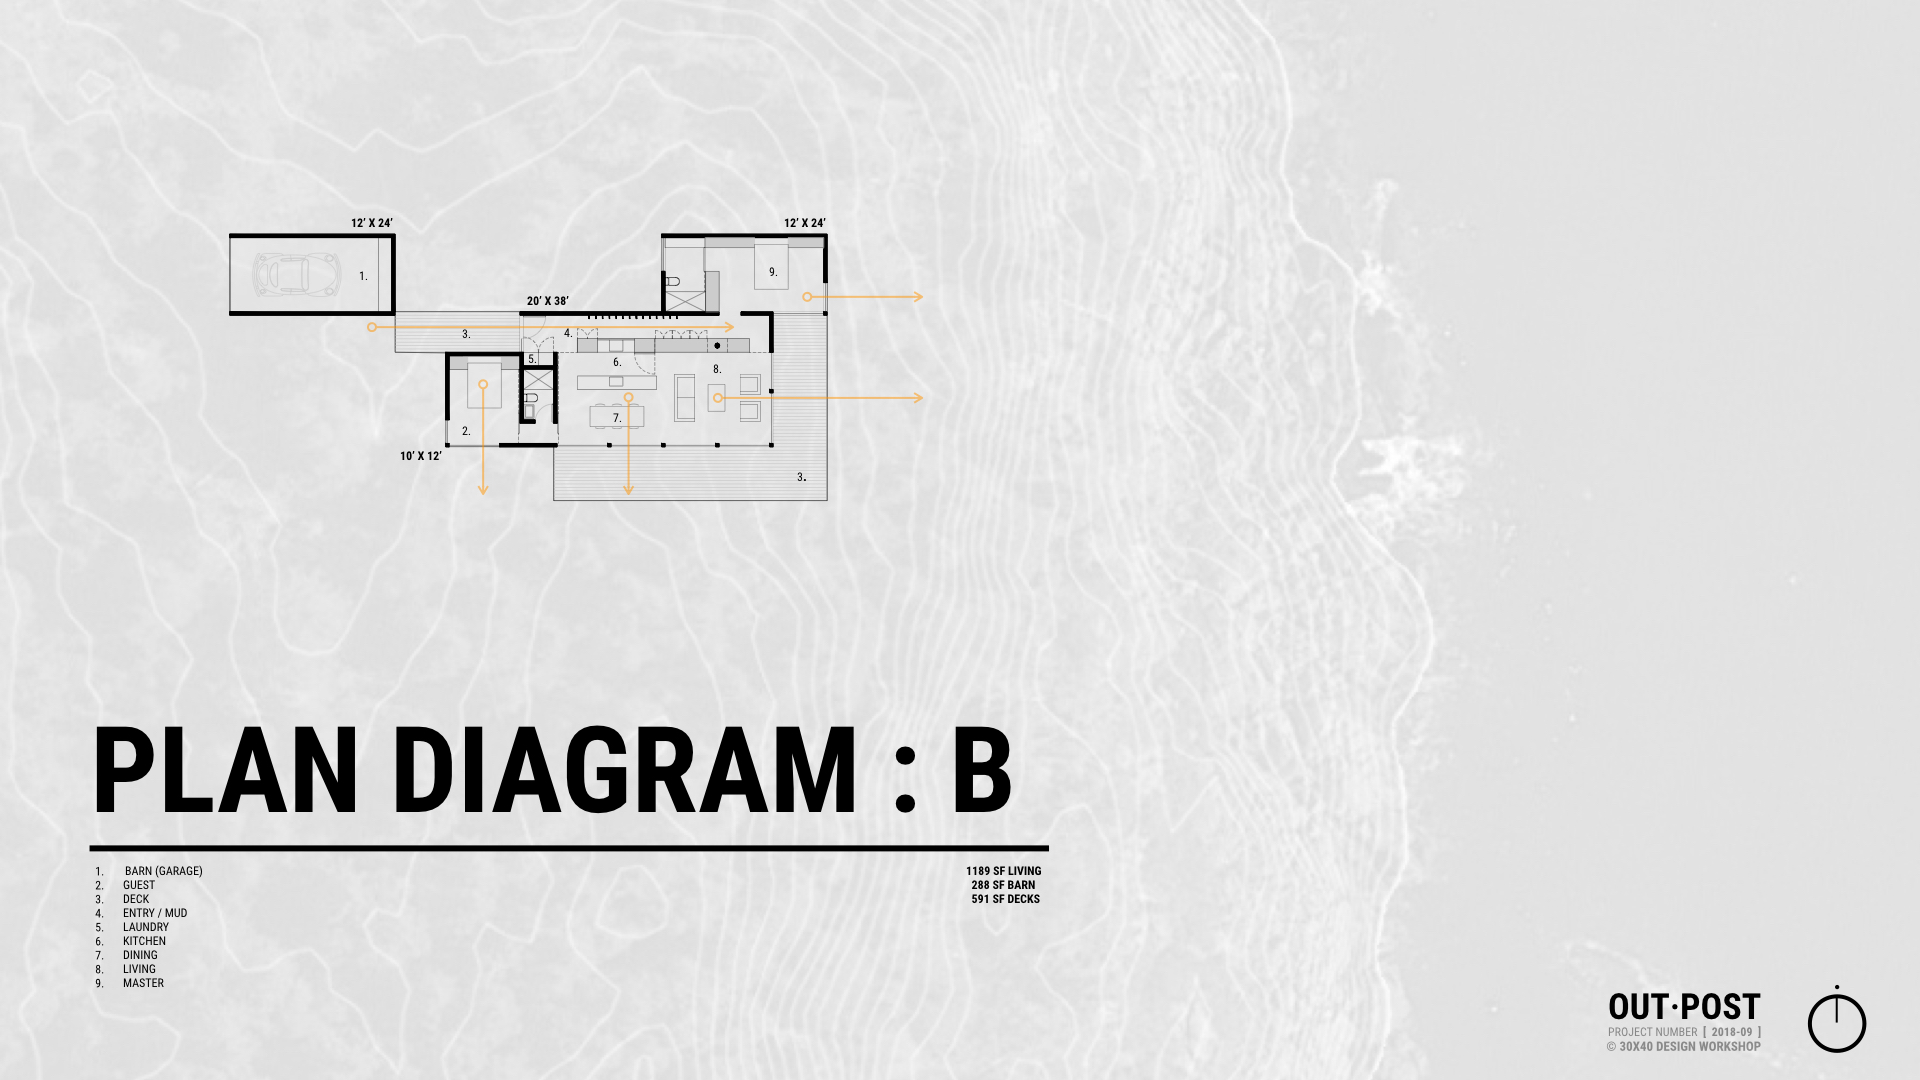
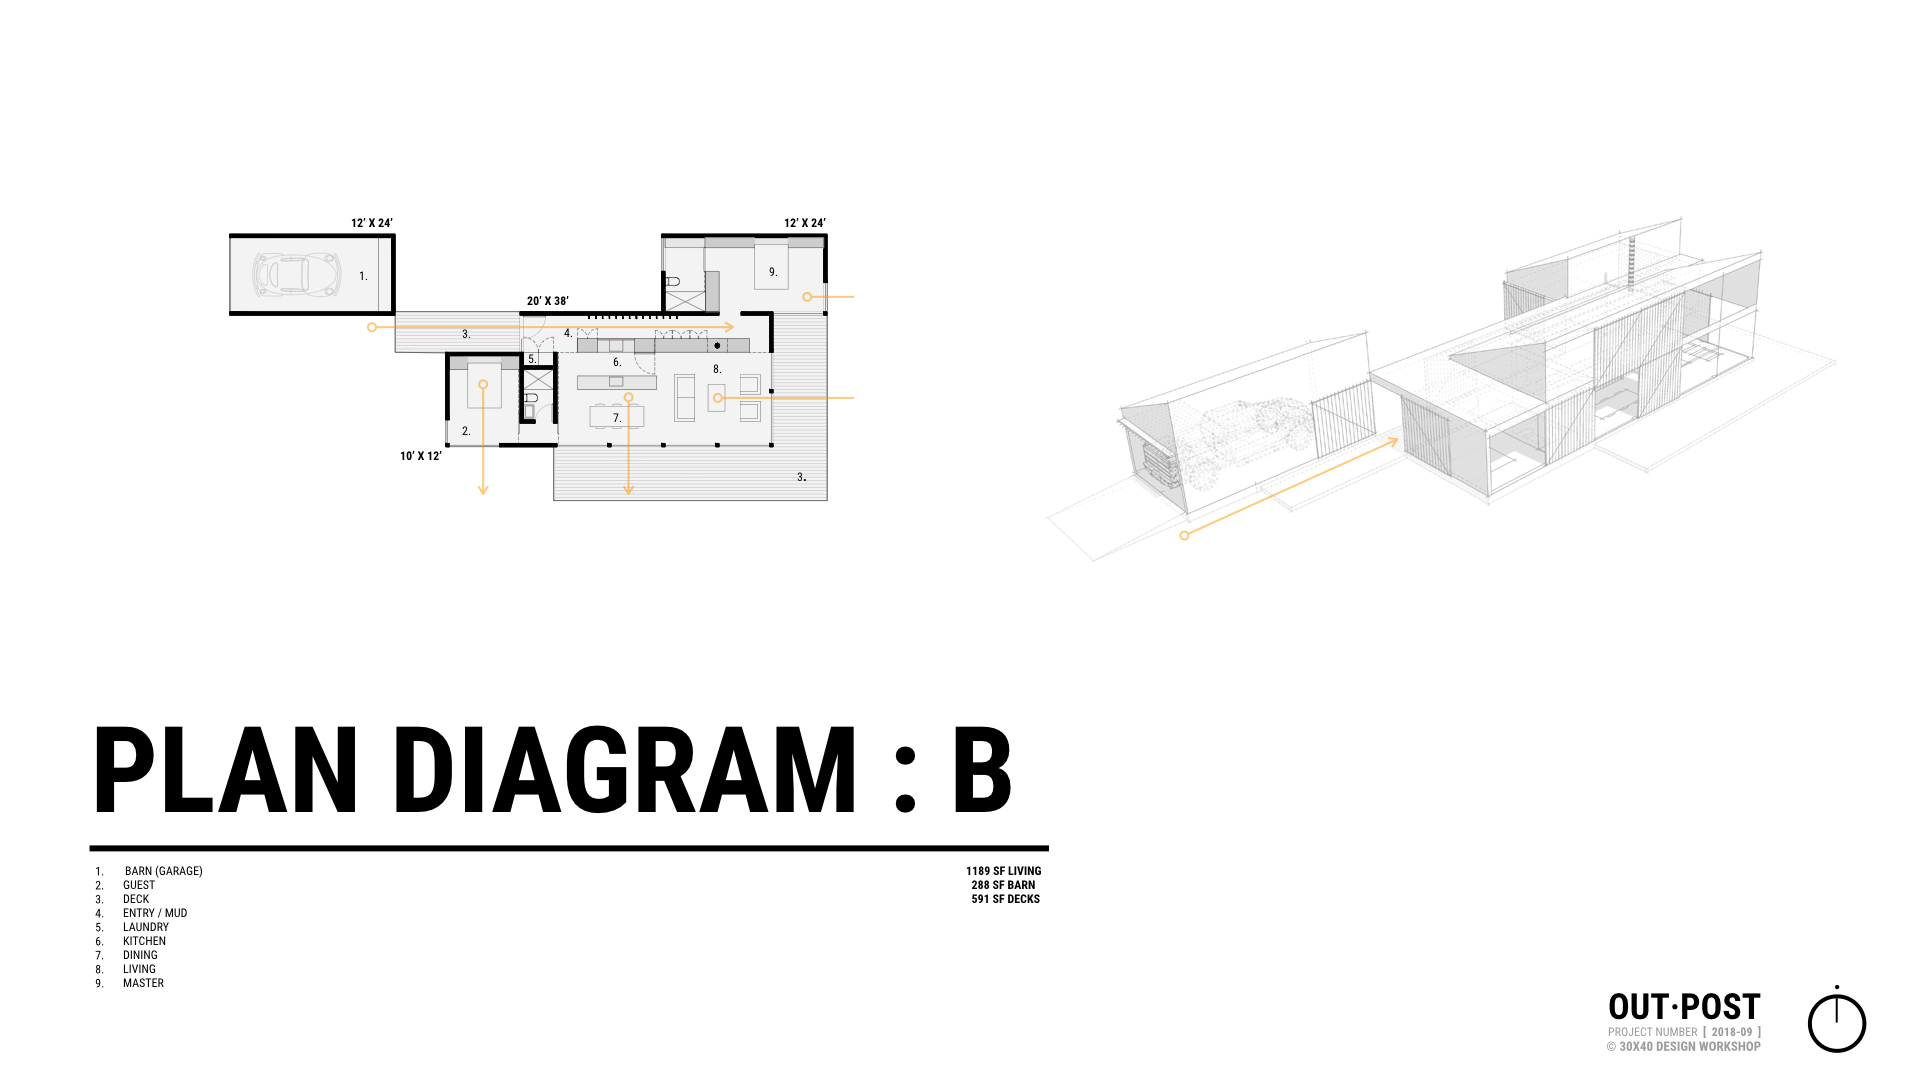
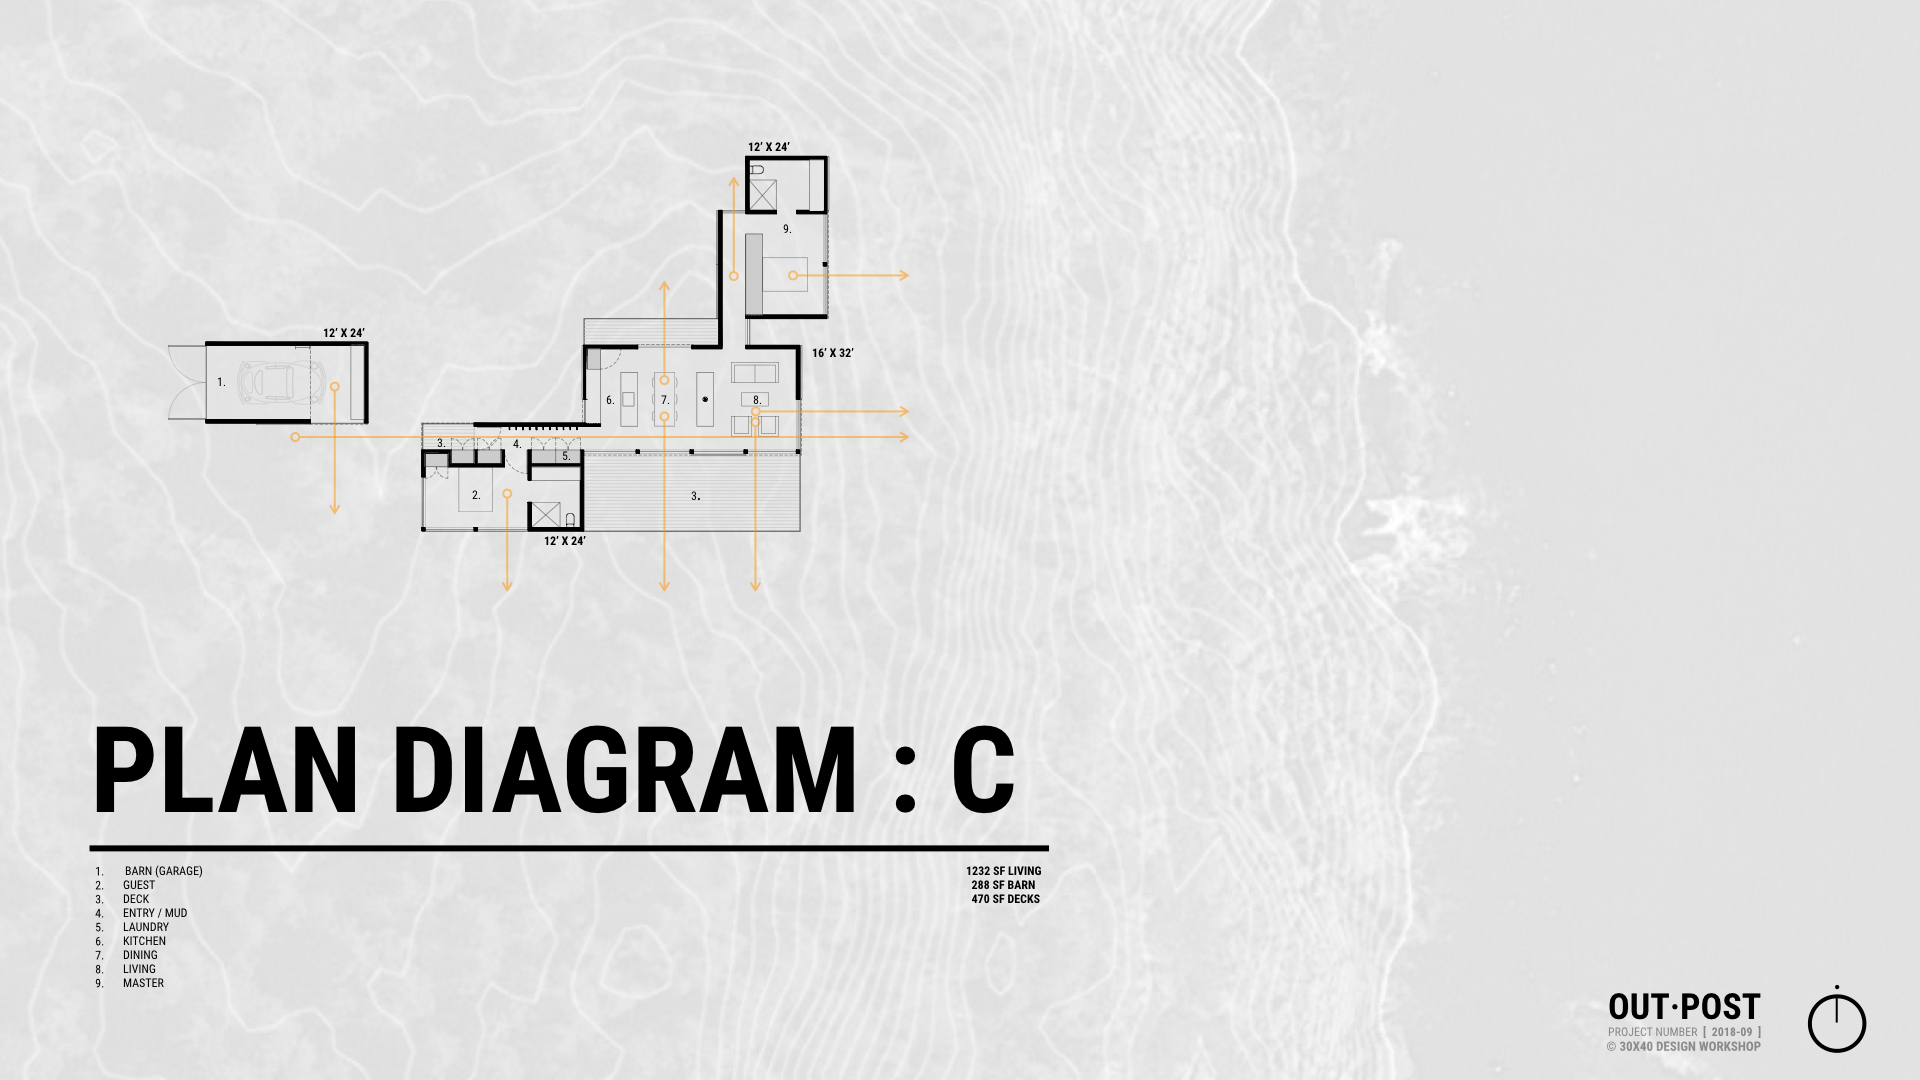
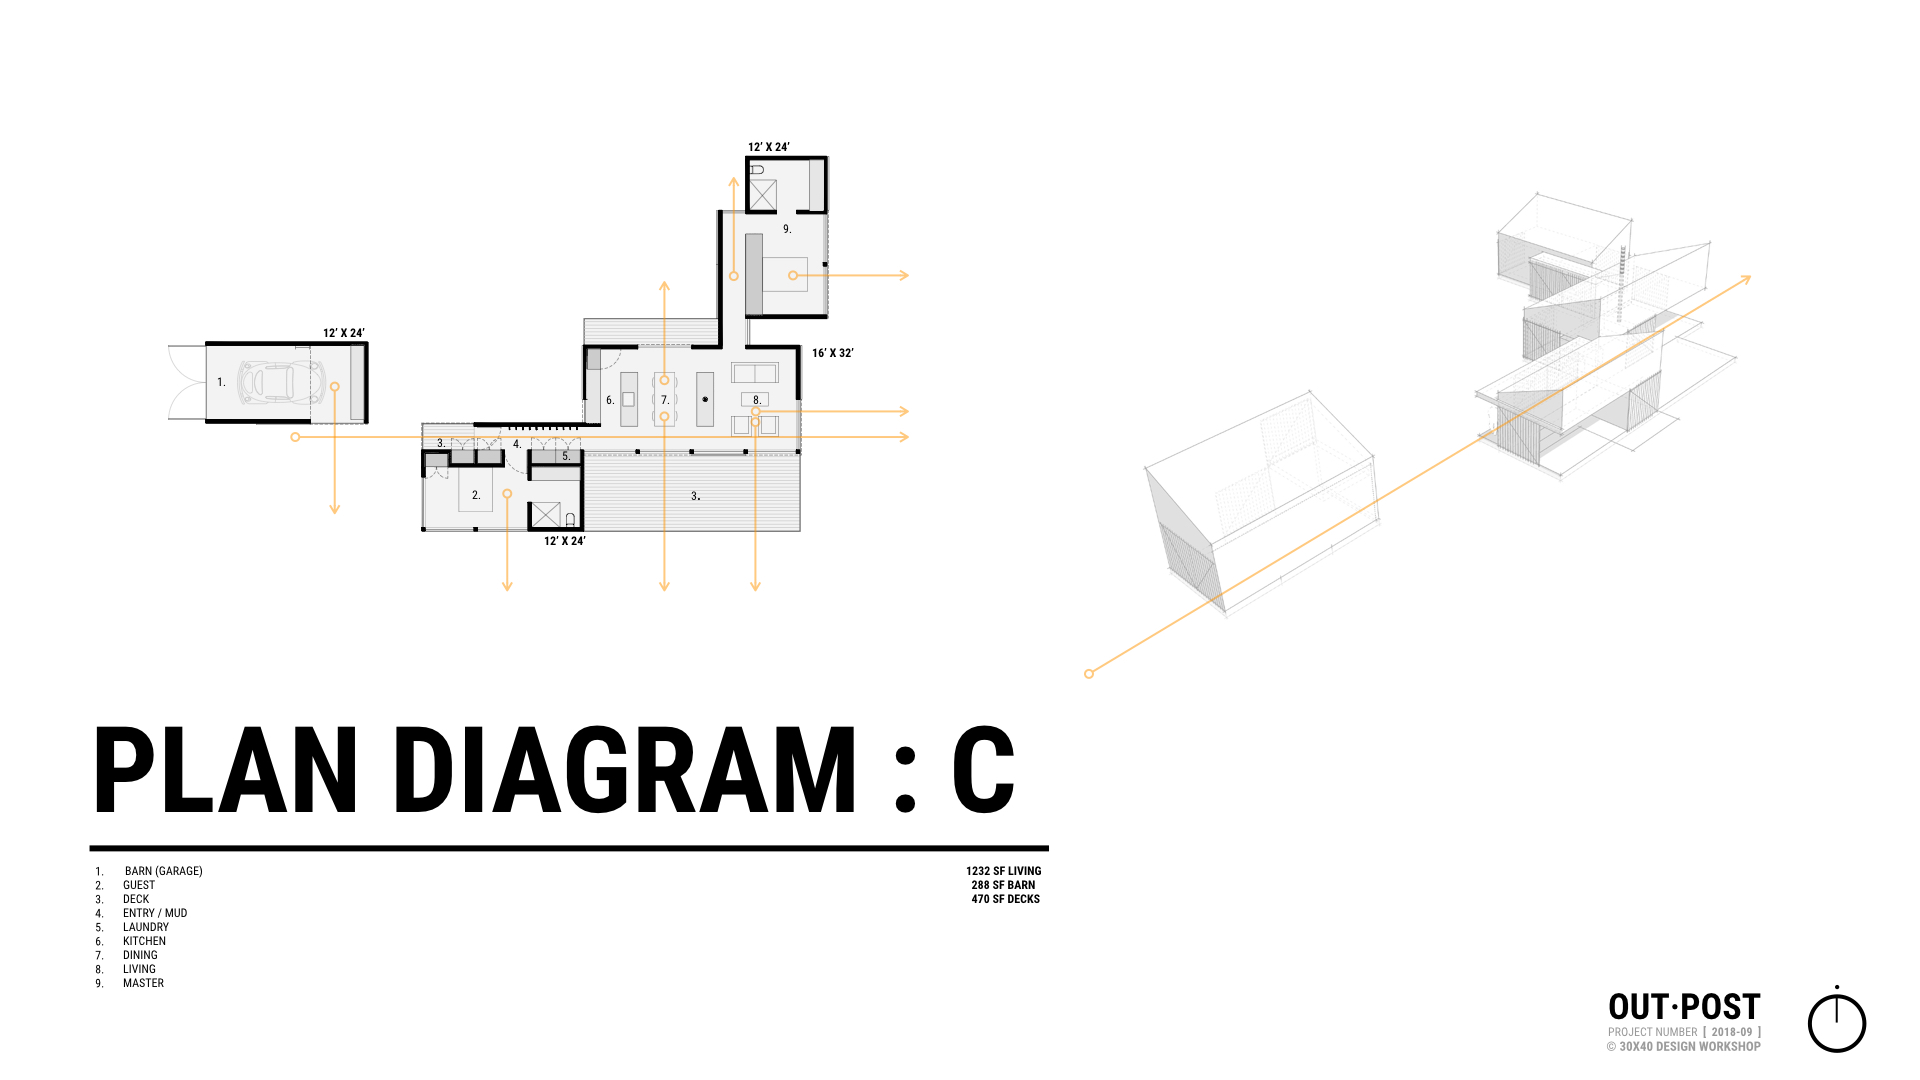
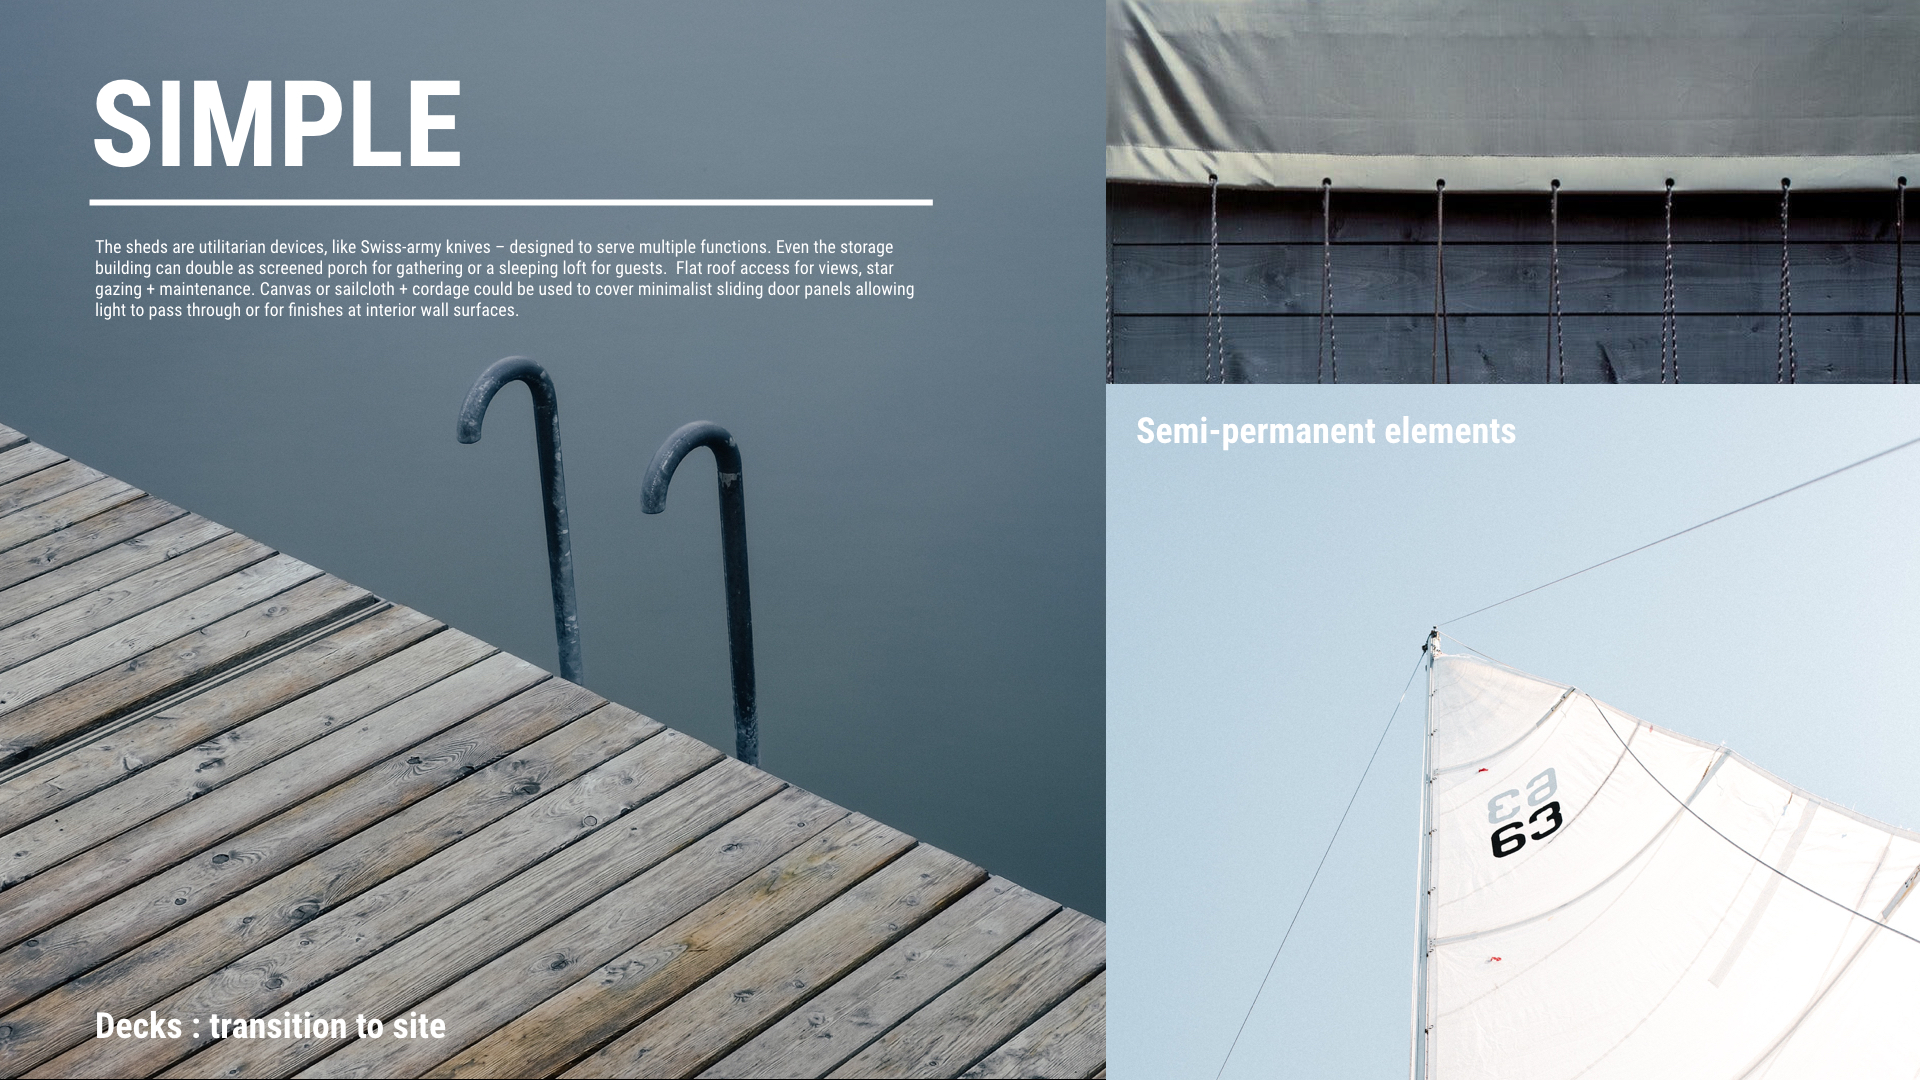
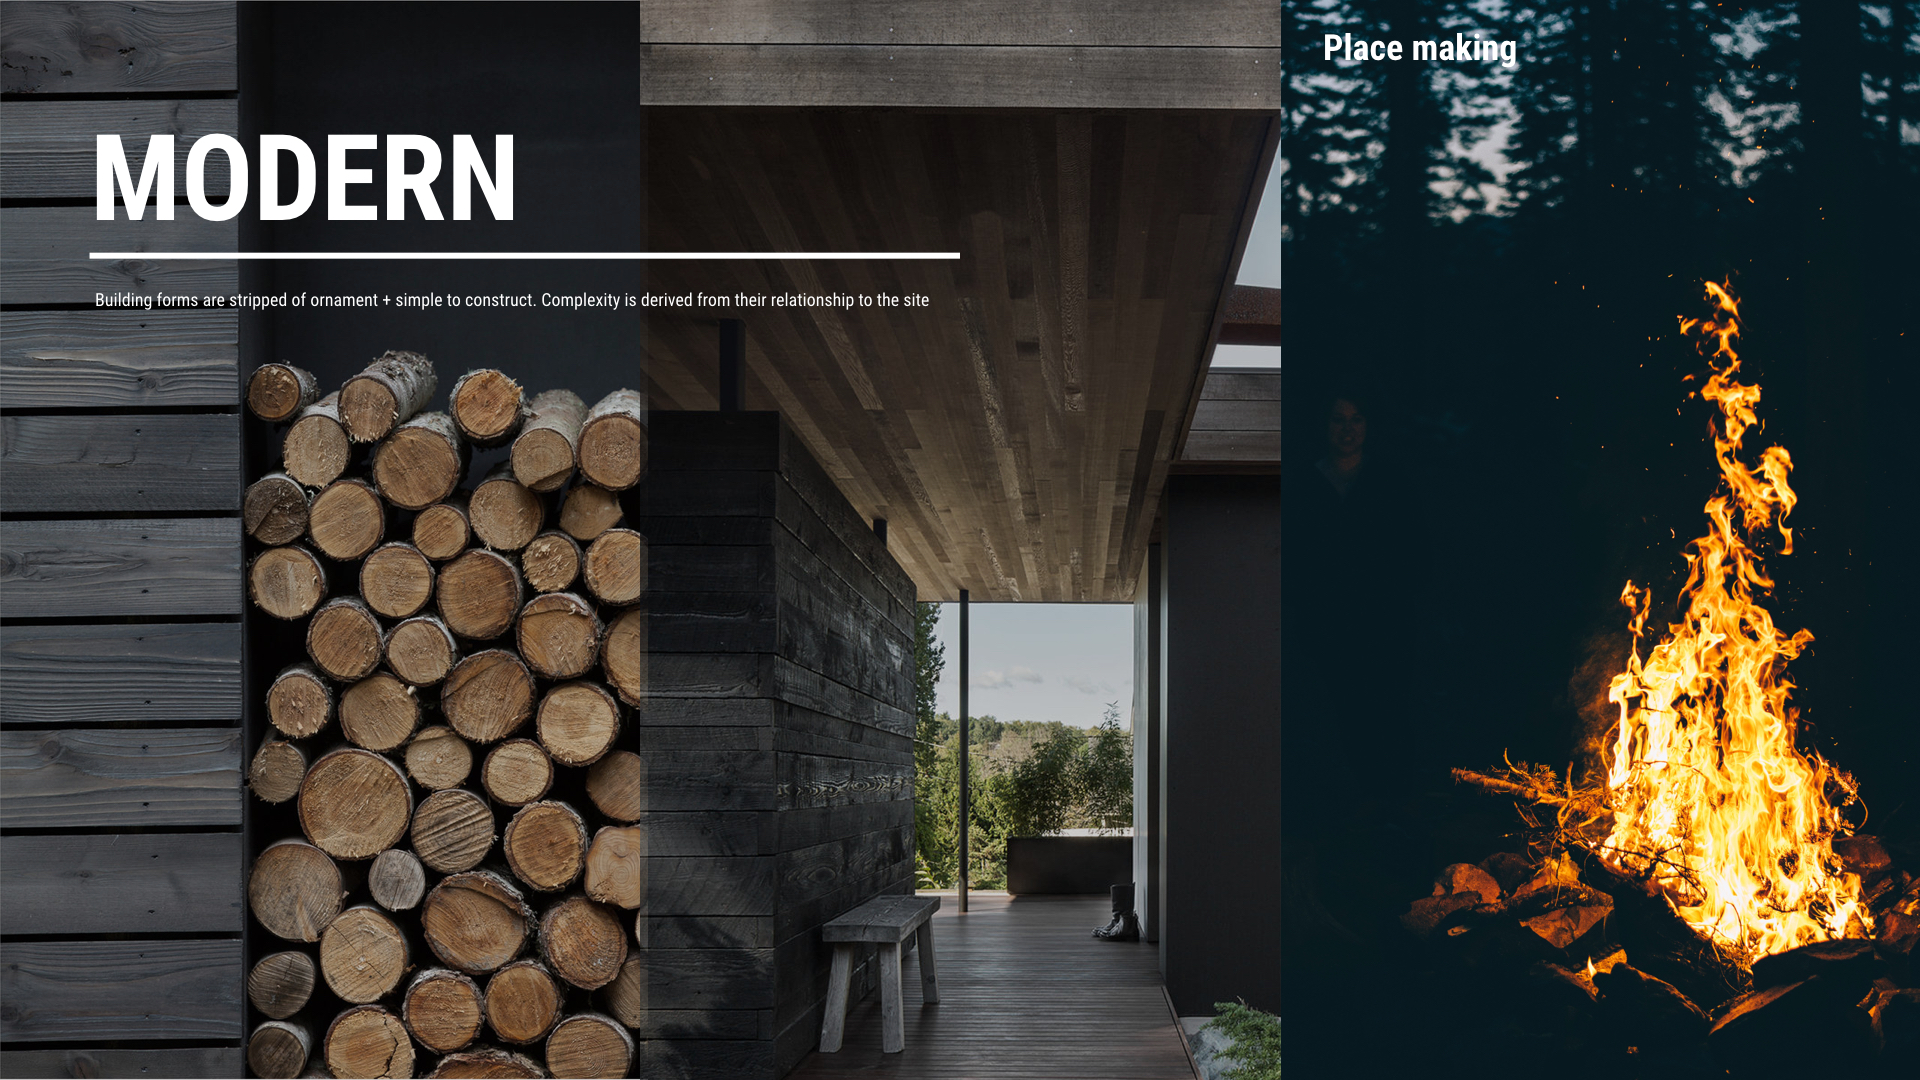
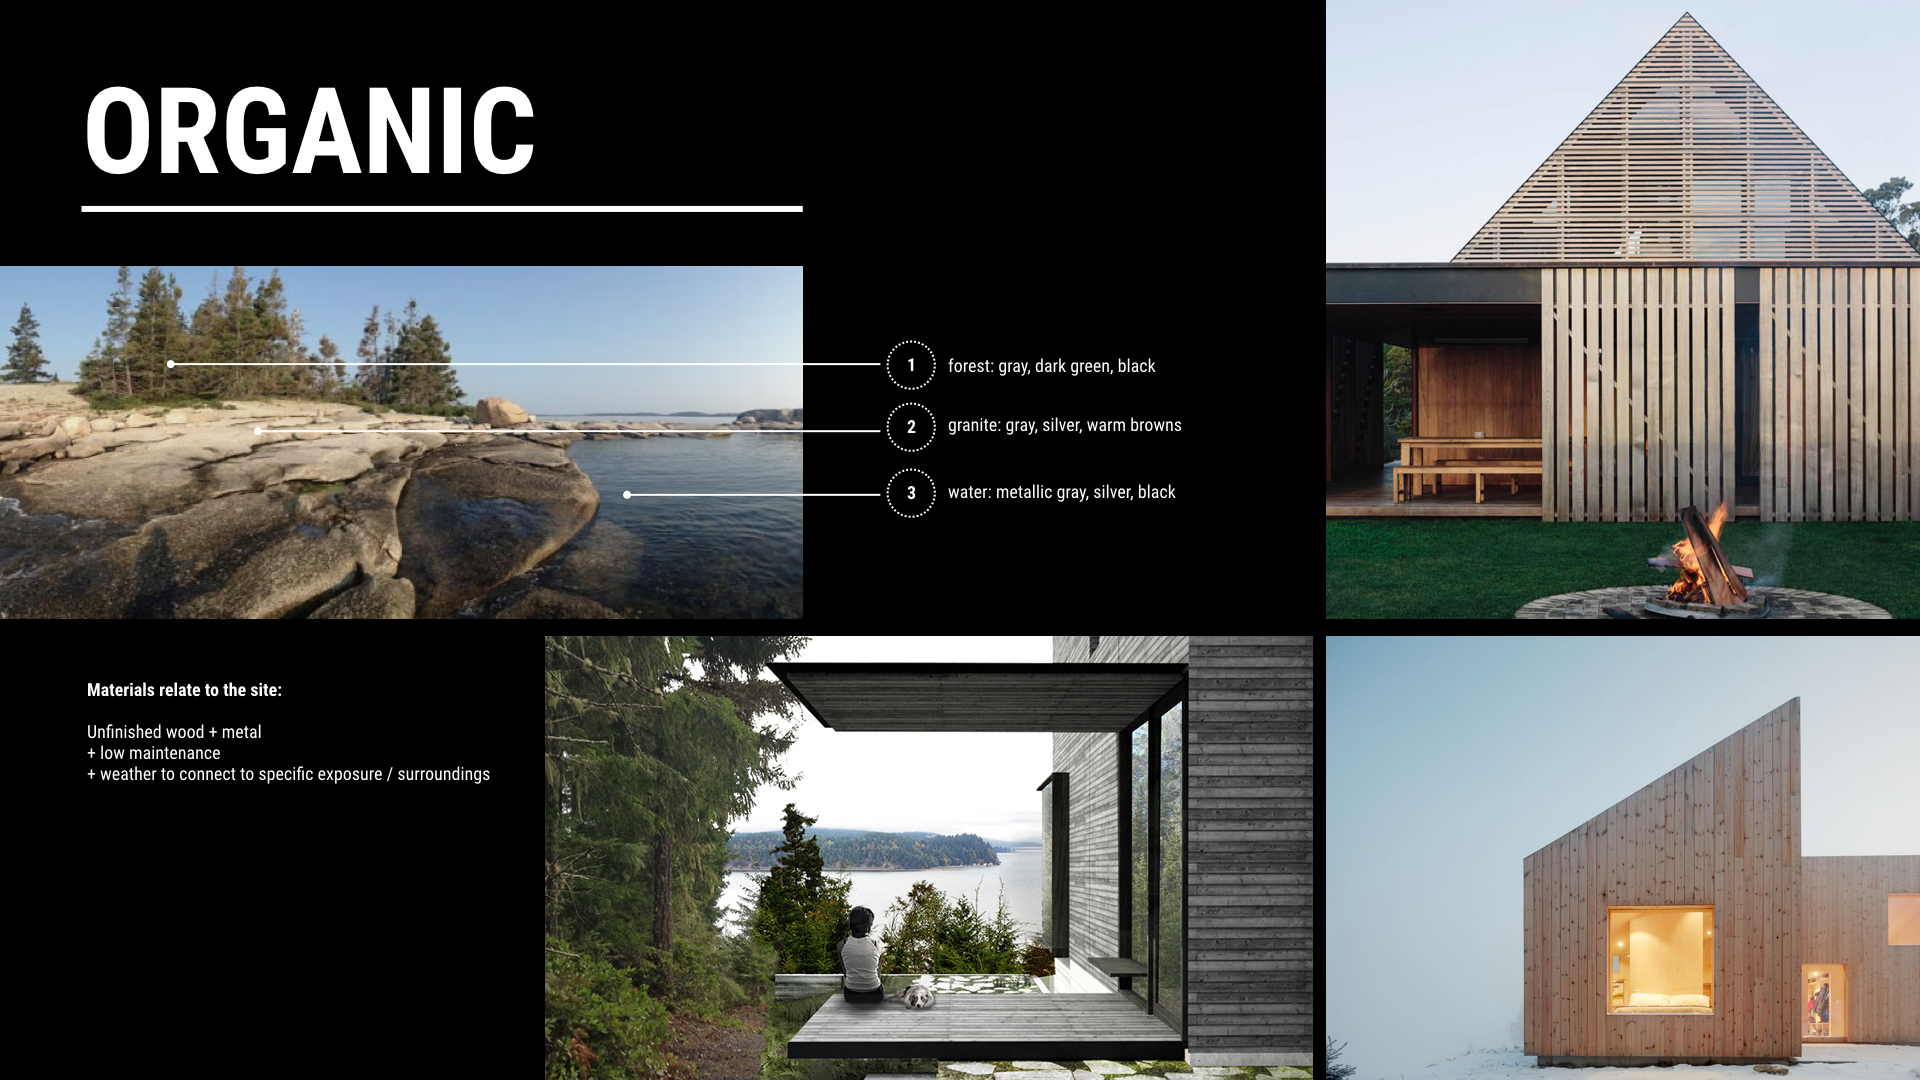
Schematic Design Presentation - The Outpost
Below are the slides from our meeting which was held on-site on July 3, 2019. The presentation was built in Keynote and presented on my MacBook Air (a larger screen would’ve been a better choice, alas, my MacBook Pro had a battery issue!)
Additional details:
Slide images: combination of visuals pulled from the project’s Pinterest board + unsplash.com
3D model: SketchUp Pro 2018
Diagrams: Keynote
Plans: AutoCAD LT


Site Visit Kit

MacBook Air (MacBook Pro with larger screen would be ideal)
Muji Pencil Case + Sign-pen + Kuru Toga pencil
Surveyor’s Flagging (to lay out building corners)
Small scale

DJI Mavic Pro ( Fly More Combo )
If you enjoy these videos, you can support 30X40’s work on YouTube by investing in a course, a toolkit or a digital tool. Many thanks!