I’m sketching design concepts for the Outpost project and an upcoming schematic design meeting in this video. Join me in the studio as I turn a rough concept into a digital model and schematic floor plans. This is the process I use for all my work. It begins as a mess and I iterate until it gets stronger and more coherent. The goal of the schematic design meeting is to settle on the architectural concept, choose a location on the site to locate the home and ideally a floor plan to move forward with.
Making a Site Model - The Outpost Project
Stacking up 50+ layers of cork to create a site model for our new residential project: The Outpost located on a remote island off the coast of Maine
Read MoreArchitectural Design Process : Form, Orientation and Sunlight
Learn how you can use the Sun to locate, orient, shape, and inspire the details for your architectural design. In this video, I walk you through the design process for a project whose form, orientation, and details were all developed by carefully analyzing the solar path on the building site.
Resources mentioned:
**White pen I'm using (+ loving)
**Get it Right with Amelia Lee - The Undercover Architect (podcast)
**Sunseeker app
Floor Plan Design Tutorial
In this design tutorial I'll show you how I develop and sketch floor plan ideas quickly. From diagram to rough sketch and on to more formalized plan layouts, you can follow along as I show you everything you need to draw a floor plan using one of our new residential projects as an example.
I discuss in detail:
- why you should start with diagrams (and not floor plans)
- information you'll need before drawing
- tools I use and recommend
- tips for developing better ideas
- form, space, and order (of course)
- using grids
- scale
- and what I listen to when designing...
Architecture Short Course - How Architects Begin the Design Process
All architecture begins with a concept. If you’re struggling to find one, curious as to what one is, or simply wondering how architects begin their projects, this short video course will walk you through the process I use and some of the techniques I rely on to develop architectural concepts all illustrated with one of my residential projects.
Very simply stated, a concept is an idea that underpins your project. To an architect, the concept is what distinguishes a work of architecture from a mere building. At its core, architecture seeks to solve problems. It’s the questions we ask that will determine which problems our architecture will solve. Developing a concept allows us to frame the questions we’re asking and it guides the design process. Choosing the starting point for your design can be intimidating and an early stumbling block for designers of any skill level. But it doesn’t have to be.
A concept shouldn’t be rigorous; the more malleable it is, the better. In fact, most architecture can’t be reduced to one singular concept diagram rather it’s informed by many concepts working in concert. There may be organizational concepts, material concepts, functional, or structural or formal concepts. Don’t fret if your design idea isn’t reducible to a single elegant black stroke on the page. It’s best to illustrate concept development with a real project as I said. So, we’ll use our Squid Cove Residence as an example. Before we can develop the concept, we have to first understand the practical constraints.
My design process begins only after gathering and assessing all the given parameters for a project. Now, this primarily consists of three types of information. There’s information derived from the site - things like: local climate, the prevailing winds, the solar aspect, vegetation, neighboring structures, the site’s history, and any unique liabilities or opportunities. The site of course also comes along with legal frameworks for development, which describe where and what we can and can’t build. The second type of information we’ll gather is from the client. Every client has a set of cultural beliefs and preconceptions, preferences and agendas. Of course, we’ll want to determine their budget, and understand the personality traits and organizational politics which might also shape the design. The client and the building type together determine what architects call, “the program” which is essentially a detailed accounting of all the spaces the building will contain.
And, the third type of information I gather is related to the building typology – is it a museum, a home…or a school for example? To learn about a building typology we often conduct an analysis of notable or relevant historical precedents. We want to know the essential problems these types of structures grapple with. Understanding the history of the archetype allows us to approach a problem from a fresh perspective. All of this is necessary information that we collect for every project. This inventory can also serve as the progenitor for the design concept – our seed idea. Rather than shunting creativity, these constraints often incite the creative process.
As with a good film, the setting, the characters, the cinematography, and the plot all conspire to make it what it is. It’s the experience you’ll recall rather than the concept per se. Sure, the concept sets the film in motion and it’s the starting point for all that follows. But this concept – the one or two-line description – can’t possible capture the richness and depth of the finished film…or in our case the architecture. Yet without it, the work is unfulfilling and so it should be clear that the concept is necessary for all our work as architects.
Be sure to watch the video for an inside look at how I craft an abstract idea into a home.
Exterior Lighting Concepts
There are two fundamental points to understand about outdoor lighting. The first is that we actually require much less light in outdoor living situations than indoors, which means the overall lighting can generally be more theatrical and less focused on tasks.
The second is that in lower ambient light situations, we actually prefer lower color temperature light (warmer); it’s actually visually more comfortable. Whether it’s our primal draw to the flickering flame of fire or the fact that warm light renders the skin so naturally, our outdoor design objective is to aim for low, warmly toned lighting levels.

In this video we'll review the general concepts pros think about when considering how to light outdoor spaces. Specific topics covered are:
- The Lantern Effect - using a structure's glazed walls to provide ambient light to nearby exterior spaces.
- Layering of light - ambient, task and accent light tips.
- Path lighting
- Color (and) temperature
- Object or sentinel lighting
- Fire
- Wall washing
- Dynamic range and dimming
- Uplighting
- Light pollution
An Architect's Design Process
I've recorded a two-part video describing in more detail the process of siting my own home, a modern longhouse. This expands on some of the concepts presented in my previous video post and supports it with a real world example.
Part I
Part II

fallen birch
There are a couple of important points that I didn't get to in the video. First, the idea of a modern longhouse was a derivative of the site, it wasn't a preconceived strategy. However, having used this plan I can see merits on many different types of sites, it's a versatile and economical plan to construct. But, back to the idea behind the longhouse concept. The swath of fallen birches, the proximity of neighbors, the solar aspect and the surrounding forest suggested a longer house to exploit the variety of textures surrounding us. We adopted the idea of a longhouse for three reasons: one because it was an historical archetype of Native Americans that settled here long before we did. Two, because the idea of the longhouse suggested a simple (and affordable) way to unite a family under one roof, the original longhouses housed up to 20 families under one roof. And, three because it suggested more broad site connections to the swath of fallen birches we were clearing away to make our home.
As I said in the video, I'll be using our longhouse as a teaching tool in future videos and posts...stay tuned. If you haven't looked over the portfolio images yet they're located here. Please leave a comment below or feel free to contact me at eric@thirtybyforty.com with any questions.
Siting Your Home - An Architect's Tutorial
There's a lot of 'ground' to cover when talking about choosing the ideal location to place your home and given just how individual each site is it would make for a very long video. So, I've outlined my process in more detail here to help guide you from purchase point to design concept. I'd love to hear from you, let me know if this helped in any way and as always you can send your questions to eric@thirtybyforty.com
YOUR SITE
This is where it all begins. More often than not, the site is a strong generator of building form and orientation, as well as material and color for my buildings, so this step is a critical one. The site is the genius loci for your project, wine makers call it terroir and understand that the site is the key to the ultimate flavor of wine. The site is really important to me and it should be to you too. It can be the raw land you’ve purchased, an empty building lot in a subdivision, the street on which you bought a row house, or even the floor of a warehouse you purchased.
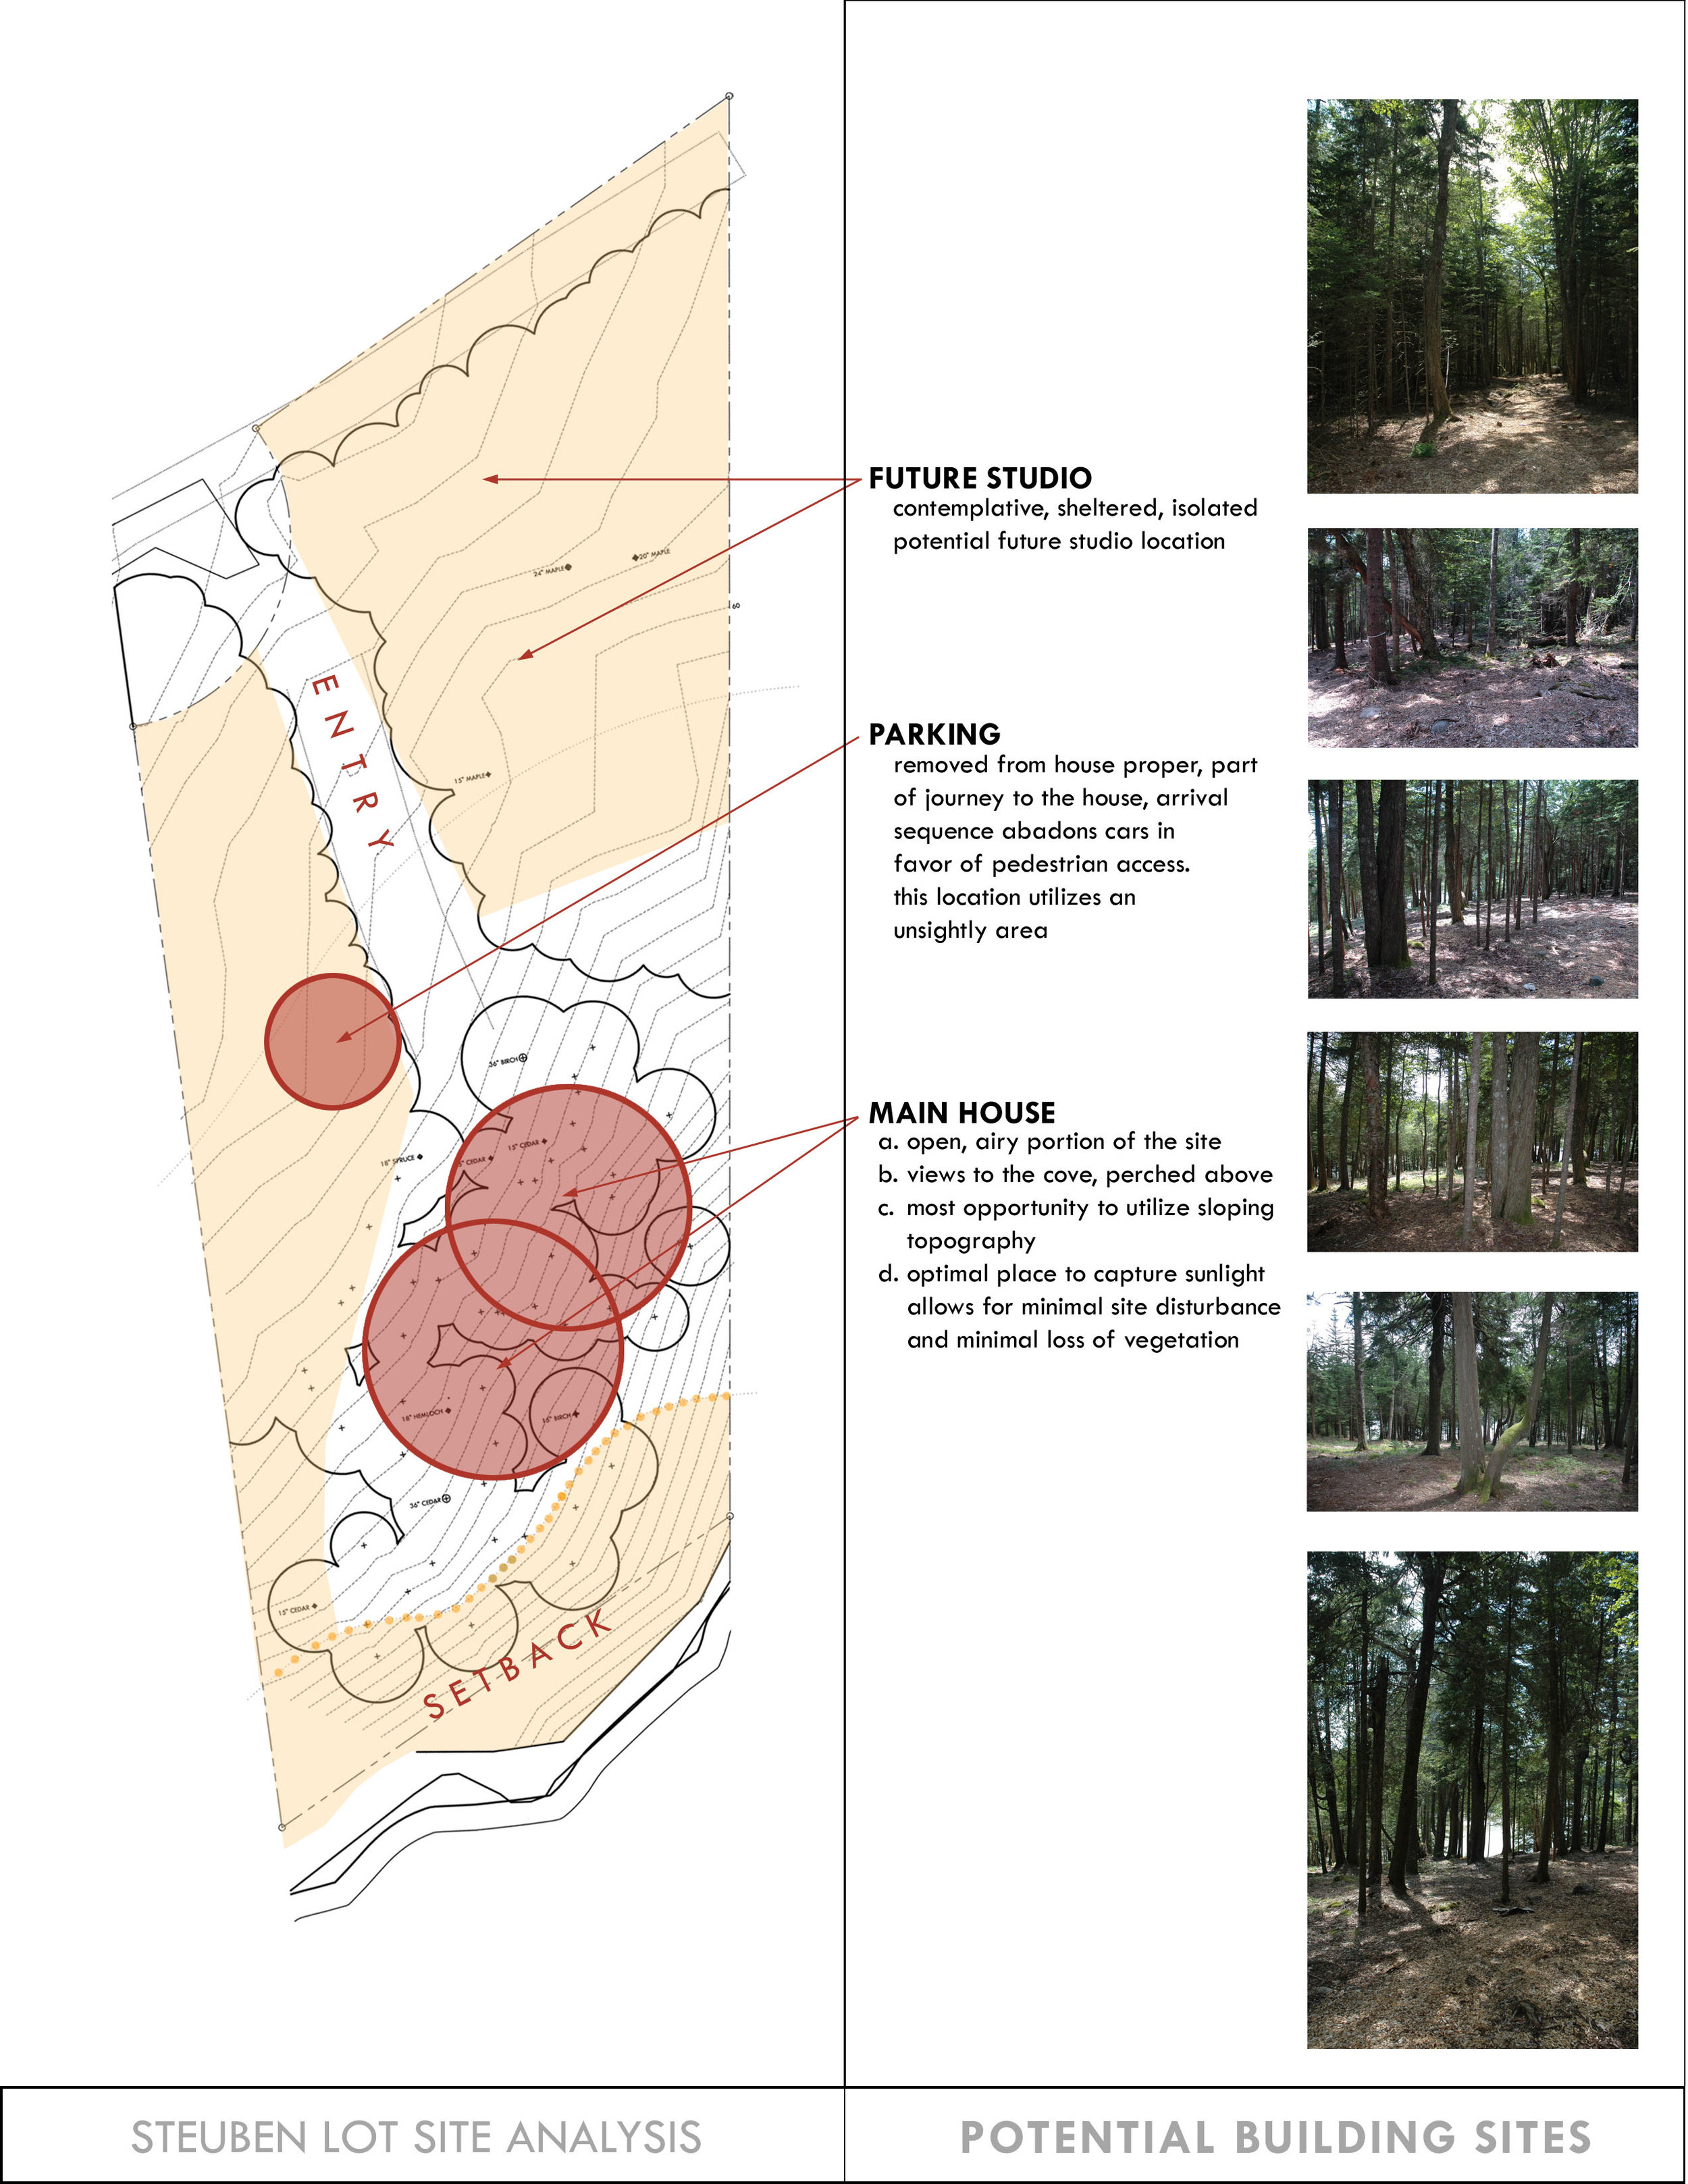
b_siteananalysis_2
Sites vary widely in their scale and reach but they all share some basic characteristics. The site will have topography, it will have utilities and if it’s remote enough and doesn’t have utilities then you’ll need to plan how you’ll get things like power, phone, cable, water supply and how you’ll address things like sewage disposal. Sites will all have access points and boundaries. Depending on your particular situation it may have streams, forest, a significant tree, an orchard, lawn, a glacial erratic, wetlands, a lake or pond, even other structures and roadways.
More broadly, your site exists within a cultural context and a set of local building traditions. If you’ve lived near your site for a long time, you’re probably aware of these. If you’re new to the area observe your surroundings, read a little about the history of your area. I always take clues from industrial or agrarian structures, which derive maximum benefit from minimal expenditure. These structures plainly exhibit local know-how because their limited budgets require it. Their choice of materials reflect local building norms and practice and while many may be in a state of disrepair, look more deeply for the origins of these selections.
DOCUMENT EVERYTHING

siteimpression
It’s important to document as much of this information as you can, within reason. I begin by walking the site without anything in my hands. This allows me to focus on important site features (and avoid tripping) without distraction. I make mental notes of things that stand out, where the sun is, where the wind is coming from, views, sounds. If the site is urban, this will entail walking the neighborhood, think of your site as everything within a 5-10 minute stroll. If possible, visit the site at different times of the day, and at least once in the morning and once in the evening. You’ll come away from these site walks knowing a lot more about the site and surrounding area than you had before. Take photographs from a variety of vantage points. This records the site pre-intervention and serves as a nostalgic record (think before-after photos). Additionally, your building permit process or design review board may require them and you’ll reference them at various times during design as a source of inspiration. Document all of this in a sketchbook, on your tablet, with a voice recorder, whatever way you choose. I usually quickly sketch my impressions in a diagram, which is my way of visually hardwiring this information. I find it easier to recall when I have to generate it by hand.
If your site has varied topography, sits on a hillside, near a stream or if it will be subject to stringent review by a design review or zoning board, you’ll probably need a survey. There are basic surveys and there are boundary surveys. The type you will require will depend on your specific situation, but more often than not you’ll only require a basic survey. A boundary survey will be required when your deed doesn’t specifically outline the property lines or if there is some questionable division of your lot. This isn’t a normal situation, but if you purchase this type of lot it will require deed research by a law clerk to determine historical land transfers, which, isn’t cheap.
If you do require a survey, contact a local professional land surveyor and ask how much a basic survey would cost. Local surveyors are a great resource to tap and meeting one on your site can provide insights into lot history, neighbors, contractors and potential pitfalls regarding the local permitting process. Be sure to pick their brains, their local knowledge is often invaluable.
TIP: if you’re looking to save money have the surveyor provide you with 2’ contour only in and around the area you’re considering building. You can walk the site together and with some surveyor’s flagging map out an area together. They can help you determine other site features you may have overlooked and decide whether you’ll need to locate them on the plan or not.
SURVEY BASICS
Reference Point
Property Lines
Other Structures
Flood Elevation
Driveways
Utilities
Contour/Topography
Significant Trees
Other Significant Features
Setbacks
REFERENCE POINT
Always have your surveyor set an elevation benchmark or reference point. This is usually in the form of a nail set with orange flagging somewhere on site and tied back to their plan and noted as E.R.P. (Elevation Reference Point).
PROPERTY LINES
Have them locate the property lines per your deed.
OTHER STRUCTURES
Sheds, nearby houses, garages, barns, silos.
FLOOD ELEVATION
If you’ll be living in a flood plan, you’ll need this for insurance and the bank will require it for loans.
DRIVEWAYS
Existing, other access points.
UTILITIES
Power (overhead/buried), propane tanks, gas lines, cable, water, sewer.
CONTOUR
In surveyor-speak, this refers to the exact elevation and slope of the land. Contour lines on a map connect points of similar elevation. These lines are set at a specific interval depending on the scale of the map. Many topographic navigation maps use a 20’ interval, with each line representing a 20’ difference in elevation from the adjacent line. The closer the lines are together on the map, the steeper the site is and conversely, the farther apart the more flat the site is. For your purposes, a 2’ interval should be sufficient. If you’re very concerned with how closely your building will adhere to your site contour you may wish to have a 1’ interval mapped, but this will be twice as expensive as the 2’ option.
SIGNIFICANT TREES
If preserving trees are important to you, have him pick up the trees within that zone that are greater than 16” in diameter.
OTHER SIGNIFICANT FEATURES
Water bodies, fencing, stone walls, etc.
SETBACKS
If there are setbacks from waterlines, wetlands, easements or restricted areas ask them to locate those on the plan as well. Always request a CAD file and PDF of their work. This will help save on survey costs, which can add up quickly. Survey costs in Maine as of publication date range between $3500-5000 for a basic survey around a building site with 2’ contours indicated, tied to the National Geodetic Vertical Datum (NGVD).
TIP: Google Earth is a great tool to see your site in context at a variety of scales. You may even find historical views and maps of your site as a layer within Google Earth. Print out the most current view of your site and use it to document your findings, it’s a great way to conduct a no-cost site analysis and see your site from a different perspective.
A few other items to consider at this stage:
1) Deed: secure a copy of your deed if you haven’t already and review it to be sure there are no restrictions listed that would prevent you from doing what you’re proposing. Pay particular attention to easements (number of structures allowed, utilities, view, access, etc.). You’re legally bound to this document even if the town doesn’t have jurisdiction to enforce it.
2) Septic system: if your site doesn’t have access to a municipal sewer system you’ll need to hire a soils scientist to design a subsurface wastewater disposal system. Basically a septic system.
3) Power: contact your local utility to verify the process and more importantly, the timeline, for getting power to your site. If it’s far from the grid expect to pay between $10-$20 per foot to construct overhead primary power line. Buried power line, as you’d expect, is more expensive and depends on site conditions (bedrock, streams, etc.)

site analysis
DIAGRAM
Once you’ve compiled as much of the information above, add it to your SITE file folder. You'll use all of this information to diagram the site. It need not be particularly good looking or graceful, it only needs to be useful. This synthesis of information usually quite quickly highlights areas of the site to be developed and suggests areas to explore. It may even result in design concepts. The diagram at left led me to a design concept for the house which I proposed for this site based on the idea of a camera lens. The gradation of light and view along with the existing site textures set in motion a particular thought process that led to this and other concepts for this property. My video describes a more fluid way of looking at all of these technicalities together but in the end, the goal is to get to a diagram that clearly describes the limitations of the site which at the same time graphically represents the possibilities of the site.
As always, I'd love to hear your thoughts and questions about your site, please feel free to contact me. Please subscribe to my YouTube channel if you'd like to keep up with future workshops.