Notion for Design Professionals

We all want to use our time efficiently and minimize effort spent on the administrative side of our design practice. Searching endless folders or open tabs for links to products you swore you found last week, trying to recall the milestones you agreed to or where the current Gantt chart lives and share it with the team isn’t a good use of anyone’s time.

I use Notion for all of this and more.

Notion has served as a second brain for me for a few years now; it’s the best “all-in-one-productivity and project management tool” I’ve found for both personal and professional documentation. It’s intuitive, capable and infinitely flexible; a blank canvas that can be almost anything you want. The open-ended structure is a strength when you know how to use it, but can be a little intimidating when you're just getting started and unsure of how to set up your workspace.

If you’re unfamiliar with it, watch the videos below to get set up; continue reading if you’re already using it see how I’ve set my workspace to run my design practice.

Getting Organized

Every Sunday I plan my Weekly schedule which is simply a favorited page that resides in the upper left corner of my workspace. I use the Maker’s Schedule + Manager’s Schedule as the structure for the week to keep me on-task. Also notice the annual objectives (set in the video above) are just a click away and serve as a reminder of the bigger goals and priorities I’m working toward each year.

I used to live in my inbox with the window open and collecting emails all day long. Every notification lured me back to the inbox, wasting my time and distracting me from the deep work that needed doing. The work that would push my business and projects forward. Maybe you can relate?

Using Notion has changed that. Now, I live in my “Week of” board which makes explicit the priorities I’ve set on Sunday rather than my inbox which is filled with the priorities of others.

Week Of Schedule Page (click the image to enlarge)

Below the schedule, I keep two to-do lists, one related to home the other for the business and a task table which is linked to my calendar. This is a great place to catalog recurring tasks you might otherwise neglect: like your annual architecture license renewal, LLC document filings, annual reports, etc. I also use it to schedule my regular monthly invoicing, which is something I’ve been getting better at over the years. I invoice every client, every 4 weeks, no matter what (setting a reminder in the task table is really helpful when you have multiple projects running).

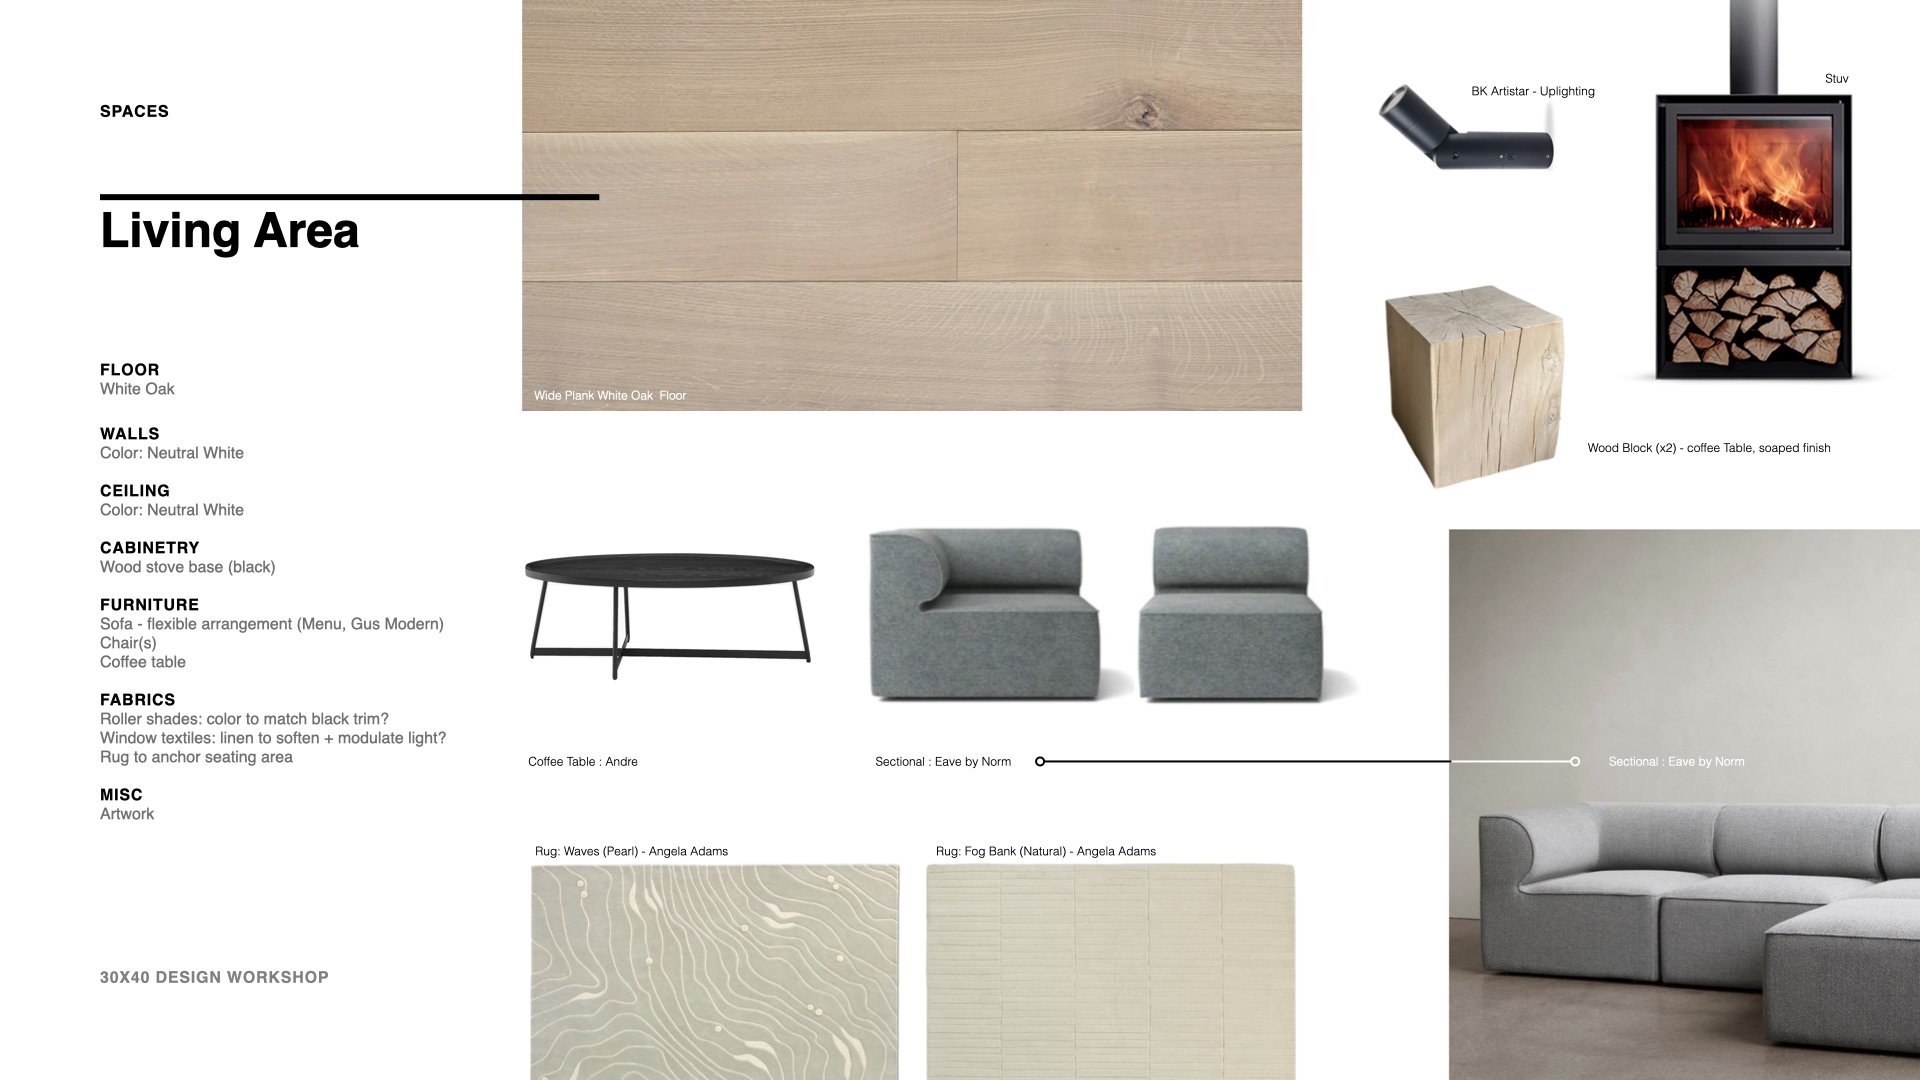
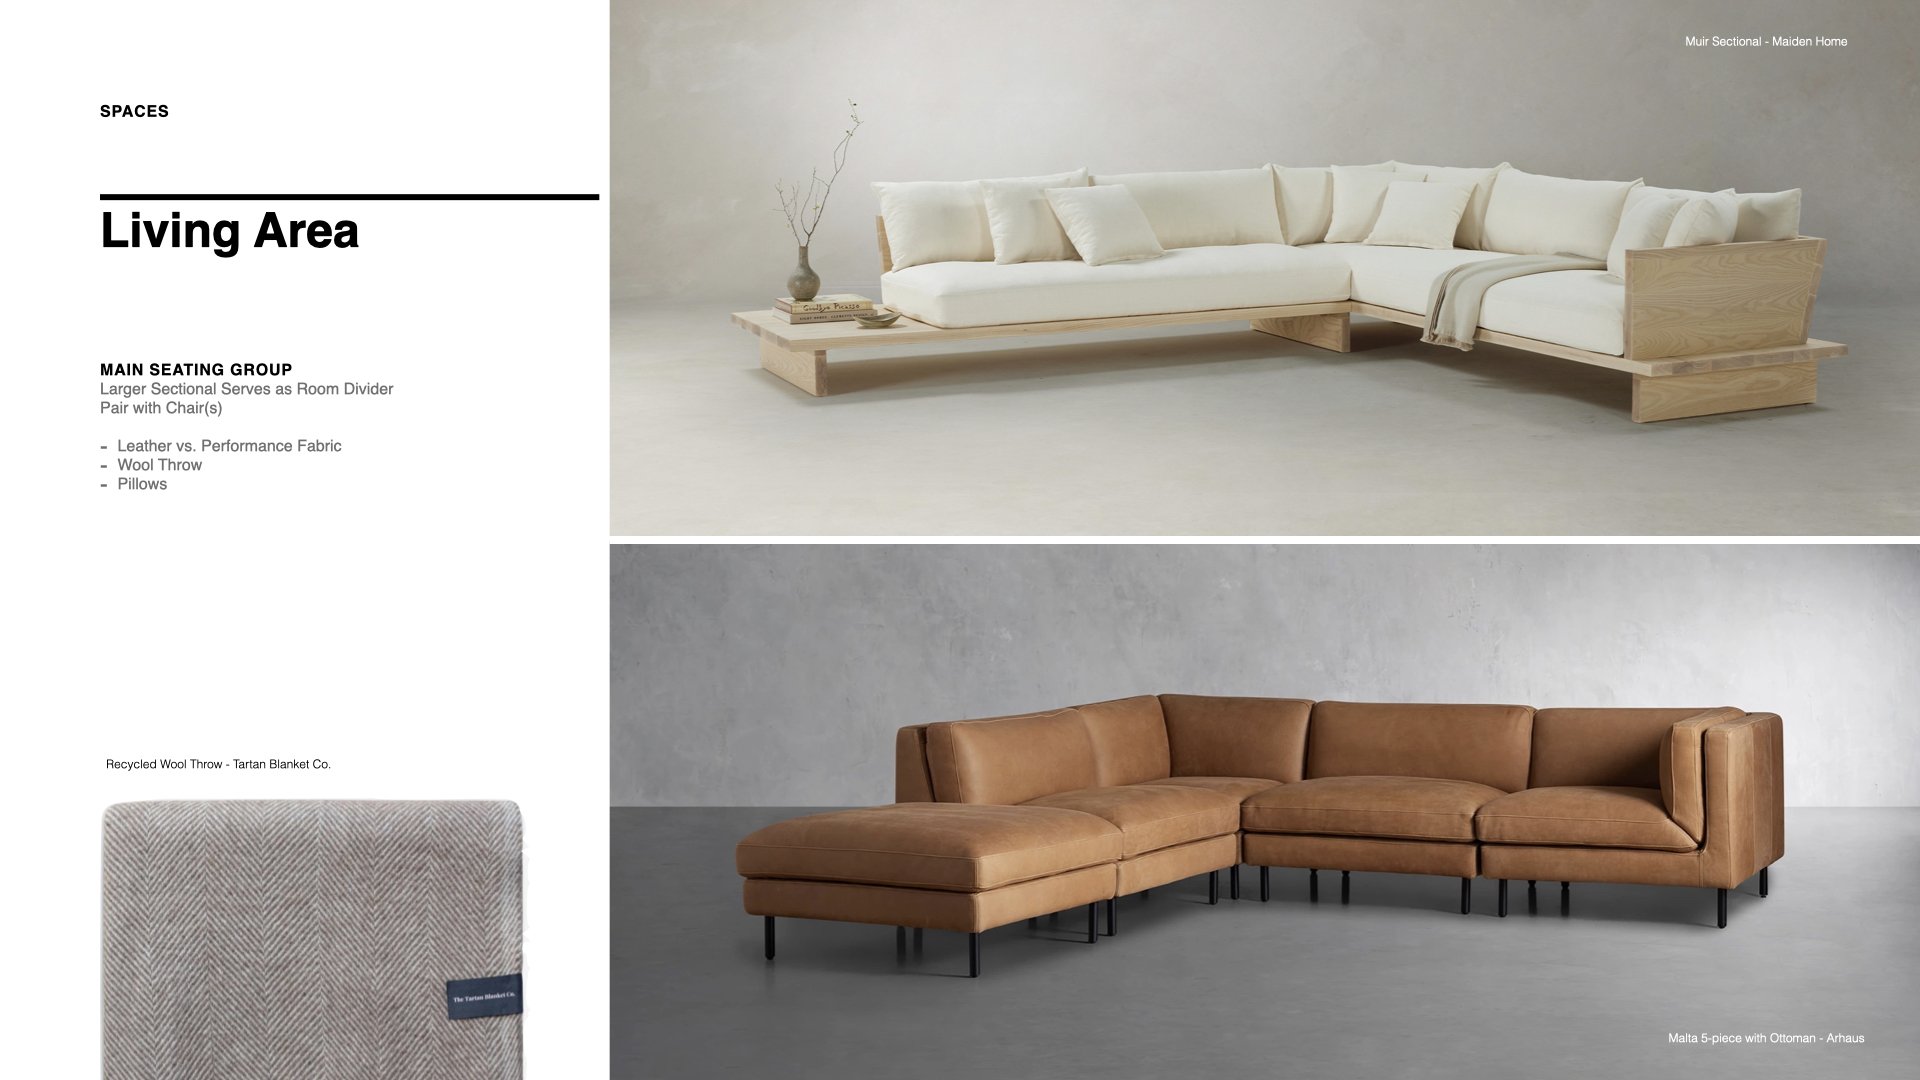
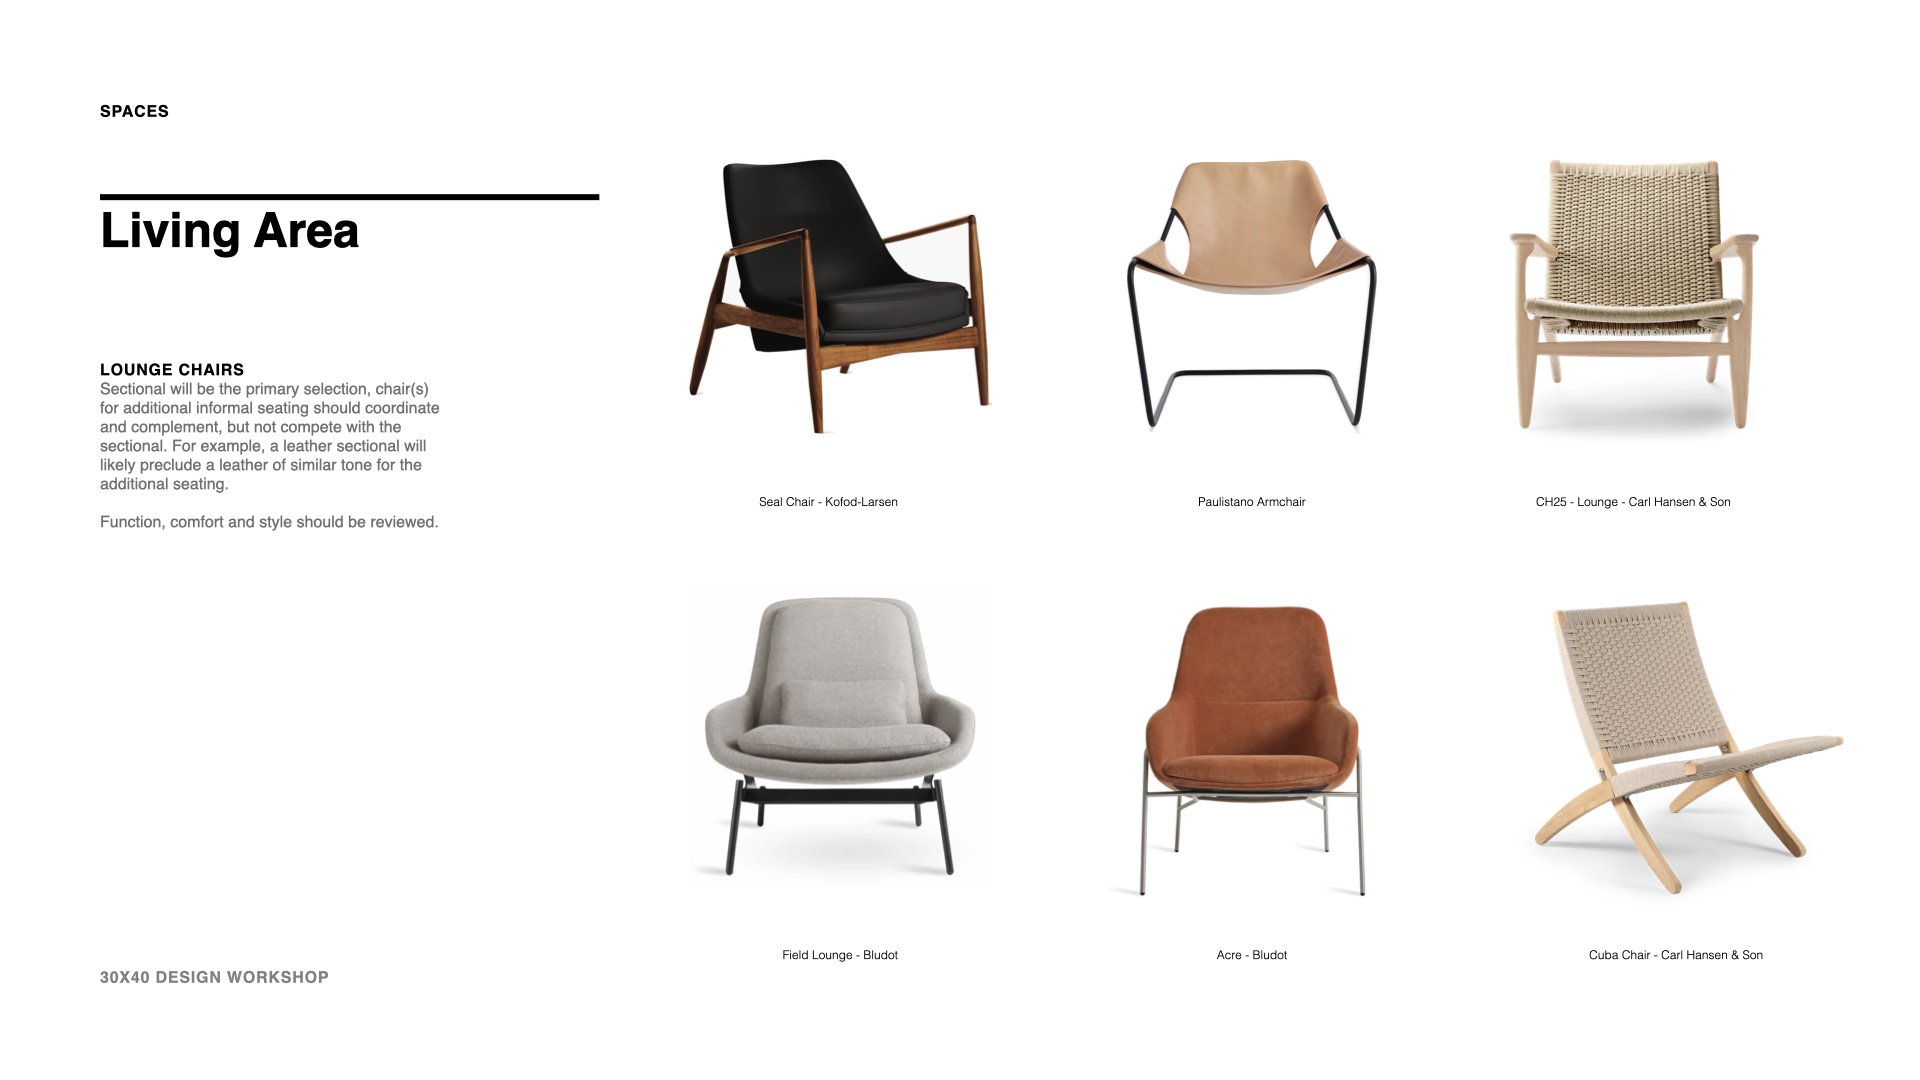
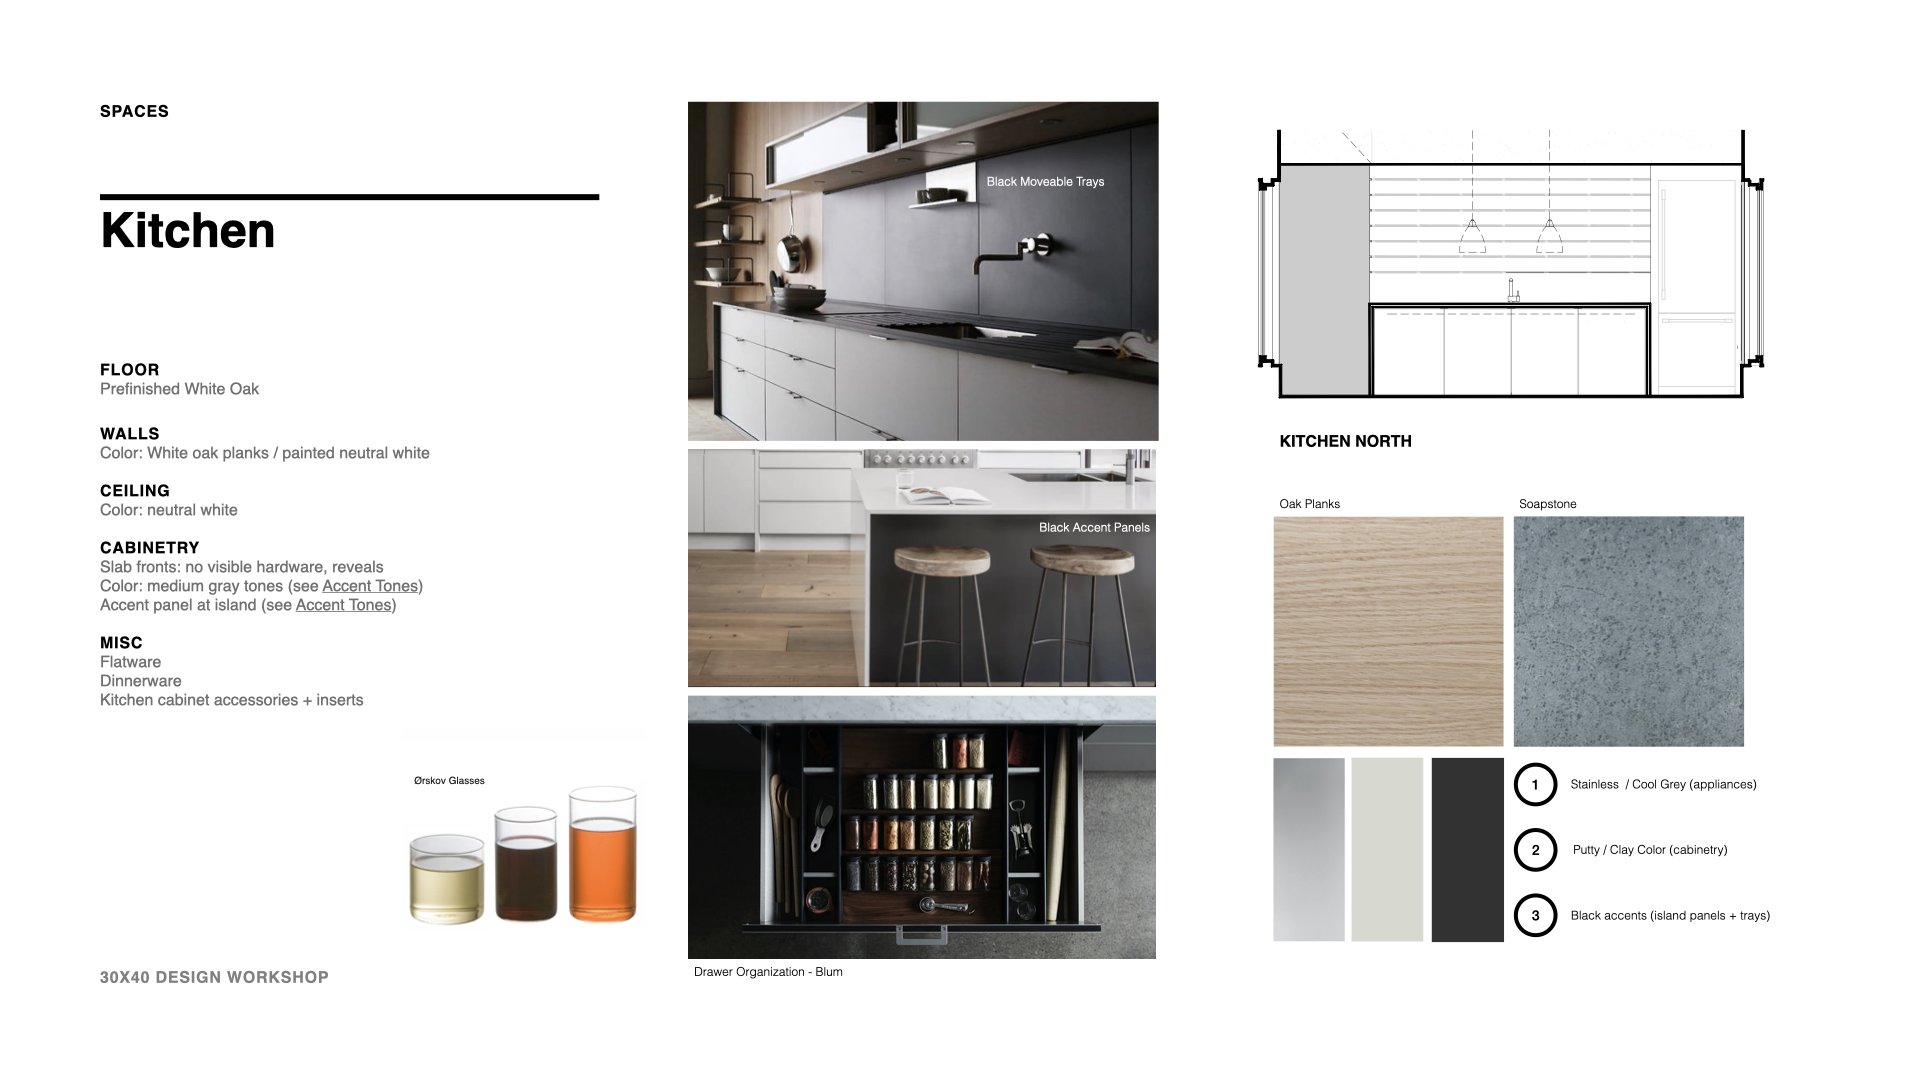
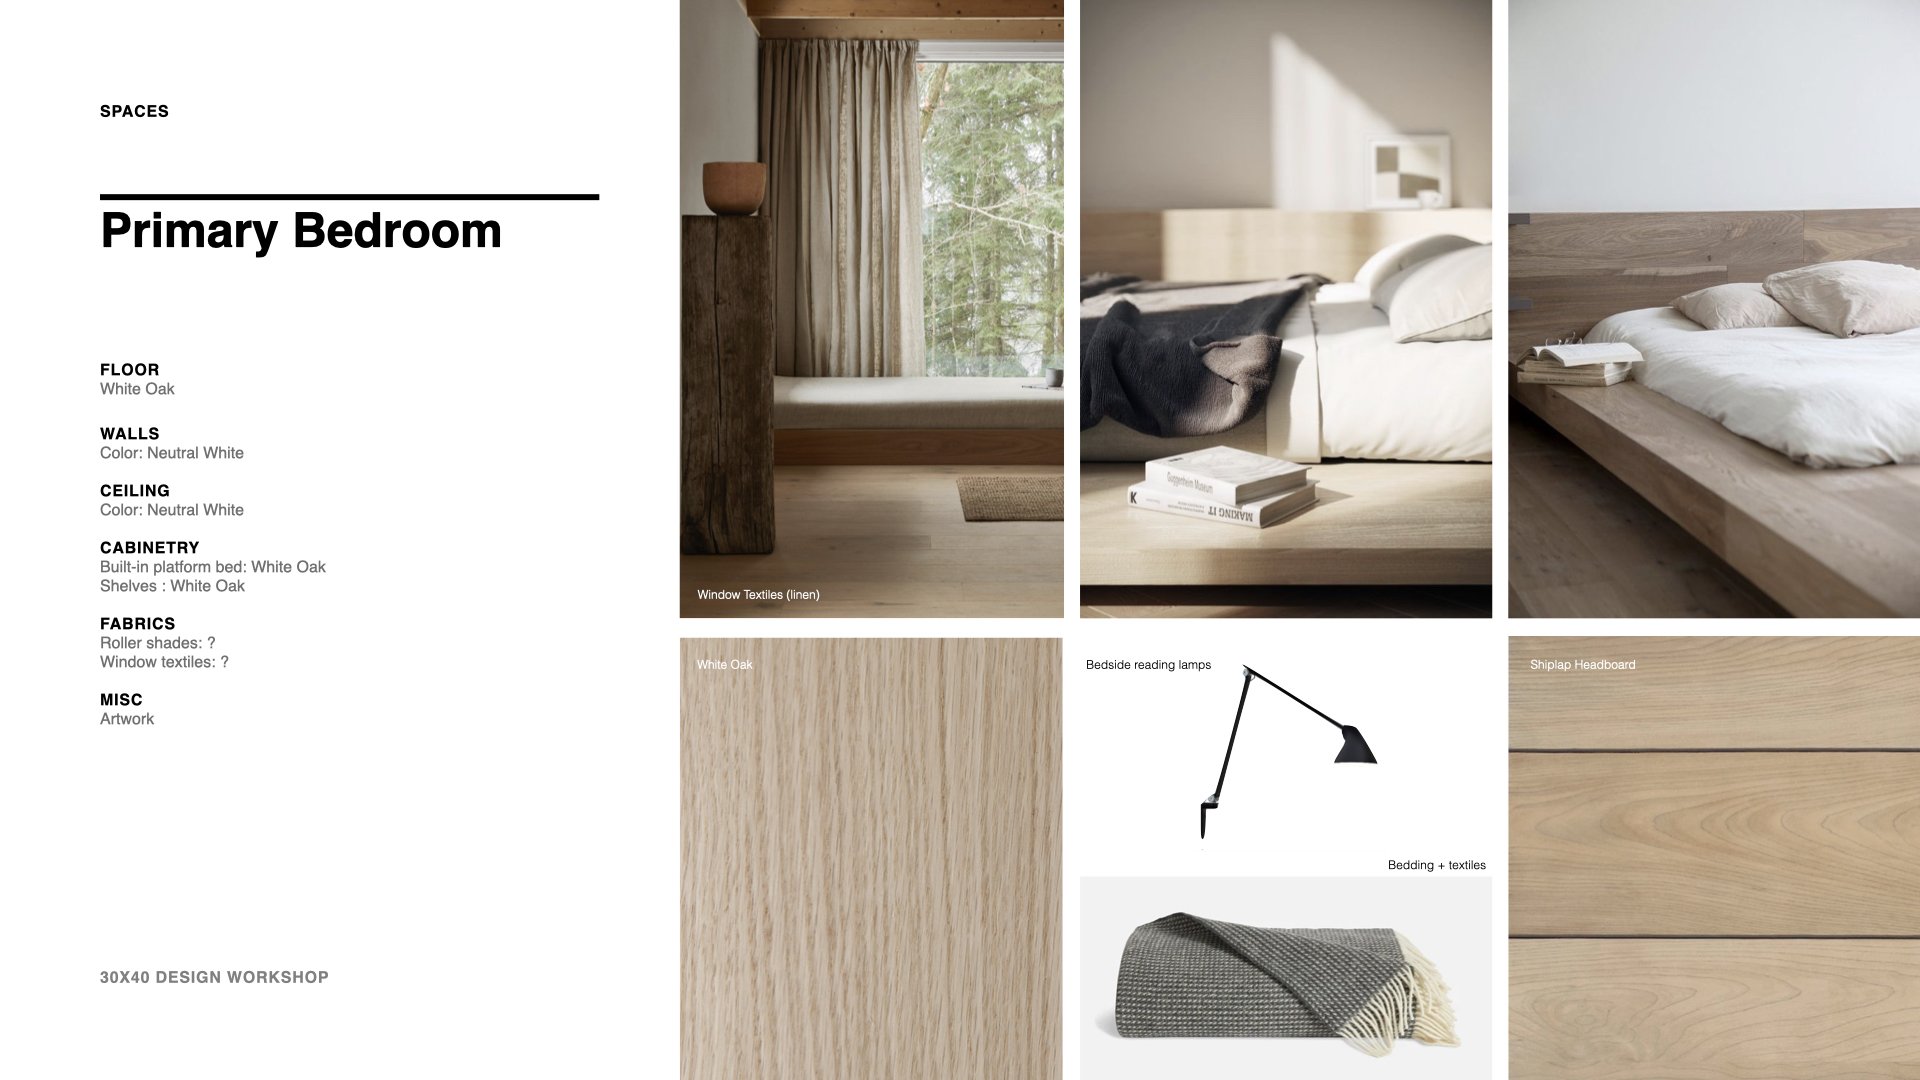
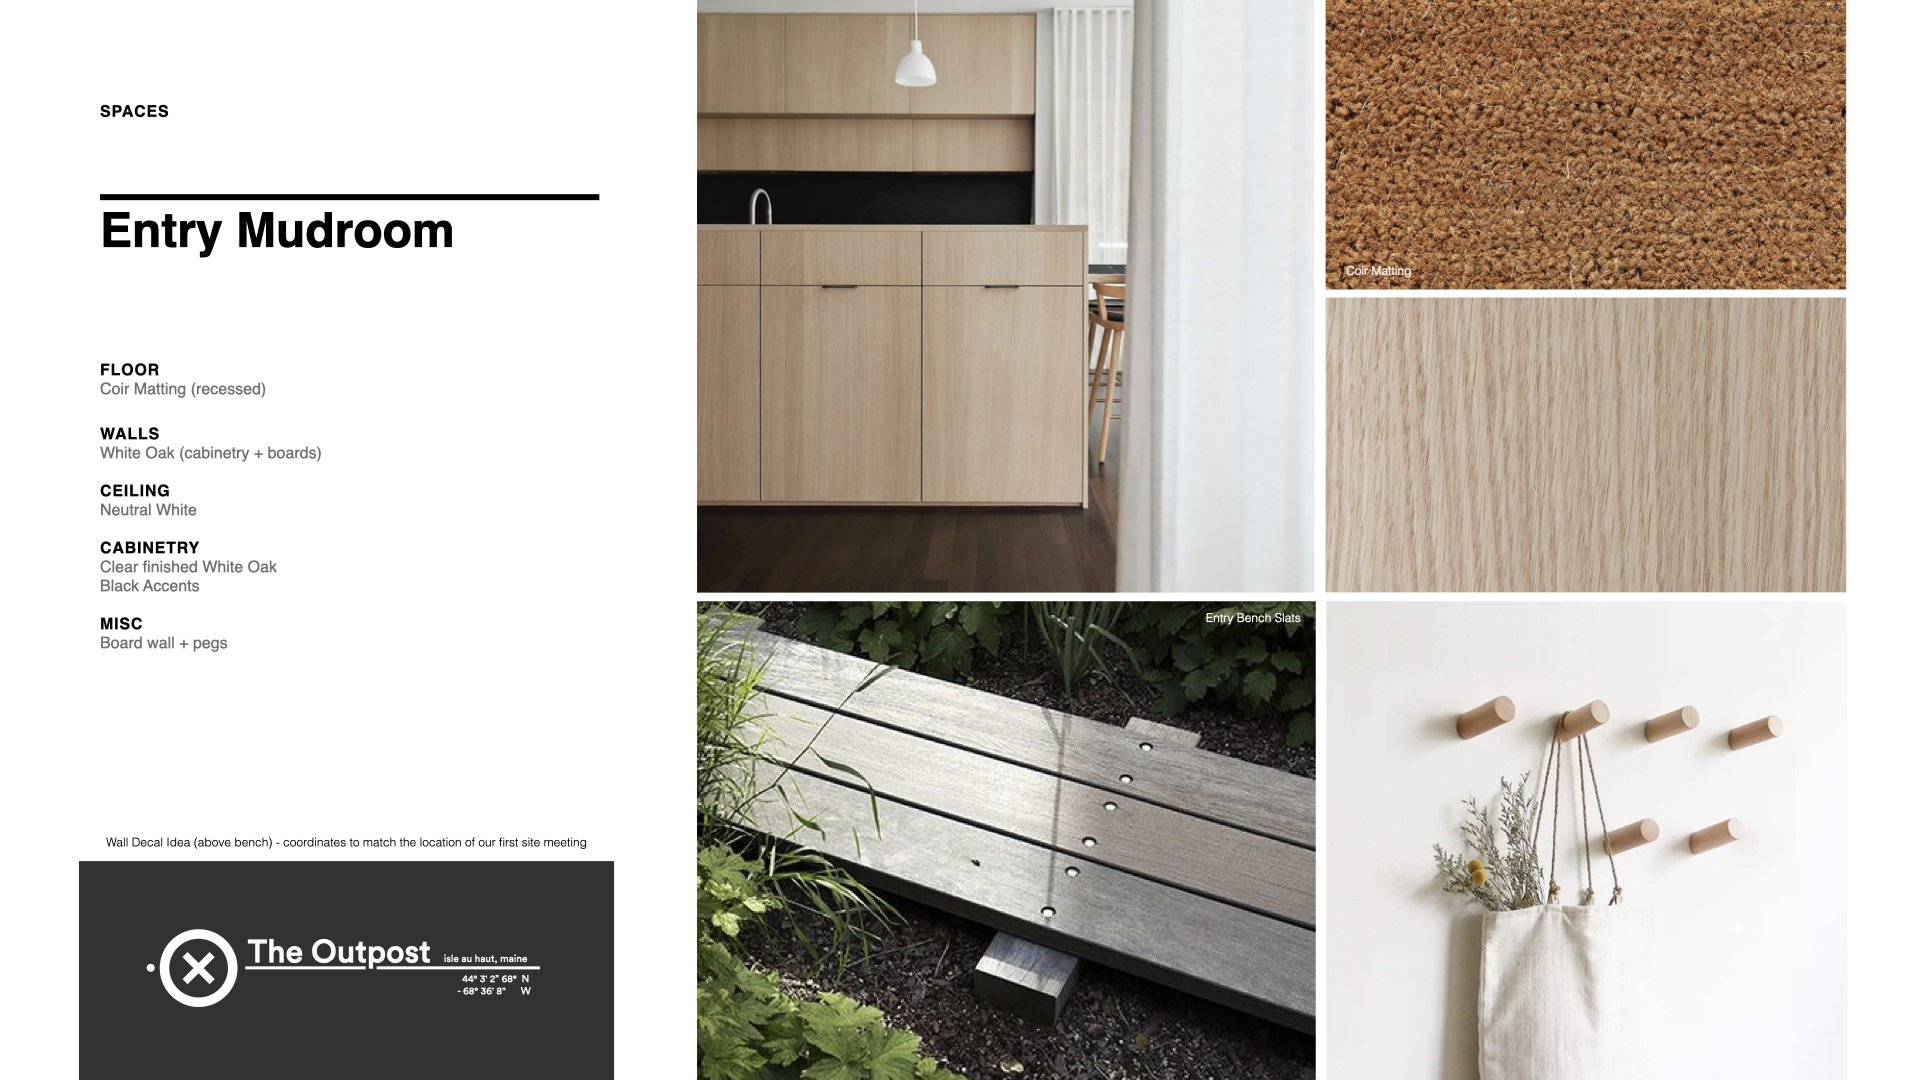
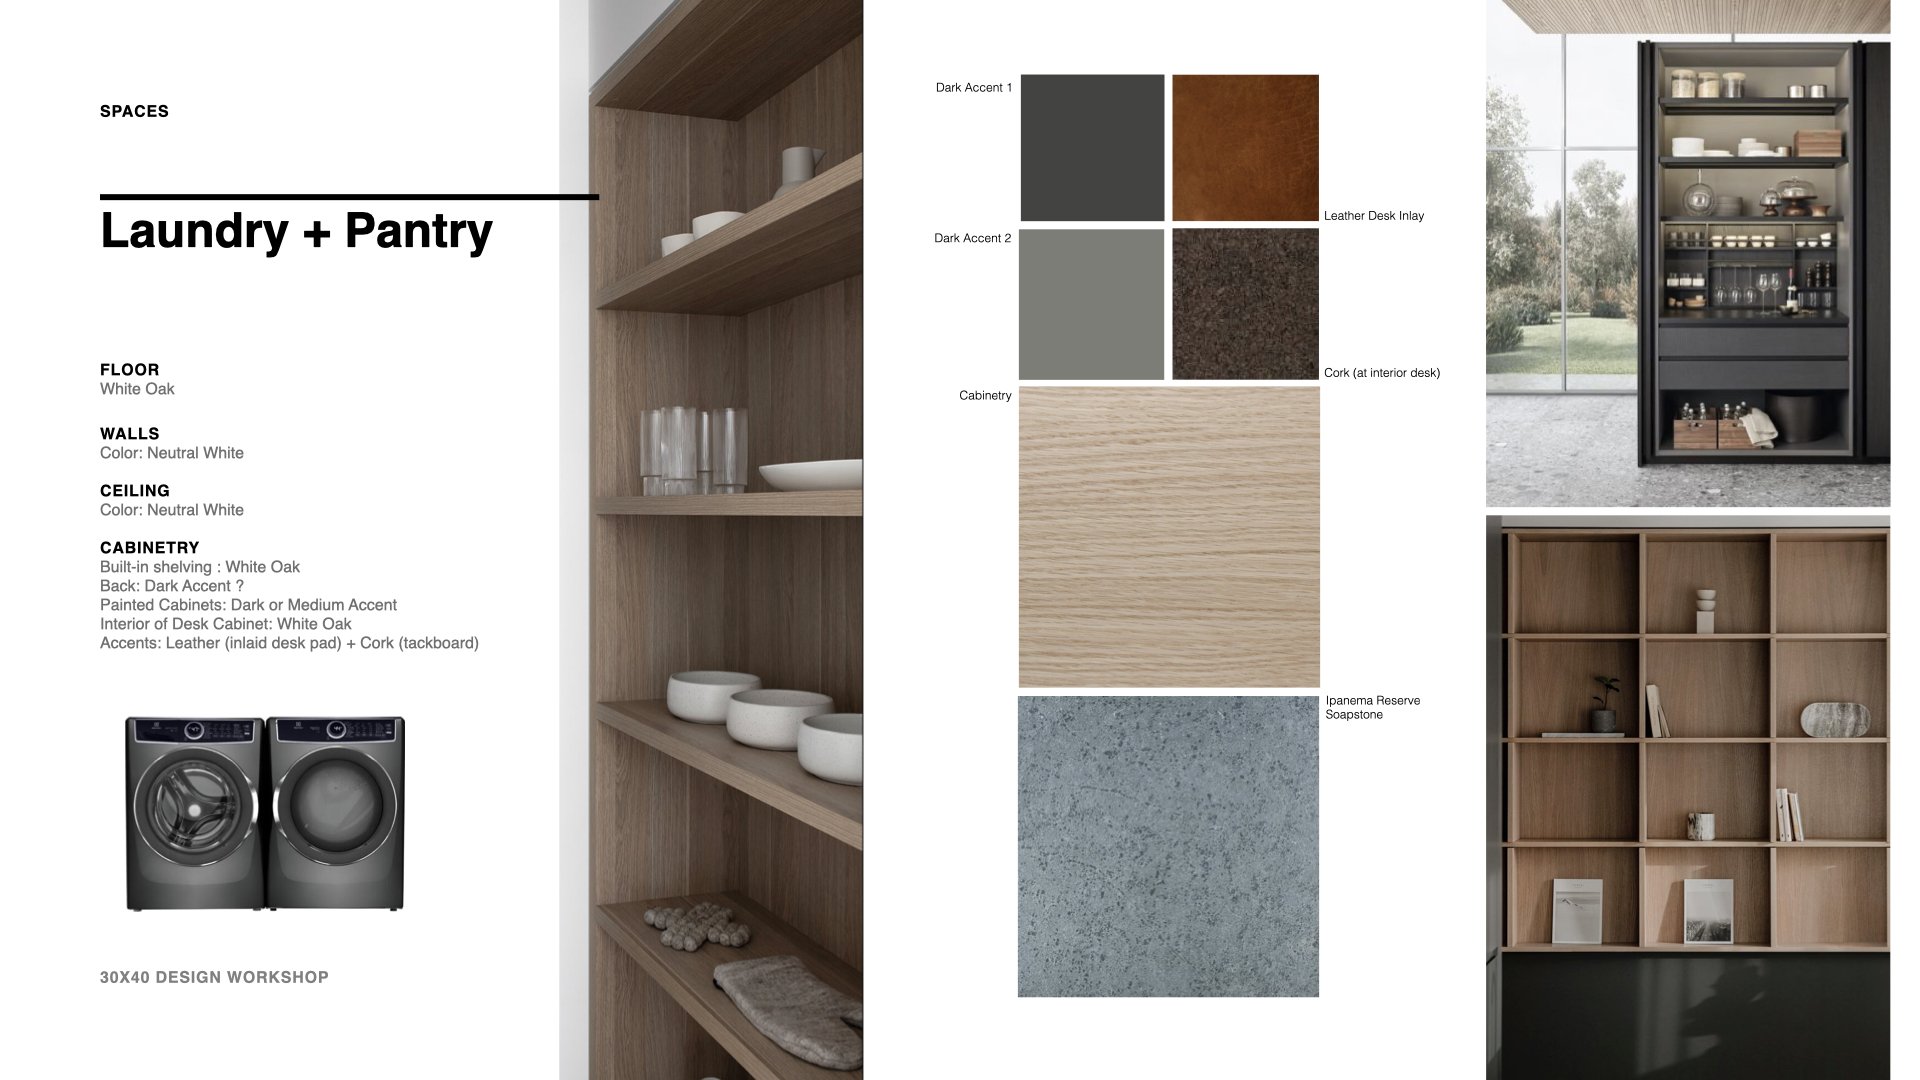
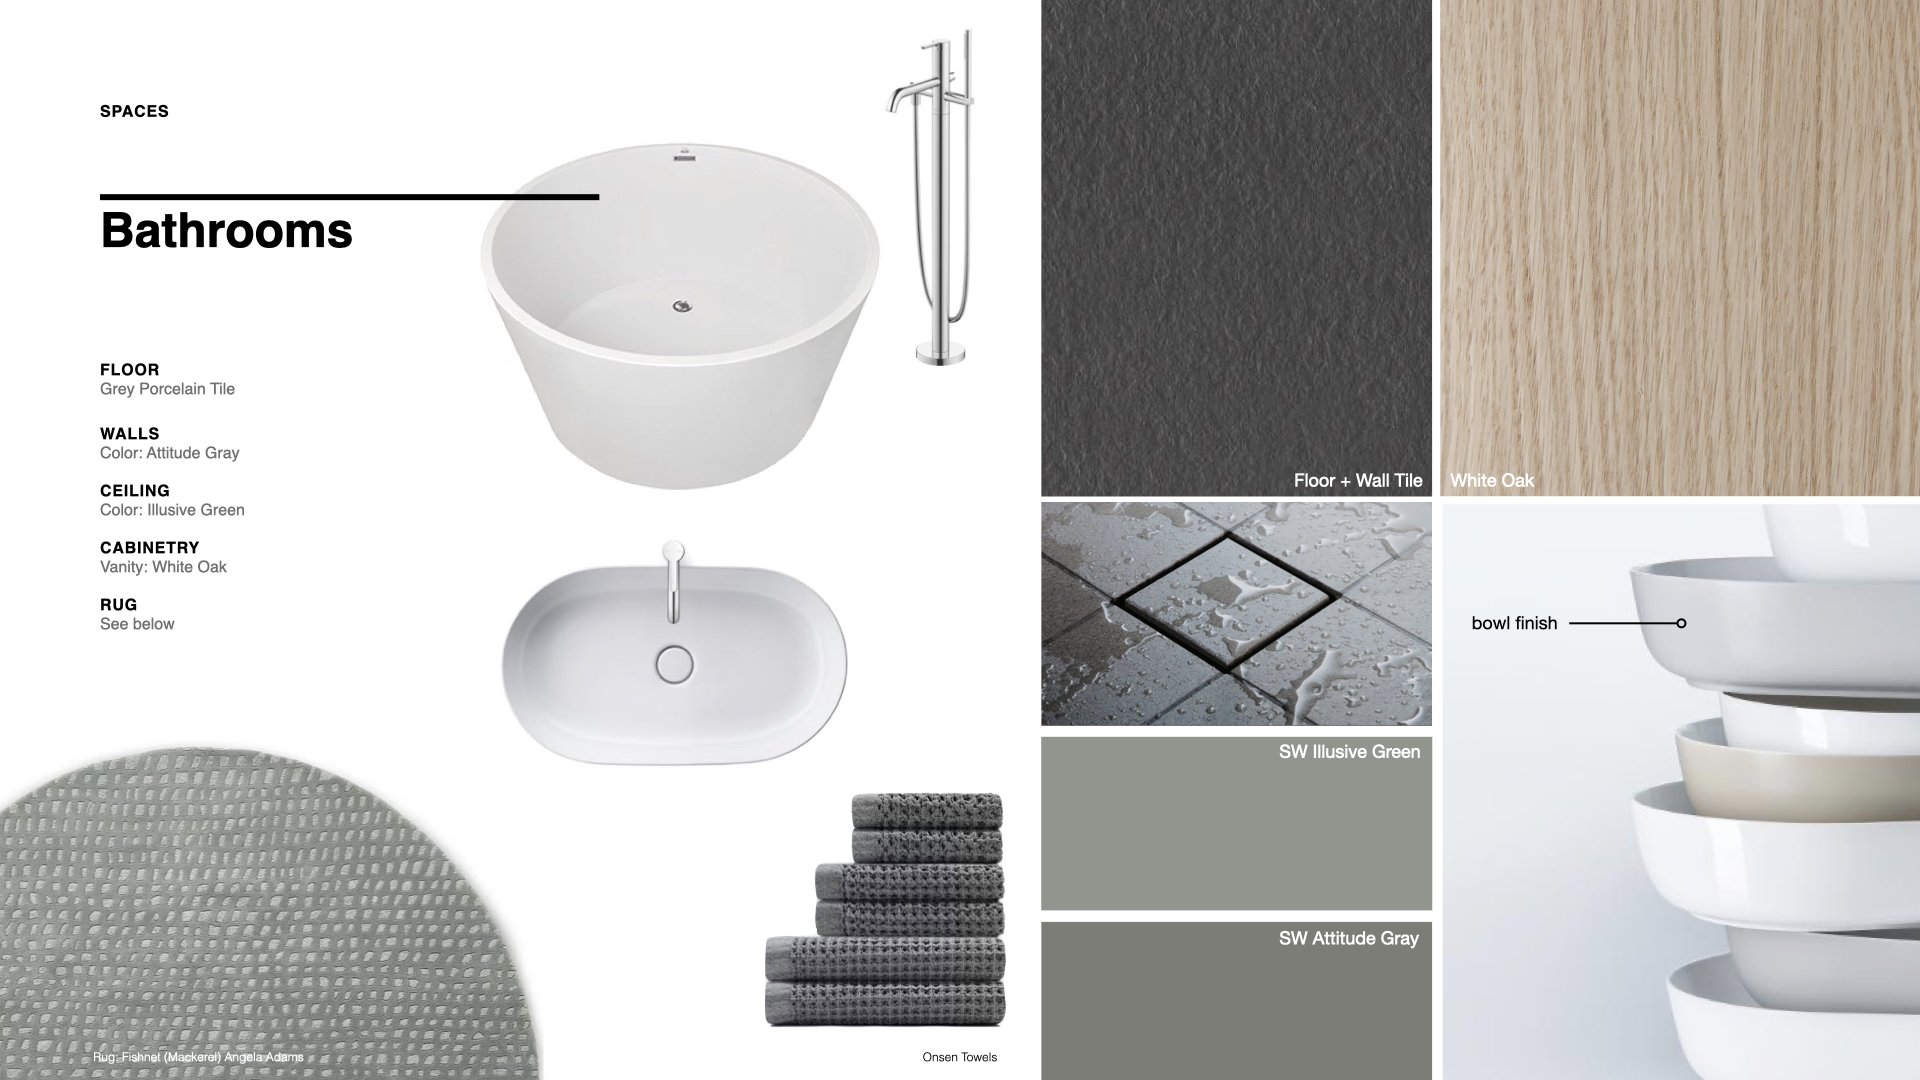
Sharing Inspiration Images with Clients or Team

Embed images from site visits

When entering the task on the table, you can use tags to assign it to a project, a person, or anything you choose. Then, on the project page, you can copy this table and filter the view to show only those tasks related to the project, or a team member, or any other tag you’ve set up. The tables are called ‘databases’ and are the key to unlocking the true power of Notion. If you’re running a team, each member can utilize a custom dashboard showing only their projects, tasks and deadlines.

This summer I’ve had an intern working in the studio and I build out the weekly task list each Sunday for the week ahead so it’s clearly laid out for them when they arrive on Monday. I can include links to SOPs and all the project files and information they need in one place. This saves both us time and limits questions (“Check your Notion dashboard”).

Task Table

Filtered Task Table for a Team Member

Any project specific commitments can be embedded directly in the weekly schedule by pasting a link to the project page or, even links to specific blocks from any page. In the schedule above you can see I made a site visit on Wednesday afternoon and the To-Do list for that project is hyperlinked right in the schedule. Clicking on it brings me to the project dashboard and the in-progress items for each stakeholder are immediately visible. Each toggle by the stakeholder can be clicked open revealing the outstanding items, documents and anything related right there.

Below that is a task table with a filtered view of the tasks related only to this project.
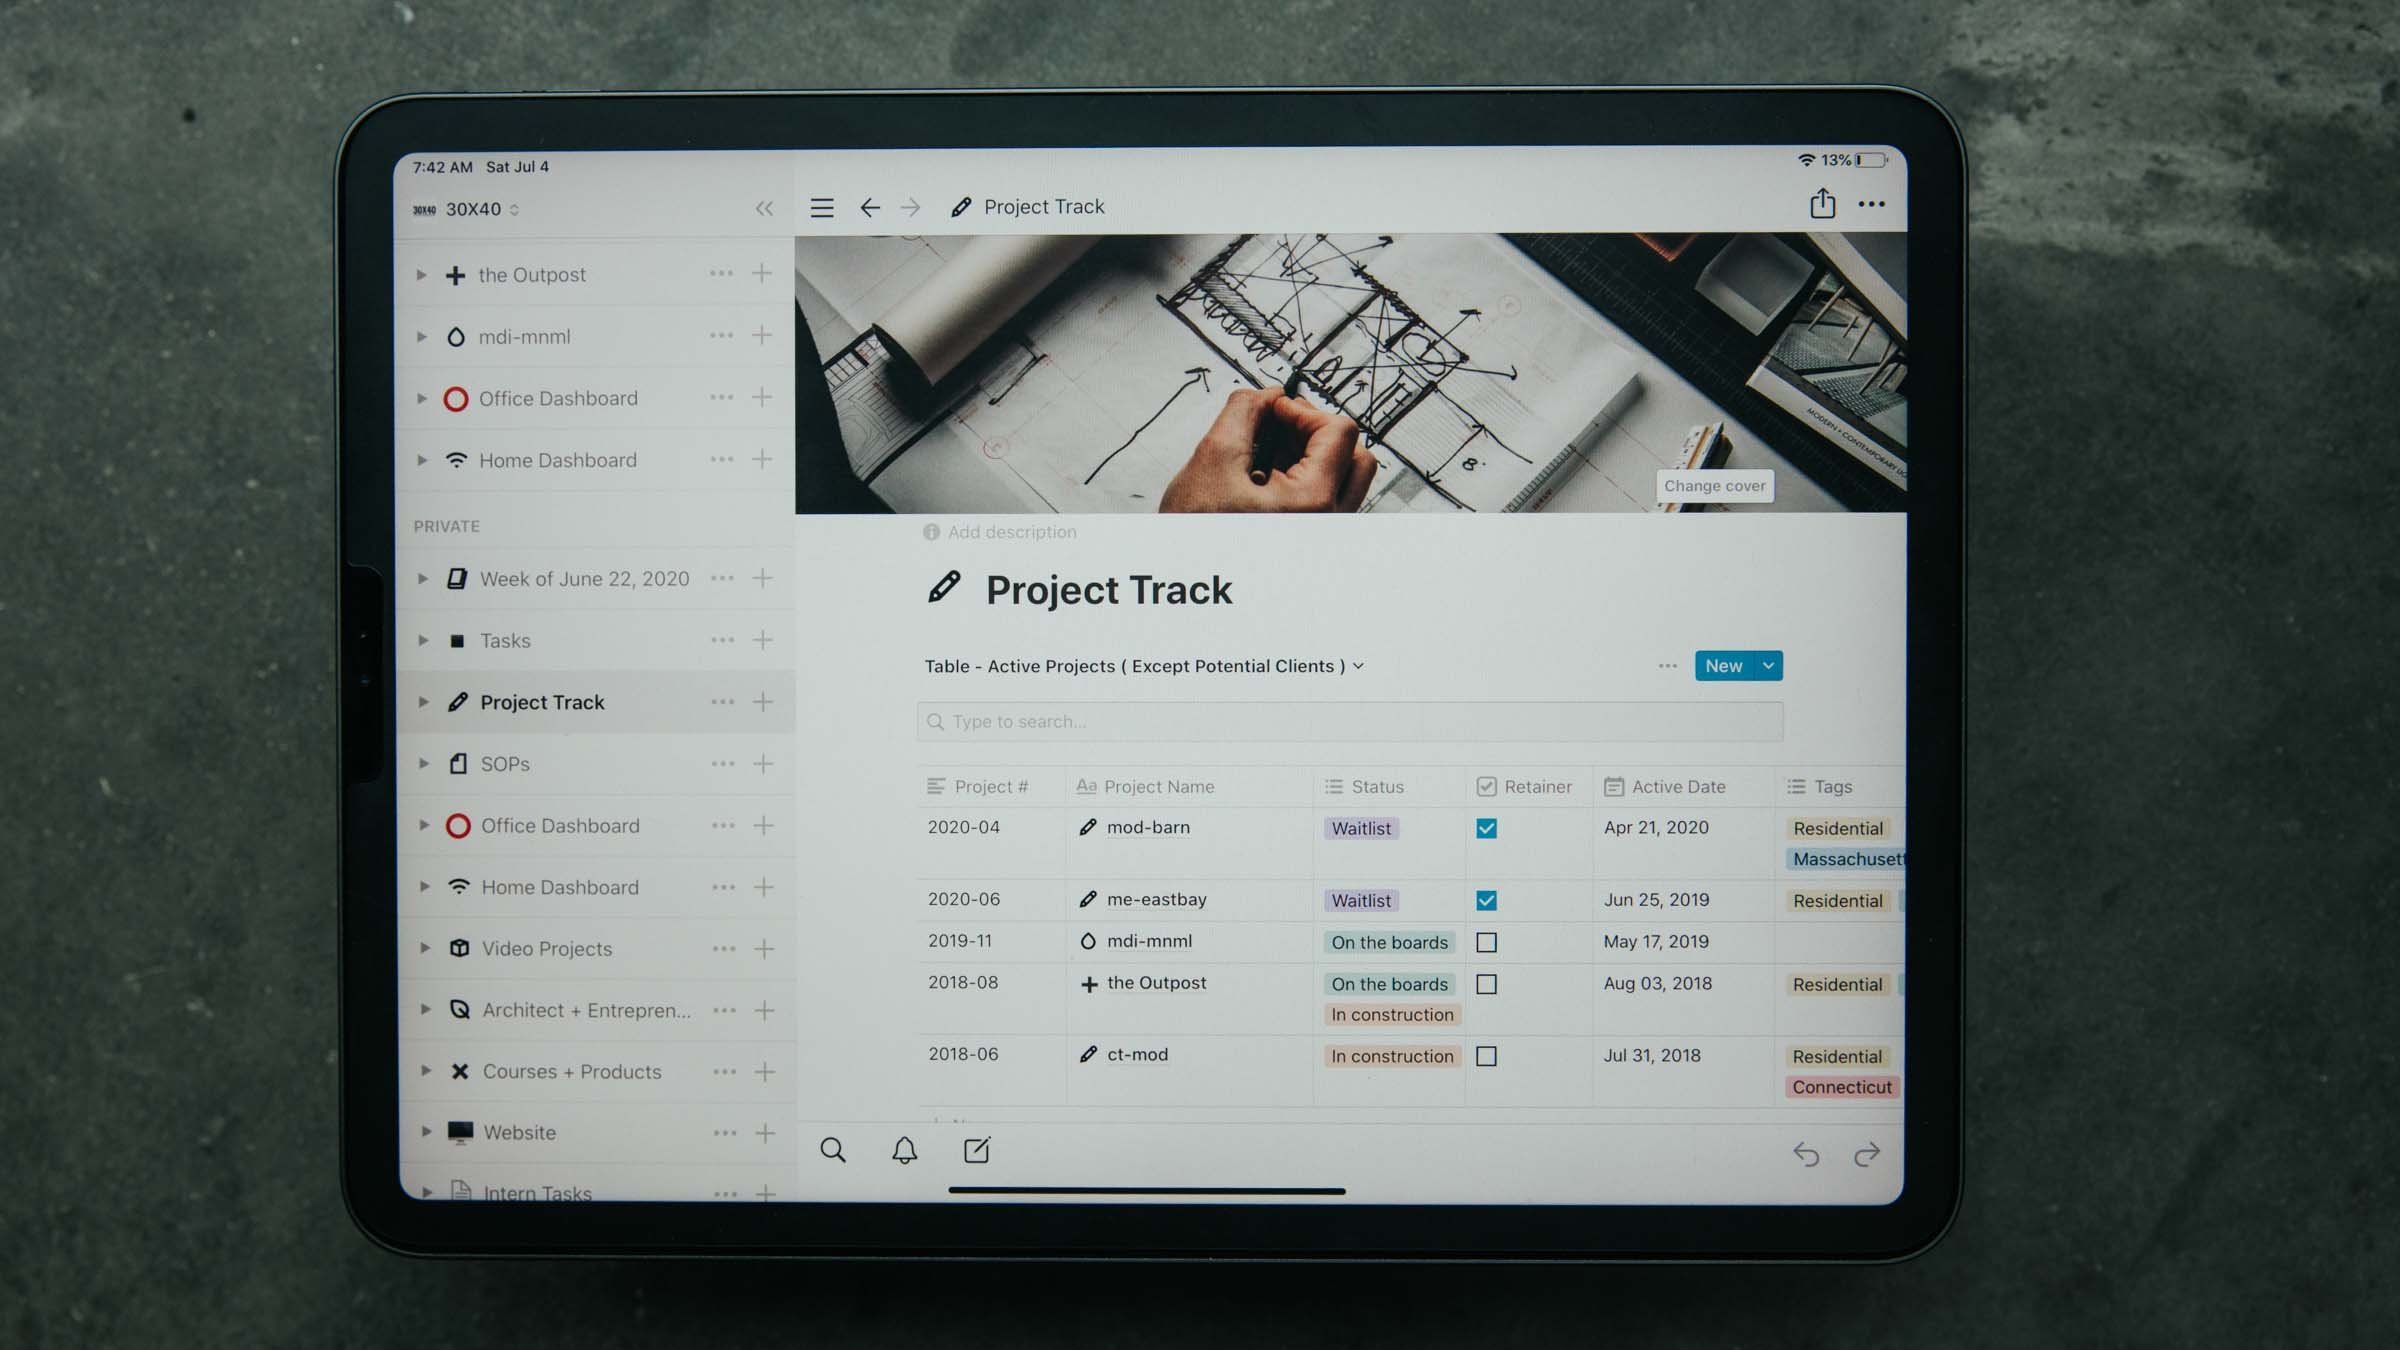
Project Dashboards

Dashboards are simply a collection of the various building blocks available to you in Notion: text, images, hyperlinks, images, videos, tables, quotes…the list is long. I create one for each project, and once you have a format you like you can turn it into a template to use for all projects (download my template to see the one I use).

When starting a new project this template brings over all your office standards in one click. My project template has an embedded a project brief, meeting notes templates, site visit templates, design and documentation checklists, code and site analysis information, client and contractor onboarding information, links to questionnaires, task tables, and more.

Don’t let this overwhelm you, all of this can be built out, customized and added to over time to suit your needs.

Creating custom dashboards for clients with all the project information you want to share - current drawings, checklists for next actions, contracts, permits, invoice due dates, and project wikis - empowers you and your clients/collaborators to seek out the information they need rather than picking up the phone, emailing, or worse - texting you - to ask! Simply share the project dashboard and teach them to check there for updates.

Project Specific Task Table

Checklist Example

As design professionals, our work involves handling an abundance of information. From site and field documentation, to client and contractor requests for changes, to design ideas and inspirations; all of the administrative tasks of project management can easily crowd out the exciting work that drew us to this profession, which for most of us is design.

I've found that Notion has provided a framework that's easy to keep updated with to-do checklists, preconfigured systems, a place to collaborate with clients, consultants and contractors, and a place for me to collect and organize all of the administrative minutiae in one place. No more stickies lining my monitor's perimeter, or bookmarked links in random folders; when it's project-related, I have a place to paste it and keep track of it.

Download my template and watch the videos above for more details on how it can help organize your professional practice.


Still not convinced?

A few more Reasons I use notion

In the past I’ve used Trello, Asana and Evernote to run and organize my business operations. While Evernote was searchable, it was messy. Trello and Asana were as customizable as I had wanted. And implementing templates and systems with each was hit or miss. These are some of the strengths of Notion and considerations when choosing a new tool:

  • Easy to use + implement

    • Onboarding with Notion is simple; a very low learning curve. Advanced features unlock more potential, but take longer to comprehend and integrate. It can grow with your needs.

  • Systems Oriented

    • Templated work will save you time managing your projects + administrative tasks. Notion allows you to create custom templates for almost anything you can imagine: projects, notes, files, tables, etc.

  • Collaborative

    • Sharing Projects + Pages with clients and collaborators is easy and allows everyone to see the most up-to-date files, checklists and information. You can assign tasks and comments to others by right-clicking on any object, assigning a due date and custom requests.

  • Searchable

    • Notion allows you to find the information you’re looking for quickly and reliably, listing every instance of your search phrase while typing. Evernote used to be amazing at search but the more I loaded it up, the less functional it became.

  • Customizable

    • Collating various media is important for our work as designers: images for reports + inspiration, video embeds, hyperlinks, product ideas + references, notes, checklists, tables…Notion has them all. Simply click the + to add. Dragging blocks around is intuitive so you can create the structure that suits your needs.

  • Graphically Pleasing

    • With a minimal interface, Notion can be what you want. Add images, banners, colors, etc. Out of the box, it just looks good and if I’m sharing this with clients I want it to be representative of my brand.

Interior Design with an Architect's Eye: My Process

As this project enters its twenty seventh month in construction (!) the crew have begun finishing the interiors. The supply chain delays of the pandemic, a prolonged labor shortage, unlucky and unfortunate delays have made for an epic build.

I’m working with the most patient clients in the universe it turns out.

February is roughly mid-winter in Maine and a good time to turn attention inside!

Not all architects consider interior design as part of their scope of work, but for a residential architect it’s at least half - and an essential part - of what I do. I want a singular holistic vision and a reflection of the architectural design solution applied consistently throughout. There are, of course, varying degrees of influence we can exert. I’m hardly a Frank Lloyd Wright fan, but I always admired his ability to design every last detail in his clients’ homes. From window glazing to tableware, linens, art, and accessories. He designed every piece of furniture and, fixed their positions, to curate the overall experience, both inside and out. Although most people have limited budgets and patience for this degree of design integration (especially after 27 months in construction), for architects it remains an aspiration.

My interior design process is a combination of design and curation. Some elements, such as door and window details, cabinetry, hardware selection, plumbing, and lighting fixtures, need to be designed and integrated, while others, such as furniture, accessories, and textiles, can be left for curation.

In the video I share my interior design process and the story (mood) boards I create for my clients. It starts with a concept and ends with a detailed focus on each space. The concept here is drawn from the colors, textures, and light patterns in the natural surroundings. You’ll see how materials, texture and color combine with the architecture to mimic the unique boundary condition this home occupies between forest and sea.

Designing a home involves many decisions, from furniture and color choices to lighting and accessories. Every aspect contributes to the overall look, feel, and function of the space. Without a concept guiding our decisions, it’s easy to simply collage and combine images we like of disparate ideas. The sum total can feel disjointed.

A concept provides:

  1. Cohesiveness: A strong concept ensures that all elements of the design work together in a harmonious and cohesive manner.

  2. Clarity: A concept provides direction and helps define the overall aesthetic and style of the space, which can be especially helpful when making design decisions.

  3. Functionality: A concept can help dictate the functional aspects of the space, such as furniture arrangements, lighting, and storage solutions.

  4. Emotion: A concept can evoke emotions and create a desired atmosphere or mood in the space, making it a personalized and meaningful environment.

  5. Impact: A well-designed concept can make a lasting impression and create a memorable experience for those who use and interact with the space.

Architectural Material Palette

Most people lack the ability to articulate precisely what they want in a space and Pinterest can unify our vision. My clients and I use Pinterest to collaborate and establish a common design language once a concept is agreed upon rather than to define the design vision or stylistic overlay. We don’t linger there though, I prefer to further cull the images and develop a story board presentation (see images below). We want to create our own unique work, derived of our own ideas not simply a collage of rooms taken from dozens of other spaces. I find using story boards in the process helps my clients see the home as their own unique design.

It’s our job as interior designers and architects to make visible the invisible, latent forces in a place. This home is sited on an island, six miles out to sea and there the weather, the changing light, the seasons; everything is about contrast. The home sits on the boundary between two very different environments, the forest and the sea and it controls one’s experience of each. I want the interiors to be the canvas that makes this contrast visible.

As we look at the floor plan there are natural places that might be more like the forest, more sheltering, darker, and lower in scale. The obvious places are the entry area, and the bathing spaces. And then there are the main living spaces which are larger, brighter with taller ceilings and sweeping views. In the bedroom and supporting spaces we can alter the balance between light and dark, mixing the two.

Material Palette Flat Lay

Materials

Contast as a concept is versatile and can operate on many levels: tonal (light and dark), textural (smooth and rough), emotional (refined and casual, high/low) and so on. Given this is a small home, we want to limit the material palette so, I’m proposing to use natural wood, painted plaster, and stone as the primary materials. I’ll be accenting these with metal, leather and some fabrics.

Be sure to watch the video for more details on the material selections. Here’s the palette I’ve chosen:

  • Floors

  • Walls/Ceilings

    • Snowbound, Sherwin Williams

    • Illusive Green, Sherwin Williams

    • Attitude Gray, Sherwin Williams

    • Iron Ore, Sherwin Williams

  • Cabinetry

    • Stamped Concrete, Sherwin Williams

    • Argos, Sherwin Williams

    • QS White Oak, WOCA Extra White Oil

  • Counters

    • Ipanema Reserve Soapstone


Below is an excerpt from the working presentation I reviewed with my clients. Download the presentation template here.

What's In My Bag - Architect Essentials

Time spent on construction sites has unquestionably made me a better architect and improved my design process. During construction, I visit the job site as often as I can, it’s the best way to avoid surprises and keep the lines of communication open with the construction team. In the video below you’ll see how I prepare and pack for these field visits and all the gear I bring with me.

Pre-Planning

Before I head out, I always have an organized plan for the visit because the job site can be a busy place and this ensures I don’t forget anything while I’m out there. I use Notion for this as it syncs with all my devices in real-time. I have checklist templates for each stage of design and construction. Each includes a list of everything I need to bring and remember to do while I’m there. My general rule is to build templates for every repeatable process in the business and Notion makes it easy to create SOPs (Standard Operating Procedures).

With my checklists and meeting agenda done, I check-in with the drawings and previous meeting notes to familiarize myself with the work I’ll be reviewing and I update my iPad with the current PDF version of the contract documents: the drawing set, schedules and specifications.

The type of visit and stage of the project determines whether I’ll bring one or two bags. The backpack will always travel with me, it has all the essentials and I’ll bring along the tote for bulky or difficult to pack items.

Let’s start with the backpack.

BaCKPACK

I like camera bags for site visits and leisure travel and LowePro make some of my favorites. This is the ProTactic 450AWII and at 45 liters it’s definitely not a small bag, but it hits that perfect sweet spot for me. It’s large enough to fit a few extras but not so large that I can bring all the gear I own. It forces me to make some strategic choices while packing.

It has a clean, low-profile, semi-rigid exterior shell covered in MOLLE webbing which gives it a tactical vibe and I picked up a bag of MOLLE clips to fasten things to it as-needed. It came with a padded hip belt which I removed, and a few accessories which I can velcro to the shell (a tripod foot cup, water bottle holder and a small bag) but I prefer the clean exterior especially when I have to slide it into an overhead airline bin.

Most of what I’m carrying with me isn’t camera gear, but the reason I like camera bags is because of the padded interior dividers that I can easily change to suit whatever it is that I’m carrying. For site visits I like having separate compartments to keep things organized and protected and for travel I can set it up to carry my camera gear, a few tech pouches and some personal items, it makes a great day pack.

Cameras**

I have three cameras that travel with me, the best quality images and video come from my mirrorless DSLR, the Canon EOS R has been my go-to camera for a few years now. For lenses, if I have to choose just two for my site visit kit, I’d choose the Canon EF 16-35mm f4L IS for it’s wide field of view. And, for details I’d opt for the Canon EF 100mm f2.8L IS Macro. These allow me to capture most spaces I encounter on a typical job site - from very tight interiors and broad exterior facades to intricate details.

I also bring along a Pelican SD Card Case and a few extra batteries.

**(More on my camera gear here)

I recently added a 360 camera to my kit, the Insta360 OneX2 can be set up in the center of a space, connected to my iPad and in a few seconds I can record of construction progress for an entire room. It’s been a huge timesaver. I’ve also been using it to record memos as I’m walking through a space and, because the videos can be recomposed later in post, I use it to view areas I may have missed during my visit or export them to send to the client for discussion and general progress updates.

For aerial photography, terrain mapping, inspecting hard to reach places, and social posts I like having a drone with me. I still use the Gen 1 Mavic Pro from DJI, but if I were buying new today, I’d opt for the new Mavic Mini for its (even) smaller form factor and because it includes a controller. My current setup needs both a dedicated controller and an iPhone connection to fly.

Photos and video are an invaluable resource and I’ll often refer back to them as I’m writing my field report, or reviewing payment requisitions to verify the stage of completion of the work. I’m always glad to have a visual reminder of everything behind a wall finish - blocking, plumbing, gas lines - once it’s covered up.

Tablet/laptop

Inside the padded back panel is a sleeve that fits up to a 15” laptop, which I’ll usually bring for longer trips ( I use the 14-inch MacBook Pro ). For site visits, the 11-inch iPad Pro (+ Apple Pencil) serves as my daily driver. Most often I’m using the camera and Procreate to work through details in real-time on-site, or working through the meeting checklists in Notion and, of course, I keep all the updated drawings, specs and schedules there too. It’s impressive just how much space the iPad has actually freed up in my bag.

Tote

The tote bag I’m using is the Yeti Camino 35 and it’s a massive upgrade from the old LL Bean canvas bag I had been using. The large compartment has a zippered pocket on each side and two pop-out pockets at each end. Similar to the camera bag, I like the organization this affords. The molded EVA bottom stands on its own so it’s easy to load and unload and the puncture resistant shell is ultra-rugged and, because it’s completely waterproof, I can hose it out after use. When I’m camping, I can use it to haul water from a stream and the intermediate cross bars gives you different carrying options which is especially nice with heavier loads. They’ve even thought of details like a closure hook to keep larger items contained.

I use this bag more than I ever thought I would. Most often I’m carrying heavy material samples, reference books or catalogs to and from the job site. It also holds my water bottle, my tripod and it’s especially useful when I’m doing work on undeveloped sites holding my 100’ tape measure, flagging and reference documents. Its’ utility extends beyond the job site: I use it for car camping, the beach, and kayaking trips too and, the size perfectly complements my backpack giving me just a little additional overflow space.

It comes with a hefty price tag ($150) though, so you may want to mark it as your own. I made a little velcro-backed nameplate which I cut out of a scrap piece of zinc and mounted a custom sticker to for mine (see the video for details).

EDC (everyday carry) + PERSONAL ITEMS

Scattered throughout the bag are my everyday carry items. In the translucent pouch on the back flap, I always carry a sketchbook with me. Currently it’s the TRACE sketchbook with a subtle white reticle on 90# vellum. The translucent pages are great for iterating ideas and take ink, pencil, even Copic markers without bleeding. I also use the BLANK Sketchbook with the subtle dot grid, debossed cover + elastic closure. If I’m traveling and unplugged, I tend to prefer analog sketching to digital and it serves as a travel diary.

For site visits I’ll always bring a 25’ tape measure and a roll of painters tape. If it’s early in the design process I’ll also bring a 100 tape and surveyor’s flagging. I use them for checking dimensions, confirming layouts and marking areas that need follow-up. If I’m meeting with a client, taping out a seating arrangement on the floor or testing various shelving heights or TV sizes can be immensely helpful. You’ll notice in the video that I printed up a few sheets of stickers with my business name on them and I use them to tag my gear. This avoids disputes with popular site tools (like tape measures) and ensures all my things land back in my bag at the end of the visit.

To keep things connected and charged I have a 30000 mAh solar battery charger with ports for all my devices, and a tech pouch to keep cables organized. The SD card case by Pelican helps me stay organized too, when a card is full I put it in the case upside down so I don’t overwrite it.

The bag has a tiny pouch for SD cards, but I prefer to keep mine in a Pelican Case so I’ve repurposed it to hold an Apple AirTag. My iPhone is set to immediately alert me when I wander too far from the bag, or someone walks off with it.

EDC Links:

  1. Braun Watch - I replaced the band with a rubberized one.

  2. Bellroy Wallet - the magnetic closure is fidget-friendly

  3. Northwall Multitool / Key - Box opener, prying tool, screwdriver. I use this frequently, it’s tiny and TSA compliant.

  4. Coast PX15R Flashlight - Fits the tactical vibe of the bag and it’s rechargeable. High power, focuses between flood and spot, + clip.

  5. Kuru Toga .5mm Mechanical Pencil + Lead

  6. Tombow Click Eraser - for precision erasing

  7. Apple AirTag - cheap insurance to keep track of your bags + valuables.

  8. Vintage H. Chapin & Son #12 Boxwood Folding Ruler

  9. Bellroy Pencil Case - More details on everything in my sketching kit here.

  10. Derwent Color Pencils

  11. iPhone 13 mini + MagSafe Leather Case

Mentioned, not pictured:

Some of the links in this post are affiliate links. Clicking on them and purchasing costs you nothing extra, but I receive a small commission which helps support my work on YouTube. Thank you!

Moving Forward + Looking Back

In that quiet period between Christmas and New Year’s I always sneak an hour or two to reflect on the year as it draws to a close. I make note of what’s gone well and what hasn’t gone to plan in both my personal and professional life. I do this using Notion and this year I wanted to share my annual review process and let you in on the changes I’m making in the new year.

Read More

What's in a typical custom architectural plan set?

All architectural drawings are representations - abstractions - of what we intend to build. The two lines that make up the wall segments drawn on a floor plan aren’t enough to describe what the wall should be constructed with. So we rely on three main devices to convey that information: drawings, schedules and specifications. Together these documents organize and catalog all the decisions necessary to build our project in a very precise way. In this video, you’ll see everything I include in a typical set of custom documents from start to finish.

By any account, this is a lot of information to include. Consider this though: anything we don't delineate, anything that's not called out in the construction documents is a decision we’re choosing to defer to someone else to make, whether that's during pricing or in the field during construction. In general, I prefer to control and direct as many design decisions as possible, so I choose to draw and call out as much as I can in the studio where making changes is relatively inexpensive as compared with on-site where every move comes at great expense.

Creating "a tight set of documents" means we’ve taken the time to document the full range of decisions required to construct the project as designed. A tight set of documents will answer every question that arises along the way, from pricing through construction. Importantly, we don’t leave things to chance, we use our set to describe very specifically the design decisions we've made with our client prior to construction. The value of this is that it helps our clients feel confident that what’s been decided during the design process will be realized in the final home, it protects the architect as the author of the design against unwelcome surprises in the field, it helps the general contractor and the sub-trades to accurately price the project and ultimately to stay on budget and on-schedule as we're building because everyone knows what's expected.

More resources:

Updating My Workspace

I’ve been in my studio workspace for about four years now and as my needs have changed it was time to adapt the studio to meet new demands. As a destination separate from my home, yet still nearby, the separation has worked out well but hiring an intern for the summer meant I needed a dedicated workstation. And, I knew that the storage situation needed improvement. To make room, I started by decluttering and removing all the non-essentials I had gathered over the years. From there I sketched out a quick plan to rethink the organization and layout. The video shows the refresh from start to finish, more details below.

See the original studio tour video here.

New Workstation

The studio workspace was designed to adapt to a variety of functions. When I first moved in, it doubled as a music practice + performance space in the off-hours for our two boys and their friends. This practice space took up a full third of the floor area and was the most obvious place to locate the new workstation. With the instruments relocated to the main house, it was time to place the new furniture.

For the work surface, I chose a sit-stand desk with a massive, solid birch top and a flexible solution for a space used by multiple people. At 60” wide by 30” deep there’s plenty of room to accommodate everyone’s needs. The black hardware and natural wood top tie in with the other details in the studio. In a small space like this it helps to maintain a limited color palette so everything plays well together, here we’re using natural wood tones, browns, blacks and grays.

For seating I picked up two of the Soho drafting chairs by Laura Davidson. With heavy-duty cast aluminum bases, plush seats, tilting backs and removable arms these were a solid upgrade from my old creaking drafting chair. I swapped out the casters for roller blade style wheels for a quieter ride on the concrete floor.

New workstation (Sway desk by Ergonofis)

New workstation (Sway desk by Ergonofis)

On the Desk

I removed all the knick-knacks, trays, external drives, and unnecessary clutter from my desktop and consolidated my small essentials (scissors, pens, pencils,) into a simple steel cylinder divided into four quadrants. To ground everything I purchased a large linoleum desk pad and swapped out the standard white apple keyboard and magic mouse for the space gray versions. I blacked out the front and base of my 27” iMac with a skin to complement the other black accessories. The coaster is a repurposed piece of black slate and I added a wireless charging pad by Anker.

Beneath the desk I mounted a black aluminum tray to hold my 8tb Lacie hard drive which stores all my digital files. I tidied up all the cables using split sleeve covers and used small black adhesive hooks throughout the space to keep my cables ordered and out-of-sight. I relocated the bluetooth soundbar that sat on the front of my desk to atop the shelving unit to my right to keep it out of view.

For task lighting, I picked up two of Artemide's Tolomeo mini desk lamps in black, I've always liked their timeless modern look and fitted them with 25W incandescent bulbs (much nicer light to sketch by than LED). Having stripped down my desk to the bare essentials, it was time for the rest of the studio to follow suit.

Walls + Backdrops

Because the north desk area often serves as a backdrop for filming I wanted a something different and darker there. One of the problems with the Douglas fir interior is that it's not a neutral tone, so it affects the ambient, reflected light in the space, which for filming isn’t ideal. Rather than painting the natural wood plywood on the north wall I chose to skin it with MDF and chalkboard paint. I mounted them on concealed Z-clips so I can easily remove them if I want to in the future.

On the MDF I installed two metal ledges from CB2 adding 8' of horizontal display space without taking up any floor area. I'm using them to display material palettes, books I'm reading and various found objects. Concealed along the front of the ledge are two play lights from Philips controlled via the Hue bridge system and their mobile app they serve as practical lighting in the background and can be changed to any color I choose.

Storage

When I built the studio, I didn't have the budget for built-in storage but if you want a minimalist, organized and clutter-free space, storage is essential. I've added two IKEA Kallax shelving units beneath the west windows. The upper cubes I'm using to store objects and as reserve capacity for books. The lower cubes I've fitted with Bladdra felt boxes - also from IKEA - to hold irregular objects and things I don't want out in view and collecting dust.

The rolling tool chest is by Husky, I'm using only the lower portion of the unit in the studio (the upper half holds tools in the basement) to organize all of my studio essentials, kiXstand samples, and camera equipment which still leaves plenty of space for new tools. With eleven drawers of varying sizes and depths it can hold a lot. The shallow drawers are easy to keep organized in a single layer. For the deeper drawers I picked up a few pouches and organizers to keep cables and smaller items grouped together.

The height of the base unit is perfect for making models and for filming or photography projects. My two large Alvin cutting mats live on top and off to the side is a rare earth magnet to hold my rulers and utility knife. When the standing desk is raised, the tool chest can easily meet its surface to give me an even larger surface to work on if needed. And if I find myself wanting additional walking space in the studio, The desk can be raised a little more and the toolbox can roll comfortably beneath it.

Styling

To pull it all together I added a few styling upgrades. I added three new prints adjacent to the new standing desk which cleverly conceal the old guitar mounts and these are matted in ice-white with black aluminum frames. These were printed in-house using Canon's Pixma Pro 100 on low lustre paper an incredible printer for less than $300. (For printing drawing sets, I use the HP T210).

To hide the (off-center!) mini-split heating unit, I picked up the Stendig wall calendar by Massimo Vignelli, which I slipped into a concealed poster sleeve and mounted to the loft floor joists above.

To bring a little of the natural landscape inside, I repurposed four concrete napkin holders by Port Living Company to plant moss in and I picked up a tiny Chinese elm bonsai to live on the corner of my desk. By adding these minor accent pieces, you can bring a certain life and personality to your workspace that can simultaneously make your office feel much more inviting. To this I’ve added a few additional inspirational objects and I finally feel like it’s a cohesive workspace with room to spare.

It's a series of progressive upgrades, an evolved, tidier version of what I started with. Our workspaces are guaranteed to change over time along with our priorities and needs and I love that this is a space that can adapt and change with me.

Check out this and all of my curated kits on kit.co.


Considering a dedicated studio space?

Read more: Five signs it’s time to rent (or build) your own.


Studio Plan diagram


1. Photography/Printing Space: This is where I keep most of my essential photography equipment, from lenses to batteries. In addition, because of it’s proximity to my desk, My printing tools, including the large format printer also live here for easy accessibility.

Above this are two wall mounted cabinets with flip-down tops which hold stationery, pens and my drone (closest to the main door).

2. Main Workspace: Where I spend the most time in the studio. My iMac, Laura Davidson chair, sketching implements and computer accessories all find their place on my vintage drafting table to create a focused and productive work environment.

3. Display Shelves: A pair of metal ledges run behind my desk and are (currently) being used for display. They also hold my play lights by Philips that provide ambient lighting in the morning + evening, and, practical lighting for filming.

4. Book Storage: This shelf contains references, inspirations, information, entertainment, a few personal accolades. The books I keep here are amongst my most-prized possessions as an architect. On top I have a sound bar which streams music.

5. Storage Units: One of the most impactful upgrades in the refresh, these shelves house concealed items on the lower tier and provide buffer space for an ever-growing library above.

6. Shelving Unit: Unlike the unit of matching design on the other side of the studio, this shelf holds a variety of resources: material sample binders, floor samples, magazines, modeling supplies and paint and a few architectural models. For now, the Canon printer also lives atop this unit. It’s a solid choice to produce colorful, frame-worthy prints, but needs a more accessible permanent home.

7. Minimalist Calendar: Although it’s purpose is to cover the - distractingly off-center - mini-split heating head, this calendar by Massimo Vignelli is a minimalist graphic addition to the studio. Every other month inverses the white and black (see images above).

8. Secondary Workspace: The new workspace is anchored by the Sway Standing Desk by Ergonofis. It’s adjustable birch top allows me to be able to easily switch between standing or sitting work environments and accommodates a variety of uses. The Laura Davidson swivel chair is paired with the desk, a comfy upgrade at a fraction of the cost of the Eames Management chairs by Knoll.

9. Tool Chest: One of the largest new furniture pieces in the studio, the Husky rolling tool box houses everything from camera equipment to power tools. I’ve converted it’s available surface so that it when the new Ergonofis desk is brought level, it creates a massive, singular workspace. When the desk is raised higher, the chest can be easily moved under it to provide additional open space.

10. Meeting Table: As more new additions were made to the studio, I found that that the spaces for simply walking had become much too cramped. And given our current situation, in-person client meetings have become a rarity. So I removed one of the tables from the meeting space.


How I Work Remotely with Clients

Sharing my process for how I work remotely with clients. Because social distancing protocols have forced us all into new working environments, I thought now would be the perfect time to share how I make, present and catalog all the revisions every design project requires from a distance. Using the Outpost project as a guide and a recent request for a few design modifications, you’ll see the process unfold from idea to presentation to documentation.

Stay safe out there and, don’t miss 15:28, it’s my favorite sequence…!

Other tools in my Kit can be found here.

Architectural Model Making Tips

Architects build two fundamentally different types of models: presentation models and study models. Presentation models are often used in client meetings to convey a finished design in miniature while study models are used by architects as part of the design process. Study models are the equivalent of a three-dimensional sketch and allow us to explore and iterate design ideas quickly. We often begin these by collaging ideas using planes of cardboard and wood.

In this video, I share my best tips for building architectural models something I’ve done professionally for close to 30 years.

Building models remains an important tool and part of my personal process for making architecture. And while many have moved to completely digital forms of modeling, I’ve maintained the habit of building models. Here’s why: there’s a sensory feedback loop between the hands and the brain known as embodied cognition. It’s been shown that our motor system influences our understanding and cognition in much the same way the mind can influence our physical actions. I build models to unlock creative inspiration I can’t otherwise access (they’re also pretty fun to build).

architecture-model-making-tools.jpg

Making Architecture Models (a tutorial)

I've always found satisfaction in turning scraps of wood and cardboard into a tiny model, but I haven't always loved the finished product. If you've struggled with this too (or if you’re just curious about model making) you'll appreciate this week's video where I share my model making techniques.

I'll show you the materials I chose, why I chose them and a few - less expensive - alternatives. I discuss why you would choose one modeling style over another, how to conceptualize what to model and how a few simple tweaks can make a big difference in the esthetics of your architectural models.

If you enjoy these videos, you can support 30X40’s work on YouTube by investing in a course, a toolkit or a digital tool. Many thanks!

Inside My Sketchbook - An Architect's Essential Tools

A look inside my sketchbook as I start a new project and review my current favorite sketching tools. See my go-to paper, pens, pencils, markers; everything in my everyday carry kit for sketching.
Instead of the chronological approach I've used in the past, I now dedicate entire sketchbooks to individual projects, tasks, or idea categories. I've found this helps me to organize information and find it quickly when I'm searching for it later.


Sketchbook

BLANK Sketchbook - Custom designed + manufactured by 30X40

Pencils

Kuru Toga .5mm - I use this for sketching currently. If you prefer a chunkier lead, try this lead holder clutch made by E+M

Colored Pencils

Pens + Markers

Pilot Precise V7

Signo

Sign Pen

Markers

Accessories

Pencil Case

Eraser

Eraser Pen

Desk Brush

Chop Stamp

No Longer (Just) An Architect

An excerpt from a conversation I had with Maleick, a 22-year old architecture student from Baltimore. He’s preparing to graduate architecture school this spring, making plans, weighing his options and struggling with the anxiety of not knowing what’s next.

Twenty-two years ago, I stood where Maleick stands today, entering the profession with the same concerns, the same worries. And today - twenty-two years later - I’m no longer an architect. Yes, I have the degree and the license and buildings I’ve designed, but the profession I stepped into back then no longer exists. There are no more architects in the singular sense of the word. Today I’m a photographera graphic designer, a marketer, a filmmakera writer, a negotiator, an editor, a curator, and a creator. Professional practice is anything and everything we design it to be.

Approaching practice with a creator's mindset has allowed me to explore a spectrum of influences and interests and incorporate those into my work as an architect. In much the same way, my architectural training informs and colors my other creative pursuits.

The uncertainty remains though as a part of life. What do you think? Did I get it right?  What advice would you offer a soon-to-be graduate?

Architectural Design Process : Form, Orientation and Sunlight

Learn how you can use the Sun to locate, orient, shape, and inspire the details for your architectural design. In this video, I walk you through the design process for a project whose form, orientation, and details were all developed by carefully analyzing the solar path on the building site.

How I find Architectural Ideas

Eight strategies I use to find architectural ideas and confront - the intimidating - blank page.

Topics covered:

  • Bisociation 

  • Trusting the design process

  • Embracing constraints

  • Inventing deadlines

  • Doing the opposite (anti-project)

  • Subtracting to solve

  • Stealing (like an artist)

These are just a few of the design tricks I use to help grease the creative wheels and instill the confidence I need to keep moving forward. What's great is these techniques work for a whole host of disciplines and creative fields, they're not exclusive to architecture.

Books mentioned: 
The Art of Thought
The Act of Creation


Frank Gehry MasterClass Review

An architect's review of the Frank Gehry Masterclass: what to expect, what you’ll get, who I think it’s for, my favorite lessons, and whether I think it’s worth taking.

Gehry is a polarizing figure in the architecture world. But, whether you love or hate his work, the fact that he’s realized - what are sure to be - some of the timeless architectural icons of our time demands respect and further study.

Watch the video to see whether I think the course delivers on all that it promises.

Storing Architectural Samples in the Studio

I'm limited in the studio by the amount of space available to store things and material samples can take up a lot of room. I've seen many types of storage racks used in studios where I’ve worked and tried a number of things myself here in the studio – from metro shelving, to archival folios and wooden, felt and cardboard boxes and bookcases. The problem: they all keep the materials hidden. So although they’re great from an organizational standpoint from a creative standpoint they're stifling. I’m much less likely to grab a material while designing to help me solve a problem or during a meeting if I have to dig through boxes to find what I’m looking for.

When I stumbled across this inexpensive baking cart it seemed perfect and I had to try it out. Learn more in the video.

How to Choose Architectural Materials

Architecture can’t exist on a page it must be built. Transforming drawings and tiny cardboard models into physical reality means choosing materials to represent our ideas. In part four of the architecture short course I discuss materials – how architects choose them, how we know what’s right, how they can shape how we feel in a space, how they influence our designs, and a rubric you can use when selecting your own.

Instead of an abstract exercise, I walk through the precise process I used to choose the materials for the case study project we’ve been following throughout the course.

Links to all my favorite material resources.

Drawing Like an Architect

In this video I share my essential tips for better architectural drawings. It's easy to forget that architectural delineation is part of our craft and - I believe - beautiful drawings communicate more clearly. 
Important concepts discussed:

Essential Architecture Books

The books in an architect's library provide context for their work: history, precedent, theory, technics, best practices, fresh perspectives and creative stimuli. The ones I return to often are like harmonic frequencies, which continue to vibrate and resonate over time even as my ideology is evolving.

Is it a coincidence that some of the most emotive connections to books and architectural writings were forged in architecture school many years ago? You know how they say the music you’ll listen to the rest of your life is the music you were into when you were 18? That’s how many of these books are for me. So, these precise books may not find the same resonance with you, but as a thought exercise, consider what your library currently says about you, your interests and your blind spots or your knowledge gaps one you might want to fill in.

Books feed the intellect, and a studio full of books assures we're surrounded by the ideas of many – the masters, colleagues, artists, entrepreneurs, performers, and documentarians. They’re a great equalizer when it comes to education and at a fraction of the cost of architecture school.

Be sure to check the resource page for links to all the books I mention in the video. 

Developing the Concept: Architecture Short Course (part 2)

Developing the architectural concept into floor plans, designing the form, and refining the spatial ideas are all covered in part 2 of our architecture short course.

The first step in making the abstract concept real is to sketch a floor plan and then give that plan a three-dimensional form. A floor plan is a quick way of describing the hierarchy and relationship of spaces and it begins fixing their real physical dimensions and shapes. Throughout the design process architects must continually consider the design in both the plan, or overhead view, and the sectional, or volumetric view. The easiest way I’ve found to do this is to begin by sketching a plan and then construct a three-dimensional version of that plan either in model form or by sketching.

In order to get to three dimensions, we have to make some decisions about form, space, and order. When we speak about form we’re referring not only to a building’s shape but also to its size, scale, color, and texture…basically, all the visual properties of an object. Form has a direct relationship to space in that it influences both interior and exterior rooms. And lastly, order is how we choose to orient and relate the forms and spaces to each other. This directs the inhabitant’s experience of a place.

We'll review strategies for refining the floor plan, designing meaningful building forms, editing, and converting two-dimensional abstract concepts into three-dimensional buildings.