Architects, designers and homeowners go to great lengths to keep the weather out of buildings, a worthy and necessary goal. But the task of creating home exteriors that resist weather’s effects — including washing, sanding, stripping and refinishing — is significant, time consuming and expensive. Rejecting this unending cycle of maintenance and accepting weathering as part of a home’s design aesthetic makes good environmental, economic and design sense. The homes in this video embrace weathering as part of their aesthetic — and even celebrate it.
Design Process - The Plans
The floor plan is probably the most widely recognized sign of an architect's work. To someone unfamiliar with the design process it's appears as simple definitions of rooms in space. To an architect, it represents much more. It's the manifestation of ideas, concepts, and a considered synthesis of many disparate pieces of information: the site, the client, the budget, cultural context, and building traditions to name a few. I thought it would be fun to walk through the design process for a small project I’m just digging into in my studio. It reveals my early design thinking and more importantly how design problem solving works. Here's a short video I recorded that describes the early evolution of the floor plan.
The details of how I arrived at these options are described below.
The Request
We begin with a client’s simple request for a multifunctional recreation and studio space. It must also have a bathroom to support a nearby pool, overflow guest-sleeping space, entertaining space (indoor and outdoor), a kitchenette and the flexibility to convert it into an in-law apartment in future – oh, right - I almost forgot the fireplace. This will be an ancillary structure on an existing property and it must be subservient to the existing architecture of the site and modest in size.
As it turns out, there’s a lot we’re asking of this little structure.
However, this isn’t everything we’ll need to include. What isn’t in the client’s wish list is often just as important. The infrastructure. We’ll need circulation space or walking space to get into and out of and around, storage space, and mechanical space too. These are items I know we’ll need given the things my client has already said – the idea that it will accommodate sleeping means it must be heated and of course that means it needs a heating plant. Walking space and storage must be baked in just to accommodate every day life. This is what architects call ‘The Program’. It’s a list of all of the required spaces.
Larger projects will have extensive program lists, this one is fairly small and manageable. Once the program list is developed, the next step is to assign each space a square footage estimate. The main flexible space will be the dominant element in the plan. I know from my client that the new structure is to appear secondary and play a supporting role on the estate. I also know that it’s to be positioned close to the driveway and pool. At this point I can make some informed guesses at the size of the structure. If I make it too wide it will compete with the existing structures as the wider it gets the taller the roof becomes. If the structure becomes too long – again it begins to compete.
Sizing the Structure
The existing nearby garage is about 44’ long. That's a good reference point to shape the building and I can revise it later if need be so I’ll start there. Many people think that architects have an innate sense for the size a building should be – immediately. While we have a general sense of the size of spaces, garages, living rooms, kitchens, the more important exercise for an architect is determining the scale in relation to the context. A 44’ long structure next to a 24’ long cottage will dominate while a 44’ long structure next to a rambling, highly detailed, 150’ long home will read as an ancillary structure. The context determines the scale.
Usually, my client’s arrive with a notion of what the structure will look like. While this isn’t always appropriate, in this particular case their image was that of a barn. Which, to me, makes perfect sense. Barns are open, multifunctional, flexible, simple, supporting structures. This already satisfies almost every parameter we’re working with.
The Building Site
The one thing we haven’t mentioned yet is the site. The site can be an extremely strong generator of form and layout for my projects. In this case, I have to know a little more about the site than I already do, but because it’s an existing property in a relatively flat area it holds a secondary place in the design process. The existing buildings and adjacencies will dictate where the Barn Studio will be located. The client has sent me their site plan and I’ll make do a cursory site analysis to get started.
Site analysis for a new project on an undeveloped site can be quite extensive. In general all sites will require an understanding of topography, local climate conditions, how the sun moves, and other significant site features (trees, water, neighboring properties) and of course code and zoning restrictions.
For this project, one of the initial priorities is for me is to determine whether or not the site can accommodate an additional dwelling unit. Whenever I'm designing a structure for habitation, zoning regulations will play a role. Many properties are zoned based on an allowable square footage per dwelling unit. This property already has one dwelling unit in place and we’ve determined that a second is allowable. The general principles at work in this phase, beyond the environmental factors (which are easily divined for most sites) are a confirmation of the rules governing construction. Zoning is the key player at this stage – dictating development, height, setbacks, lot coverage and other constraints. Deed restrictions and special restrictions based on the site’s location can be factors in the general design process, but for this one it’s straightforward. We can move on.
Sketching
Now the fun begins. I’ll pick up my favorite lead pencil, my black sign pen, and a sharpie and begin by quickly sketching concepts on tracing paper. I’ll block out plan shapes on the site plan where I can think about access, building size and location. I’ll sketch out my initial impressions along with a three dimensional concept for the building. I like to work at all scales at this point. I’ll think about what the materials might be, what the doors might look like, and very specific nuances of how the building meets the ground and sky. These sketches frame the problem and help me to quickly test and work through ideas without a lot of commitment. The process of sketching for me reveals the latent possibilities of the project.
Design is an iterative process, where I test and re-test, either confirming or repositioning and re-testing all the while building on previous set of decisions.
The Plans
Once I’ve narrowed it to a few strong organizational ideas, I begin blocking out the floor plans, the process is best described in the video.
Client feedback is of course extremely important. Once we get to this stage, I’ve already put a lot of time and thought into the project. Unfortunately, all of this thought isn’t explicit or necessarily visible. By the time I’ve generated floor plans in my CAD (computer aided drafting) program, I’ve internalized, processed and devised a solution to many of the problems presented by the client. Now, it’s my job to communicate that to the client and solicit their feedback. Which will necessitate the next iteration and an evolution of the design.
I'm eager to hear from them about what they liked and what they didn't. This is where the building begins to take on a life of its own - with the client weighing in. To me, it's the best part. We all engage and contribute, fine tuning and pivoting and each step brings the final building more into better focus.
Stay tuned as we move forward with the next steps designing the Barn Studio. If you’d like your very own Barn Studio it's now available for download.
Twists on window trim
Architects often think about projects in terms of systems. It’s one of our strategies for organizing the complexities of construction into a coherent whole. Each system has an order and interfaces with the other building components in a clear way. Windows have a special place in our systems. They help to define site connections, permit or screen views, and modulate natural light entering our spaces. When thinking about how window systems integrate into the larger structure, I like to develop a clear logic that describes how they’re placed in walls, which always requires adopting an attitude toward trim. Trim is a standard vehicle for hiding joints where materials come together — the edges of Sheetrock are a good example. Trim can also set a building in a particular time period.
But to me, the more integrated even a small detail such as trim is with an idea about a place or structure, the more it can support the overall logic of a building. The following projects eschew traditional ideas about trim in service of a bigger, modern idea.
Putting Narrow Windows to Work
Without windows, our architecture would be lifeless, heavy and dark. We use window openings to control light, admit fresh air and connect our interiors to the outside world. Because they control these key components of our built environment, windows are integral to setting the mood of a space. Sliver, or ribbon, windows have a particularly unique way of controlling the way we feel in a space. Used high in a wall, they wash the ceiling with an even light, making a space feel secure yet luminous and introspective. Used low in a wall, they create a dramatic shift in focus, highlighting and reflecting the adjacent ground color, material and weather outside. Used at or just below eye level, sliver windows create a carefully controlled horizontal framed view to the building’s surroundings.
My video discusses how you can put these narrow openings to work in your home.


Longhouse Materials
Playing with Fire (places)
Radiating warmth and light, the hearth as the center of a home endures. And while contemporary thinking about fireplaces has shifted from the essential to the quaint, fireplaces remain appealing architectural devices in a home. Modern fireplaces share a number of common design elements essential for their operation, each of which has size requirements dictated primarily by building code requirements.Abiding by and conforming to these restrictions can have a homogenizing effect on fireplaces, forcing them to look similar in scale and proportion. Fireplaces consist of three primary elements: a hearth, a firebox and a chimney. (Some modern gel-fueled fireplaces don’t even require a chimney.) Other components, including wood storage and mantels, while traditional necessities, are being used in new and exciting ways too. By oversizing or minimizing these three primary elements, you can achieve some brilliant effects.
For the full post and detailed descriptions, see the video below.
Opinions differ on the environmental friendliness of fireplaces used in homes. In some locales, new fireplaces simply aren't permitted any longer. They can be energy drains on a home, no doubt, but taking care to design ways to close off unused flues from living spaces can make a huge difference in heat loss. The compromise solution is to use an efficient, glass fronted wood stove, or fireplace insert. Ch My home is heated with a small Danish wood stove made by Scan, and I love the heat offered. It capably heats our 1600 square feet without trouble. But, heating with wood isn't without drawbacks and the handling of wood is quite simply a chore - especially when March rolls around.
What are your thoughts on fireplaces?
Design Workshop : The Beauty of Humble Materials
Humble materials aren’t costly or luxurious, but using them in residential design doesn’t mean you have to sacrifice interest or refinement. Many architects find inspiration in the humble beauty of simple structures dressed in plain materials that are used honestly. These materials don’t draw attention to themselves or pretend to be something they’re not. They’re chosen to modestly serve their purpose.
Design Workshop : Material Marriages
Some materials just belong together; in this video we look at a few of my favorites. Did I miss any?


DIY Noticebar steps
Project: Floating Steel Notice Bar
I recently added a simple floating steel notice bar to our entry hallway as a place to tack notes, keep lunch menus and even hang our keys. It's an easy project with lots of potential and once you’ve gathered the materials, it should take only about 10 minutes to complete. Lee Valley sells the magnet cups (along with some beautiful, and hard to resist, tools...) Varying the thickness of the spacers (or washers) will change how far the bar appears to float off of the wall surface - I set mine at 1/2".
Materials:
Wallboard Anchors/Screw Anchors (to receive screw)
Rare earth cup magnets / washers (1” diameter works well)
*Before beginning, a word of caution. Rare earth magnets are strong enough to rearrange data on hard drives and magnetic stripes on credit cards...so use care when playing with them.
Instructions:
Mark your wall surface at the mounting locations for the magnet cups. I spaced the mounts about 3" in from each end of the bar and 4' above the floor.
Drill the holes in the wall surface and insert your anchor to receive the screws.
Place the spacer as shown in the photo against the wall and the magnet cup on top of that with the cup facing outward.
Carefully insert the magnet into the cup being sure to keep it straight. It may leap out of your hands into the cup, it's that strong.
Repeat for additional spacers/cups.
Attach the bar, using your level to shift it into place.
That's all there is to it. I personally like the raw steel look, but the steel could be painted or oxidized for a more finished look. I purchased additional rare earth magnets along with my spacer/cup sets as I find them to hold just about anything (i.e. multiple layers of paper) to the steel. I've also used these cups recessed in door panels to hold pocket doors closed and they make versatile hangers for many different items around the house (kitchen knives, hidden hangers for pictures, if you use steel angle in lieu of the bar you have a small shelf too...etc.) Good luck and cheers...!
Warmboard Radiant Panel - An Architect's Review
In this video I review a new flooring product we've been using - Warmboard. Reasons to Consider Using Warmboard:
- Low mass radiant flooring option - fewer BTUs to get to operating temperature, faster response times
- Highly conductive aluminum face on subfloor - lower boiler temps, lower energy bills, geothermal/solar compatibility
- Fast install times - structural subfloor + heat tubing layout all-in-one
- Aluminum sheet diffuses heat along top surface of subfloor for even heating
- Compatible with multiple flooring types can be overlaid - hardwood, tile + carpet
- Zoning + panel layout design included in the price - assembly arrives with a numbered diagram for installation
- Tubing is visible on top face of subfloor - minimizes tubing penetrations via errant fasteners during floor finish application.
- 20% recycled content in alum. facing, OSB + Plywood panels are efficient use of natural resources
- Warmboard R (retrofit) can be used in renovation projects where floor build-up and thickness is a concern
House Size - Balancing Wants, Needs and Budget
This post is the second in a series intended to walk you through the process of designing your own home where I guide you from the initial stages of your building project through construction. Please check out my about page and my portfolio for more about what qualifies me to do this. So, here we are at step two (if you missed step one, be sure to read and watch that section first). You've determined your building site and diagrammed the assets and liabilities, now it's time to figure out exactly what you'll be trying to fit within your home. Architect’s call this second phase the ‘programming’ phase. The ‘program’ is a detailed list of all of the spaces you’ll include in your home along with their sizes. Think of it as a sort of ingredient list in a recipe you’re following.
A couple of things to keep in mind while developing your wish-list. First, every square foot will cost you between $250-350+, choose carefully. Secondly, and more importantly each added square foot is another one you'll have to heat, cool, light, maintain, and clean (!) for many years to come. Homes use an incredible amount of energy and here in the USA our homes are substantially larger than our European counterparts. Be ruthless about what you really need and what you can live without. By consuming fewer resources your self-less act gives to generations that follow us.

Average House Size Comparison
Program Ingredients
A good place to start is by compiling a wish list of rooms. Basically anything that will take up space in the home should be on the list. While you’ve probably already considered many of the spaces listed below, there are undoubtedly some you haven’t accounted for. Most often people overlook essential spaces like stairs, hallways, mechanical rooms and electrical closets. These are critical to every successful floor plan, however mundane they may be, and they also account for a large percentage of the actual floor area, and by extension, your budget too. Be sure not leave these out.
Some common spaces you’ll want to consider:
- Entry/Mudroom
- Living
- Dining
- Kitchen/Pantry
- Study
- Powder-1/2 Bath
- Bathroom(s)
- Laundry
- Bedrooms
- Porches
- Decks
- Mechanical/Electrical
- Circulation (stairs/hallways)
- Garage
- Carport
- Outdoor Terraces
- Media Room
- Game Room
- Screened Room
Size Matters
Or should I say, matters of size? Once you've compiled the list, you'll need to assign each room a rough size. A good place to begin thinking about the sizing of these spaces is to measure your current living spaces. You'll have a sense for the scale of your furniture in those spaces and what works and what doesn't. If your current bedroom is too small, roughly estimate the extra room it would take to make it more functional and account for that in your spreadsheet.
My worksheet lists basic room areas and sizes, but really it’s a guideline to help you get started. Try not to take this too seriously to begin with. It usually makes sense to stay in the general range of the room sizes I list but if your design vision calls for a living room in the shape of a bowling alley by all means, bend the rules. Make the rules and then break the rules. Develop a set of operating principles and consciously break them for effect. Architect’s do this all of the time, when you do this with intent you’re one of us.
It’s important that along with the development of room sizes that you keep in mind ceiling heights. Not exact ceiling heights, but a more generalized idea of which spaces might be taller than a standard 8’ ceiling. You’ll note in the worksheet there’s a column labeled ‘factor’. Ceiling heights are one thing that affects the factor; it’s essentially a multiplier that accounts for the extra materials (sheetrock, framing, paint, etc.) you’ll require when building a non-standard room volume (1.5 for cathedral/vaulted ceilings). Some of the other factors listed account for unfinished basement spaces (0.1 because it’s significantly less costly than heated living space), as well as covered porches (0.75) and decks (0.5). Landscape elements aren’t covered here but be sure to include terraces and other hard-scape elements in your program so you can allow for them in your budget.
What's Important?
When thinking about the size of spaces in relation to each other and the overall square footage try to think about them hierarchically. Each should be relative in size to their importance in the floor plan.
Nothing says hierarchy like, “Check out our roof…we put a giant hole in it to show you how important it is for controlling light, for letting in the things we want and keeping out the things we don’t.”
A mudroom larger than a living room has certain connotations and functional implications. The Romans were masters at spatial hierarchy. Have a look at the Pantheon.

The Pantheon's Oculus
The large central space, flanked by smaller alcoves, with its’ oculus (the penultimate hierarchical move). Nothing says hierarchy like, “Check out our roof…we put a giant hole in it to show you how important it is for controlling light, for letting in the things we want and keeping out the things we don’t.”
This is powerful and it’s really a marvelous space to stand in. Look at the entry portico, and note the size of it. It’s not wart-sized; it’s proportioned to the volume it’s attached to. Now, have a look at your local convenience store entry (a gabled portico of sorts I’m guessing) and you’ll see the difference. The convenience store is poorly proportioned, it’s too small and it’s too tall and it looks like the rest of the walls it’s adjacent to, except for the two doors. While this example is intentionally simple I think it illustrates my point, which is once you’ve seen the difference, you’ll better appreciate the difference.

Pantheon Exterior View
The Pantheon, with just a few simple elements and architectural moves allows one to understand immediately upon arrival how one enters and what’s important. This is the approach you must take when thinking about sizing your spaces. You’ll have a chance to revise this as you begin your design when you realize that the dining room should be a little larger and the pantry a little smaller, etc. Many architects rely too heavily on the exact sizing of the spaces in the Program. I try not to get too hung up on the size of the living room before I get into the design a little deeper. I prefer to use it as an outline.
Sticker Shock
Develop the list of spaces, assign them rough sizes, total it up and, most importantly, assign a square foot (SF) price range to the total. This is where the exercise becomes particularly meaningful and dare I say, painful. At the beginning stages of the design process your program serves as an essential budgeting tool.
I recommend assigning a price range for two reasons:
1) Early on before you even have a design; this is by far the most accurate means of portraying the variability of the costs involved. Having a range will hold you accountable as you work toward getting the upper number of the range to be your target number. I’ll explain more below.
2) No two contractors will look at your design, drawings and specifications the same way, even when given the exact same information. Equally, building techniques vary from contractor to contractor as do subcontracts and labor rates.
Having said all of this, I want you to look at the upper end of the range and know that that number is real. Don’t make the mistake of assuming you can make material or finish decisions (bamboo flooring, plywood walls, cheap toilet fixtures…) and have any real effect on the overall scope and scale of this number.
Way too expensive?
Building costs are always rising. The addition you worked on 5 years ago, from a pricing perspective, is irrelevant. To be serious about controlling costs at this stage is to eliminate square footage. This will be the easiest and best opportunity you have to do so. Work backwards if need be, determine the maximum you’re willing to spend and fit the program sizes to meet the budget. This part of the process can be bruising. Expect it and work through it. Every client, of every means, that I've ever worked with at this stage agrees to move forward based on the false hope that the actual numbers from the contractor will come back at the lower end of the range. Believe me, Scout’s honor, it’s never happened. Not one time. If you take this part of the process seriously then the bidding and/or negotiation phase will be much, much easier.
"What Square Foot Price Do I Use?"
If you’re not sure what range to use, make a few phone calls to local builders or architects in your area. They’re usually more than accommodating when it comes to giving out such basic information, and they have the benefit of recent projects to back up their knowledge base. In my local area, the range I tell people wanting to do custom work is $300-400/SF. It’s possible to be around $200/SF, however, it requires special concessions not many people are willing to make.
Once you've worked through this process: revising your wish list, revising your budget and you’re comfortable with what you have, you’re ready for the next step. Get out your markers, pencils and tracing paper, Schematic Design is up next. Possibly my favorite…
Questions...Comments?
Drop me a line, I'm here to help. I’d love to hear your thoughts or design conundrums.
If you subscribe you’ll be sure to receive my next post in your inbox, there’s also my YouTube channel with helpful videos. I’ll also post some links to a few books that will help you through the programming phase and provide some inspiration as to what’s possible when you economize and double up on the functions of your spaces.
An Architect's Design Process
I've recorded a two-part video describing in more detail the process of siting my own home, a modern longhouse. This expands on some of the concepts presented in my previous video post and supports it with a real world example.
Part I
Part II

fallen birch
There are a couple of important points that I didn't get to in the video. First, the idea of a modern longhouse was a derivative of the site, it wasn't a preconceived strategy. However, having used this plan I can see merits on many different types of sites, it's a versatile and economical plan to construct. But, back to the idea behind the longhouse concept. The swath of fallen birches, the proximity of neighbors, the solar aspect and the surrounding forest suggested a longer house to exploit the variety of textures surrounding us. We adopted the idea of a longhouse for three reasons: one because it was an historical archetype of Native Americans that settled here long before we did. Two, because the idea of the longhouse suggested a simple (and affordable) way to unite a family under one roof, the original longhouses housed up to 20 families under one roof. And, three because it suggested more broad site connections to the swath of fallen birches we were clearing away to make our home.
As I said in the video, I'll be using our longhouse as a teaching tool in future videos and posts...stay tuned. If you haven't looked over the portfolio images yet they're located here. Please leave a comment below or feel free to contact me at eric@thirtybyforty.com with any questions.
Siting Your Home - An Architect's Tutorial
There's a lot of 'ground' to cover when talking about choosing the ideal location to place your home and given just how individual each site is it would make for a very long video. So, I've outlined my process in more detail here to help guide you from purchase point to design concept. I'd love to hear from you, let me know if this helped in any way and as always you can send your questions to eric@thirtybyforty.com
YOUR SITE
This is where it all begins. More often than not, the site is a strong generator of building form and orientation, as well as material and color for my buildings, so this step is a critical one. The site is the genius loci for your project, wine makers call it terroir and understand that the site is the key to the ultimate flavor of wine. The site is really important to me and it should be to you too. It can be the raw land you’ve purchased, an empty building lot in a subdivision, the street on which you bought a row house, or even the floor of a warehouse you purchased.
b_siteananalysis_2
Sites vary widely in their scale and reach but they all share some basic characteristics. The site will have topography, it will have utilities and if it’s remote enough and doesn’t have utilities then you’ll need to plan how you’ll get things like power, phone, cable, water supply and how you’ll address things like sewage disposal. Sites will all have access points and boundaries. Depending on your particular situation it may have streams, forest, a significant tree, an orchard, lawn, a glacial erratic, wetlands, a lake or pond, even other structures and roadways.
More broadly, your site exists within a cultural context and a set of local building traditions. If you’ve lived near your site for a long time, you’re probably aware of these. If you’re new to the area observe your surroundings, read a little about the history of your area. I always take clues from industrial or agrarian structures, which derive maximum benefit from minimal expenditure. These structures plainly exhibit local know-how because their limited budgets require it. Their choice of materials reflect local building norms and practice and while many may be in a state of disrepair, look more deeply for the origins of these selections.
DOCUMENT EVERYTHING

siteimpression
It’s important to document as much of this information as you can, within reason. I begin by walking the site without anything in my hands. This allows me to focus on important site features (and avoid tripping) without distraction. I make mental notes of things that stand out, where the sun is, where the wind is coming from, views, sounds. If the site is urban, this will entail walking the neighborhood, think of your site as everything within a 5-10 minute stroll. If possible, visit the site at different times of the day, and at least once in the morning and once in the evening. You’ll come away from these site walks knowing a lot more about the site and surrounding area than you had before. Take photographs from a variety of vantage points. This records the site pre-intervention and serves as a nostalgic record (think before-after photos). Additionally, your building permit process or design review board may require them and you’ll reference them at various times during design as a source of inspiration. Document all of this in a sketchbook, on your tablet, with a voice recorder, whatever way you choose. I usually quickly sketch my impressions in a diagram, which is my way of visually hardwiring this information. I find it easier to recall when I have to generate it by hand.
If your site has varied topography, sits on a hillside, near a stream or if it will be subject to stringent review by a design review or zoning board, you’ll probably need a survey. There are basic surveys and there are boundary surveys. The type you will require will depend on your specific situation, but more often than not you’ll only require a basic survey. A boundary survey will be required when your deed doesn’t specifically outline the property lines or if there is some questionable division of your lot. This isn’t a normal situation, but if you purchase this type of lot it will require deed research by a law clerk to determine historical land transfers, which, isn’t cheap.
If you do require a survey, contact a local professional land surveyor and ask how much a basic survey would cost. Local surveyors are a great resource to tap and meeting one on your site can provide insights into lot history, neighbors, contractors and potential pitfalls regarding the local permitting process. Be sure to pick their brains, their local knowledge is often invaluable.
TIP: if you’re looking to save money have the surveyor provide you with 2’ contour only in and around the area you’re considering building. You can walk the site together and with some surveyor’s flagging map out an area together. They can help you determine other site features you may have overlooked and decide whether you’ll need to locate them on the plan or not.
SURVEY BASICS
Reference Point
Property Lines
Other Structures
Flood Elevation
Driveways
Utilities
Contour/Topography
Significant Trees
Other Significant Features
Setbacks
REFERENCE POINT
Always have your surveyor set an elevation benchmark or reference point. This is usually in the form of a nail set with orange flagging somewhere on site and tied back to their plan and noted as E.R.P. (Elevation Reference Point).
PROPERTY LINES
Have them locate the property lines per your deed.
OTHER STRUCTURES
Sheds, nearby houses, garages, barns, silos.
FLOOD ELEVATION
If you’ll be living in a flood plan, you’ll need this for insurance and the bank will require it for loans.
DRIVEWAYS
Existing, other access points.
UTILITIES
Power (overhead/buried), propane tanks, gas lines, cable, water, sewer.
CONTOUR
In surveyor-speak, this refers to the exact elevation and slope of the land. Contour lines on a map connect points of similar elevation. These lines are set at a specific interval depending on the scale of the map. Many topographic navigation maps use a 20’ interval, with each line representing a 20’ difference in elevation from the adjacent line. The closer the lines are together on the map, the steeper the site is and conversely, the farther apart the more flat the site is. For your purposes, a 2’ interval should be sufficient. If you’re very concerned with how closely your building will adhere to your site contour you may wish to have a 1’ interval mapped, but this will be twice as expensive as the 2’ option.
SIGNIFICANT TREES
If preserving trees are important to you, have him pick up the trees within that zone that are greater than 16” in diameter.
OTHER SIGNIFICANT FEATURES
Water bodies, fencing, stone walls, etc.
SETBACKS
If there are setbacks from waterlines, wetlands, easements or restricted areas ask them to locate those on the plan as well. Always request a CAD file and PDF of their work. This will help save on survey costs, which can add up quickly. Survey costs in Maine as of publication date range between $3500-5000 for a basic survey around a building site with 2’ contours indicated, tied to the National Geodetic Vertical Datum (NGVD).
TIP: Google Earth is a great tool to see your site in context at a variety of scales. You may even find historical views and maps of your site as a layer within Google Earth. Print out the most current view of your site and use it to document your findings, it’s a great way to conduct a no-cost site analysis and see your site from a different perspective.
A few other items to consider at this stage:
1) Deed: secure a copy of your deed if you haven’t already and review it to be sure there are no restrictions listed that would prevent you from doing what you’re proposing. Pay particular attention to easements (number of structures allowed, utilities, view, access, etc.). You’re legally bound to this document even if the town doesn’t have jurisdiction to enforce it.
2) Septic system: if your site doesn’t have access to a municipal sewer system you’ll need to hire a soils scientist to design a subsurface wastewater disposal system. Basically a septic system.
3) Power: contact your local utility to verify the process and more importantly, the timeline, for getting power to your site. If it’s far from the grid expect to pay between $10-$20 per foot to construct overhead primary power line. Buried power line, as you’d expect, is more expensive and depends on site conditions (bedrock, streams, etc.)

site analysis
DIAGRAM
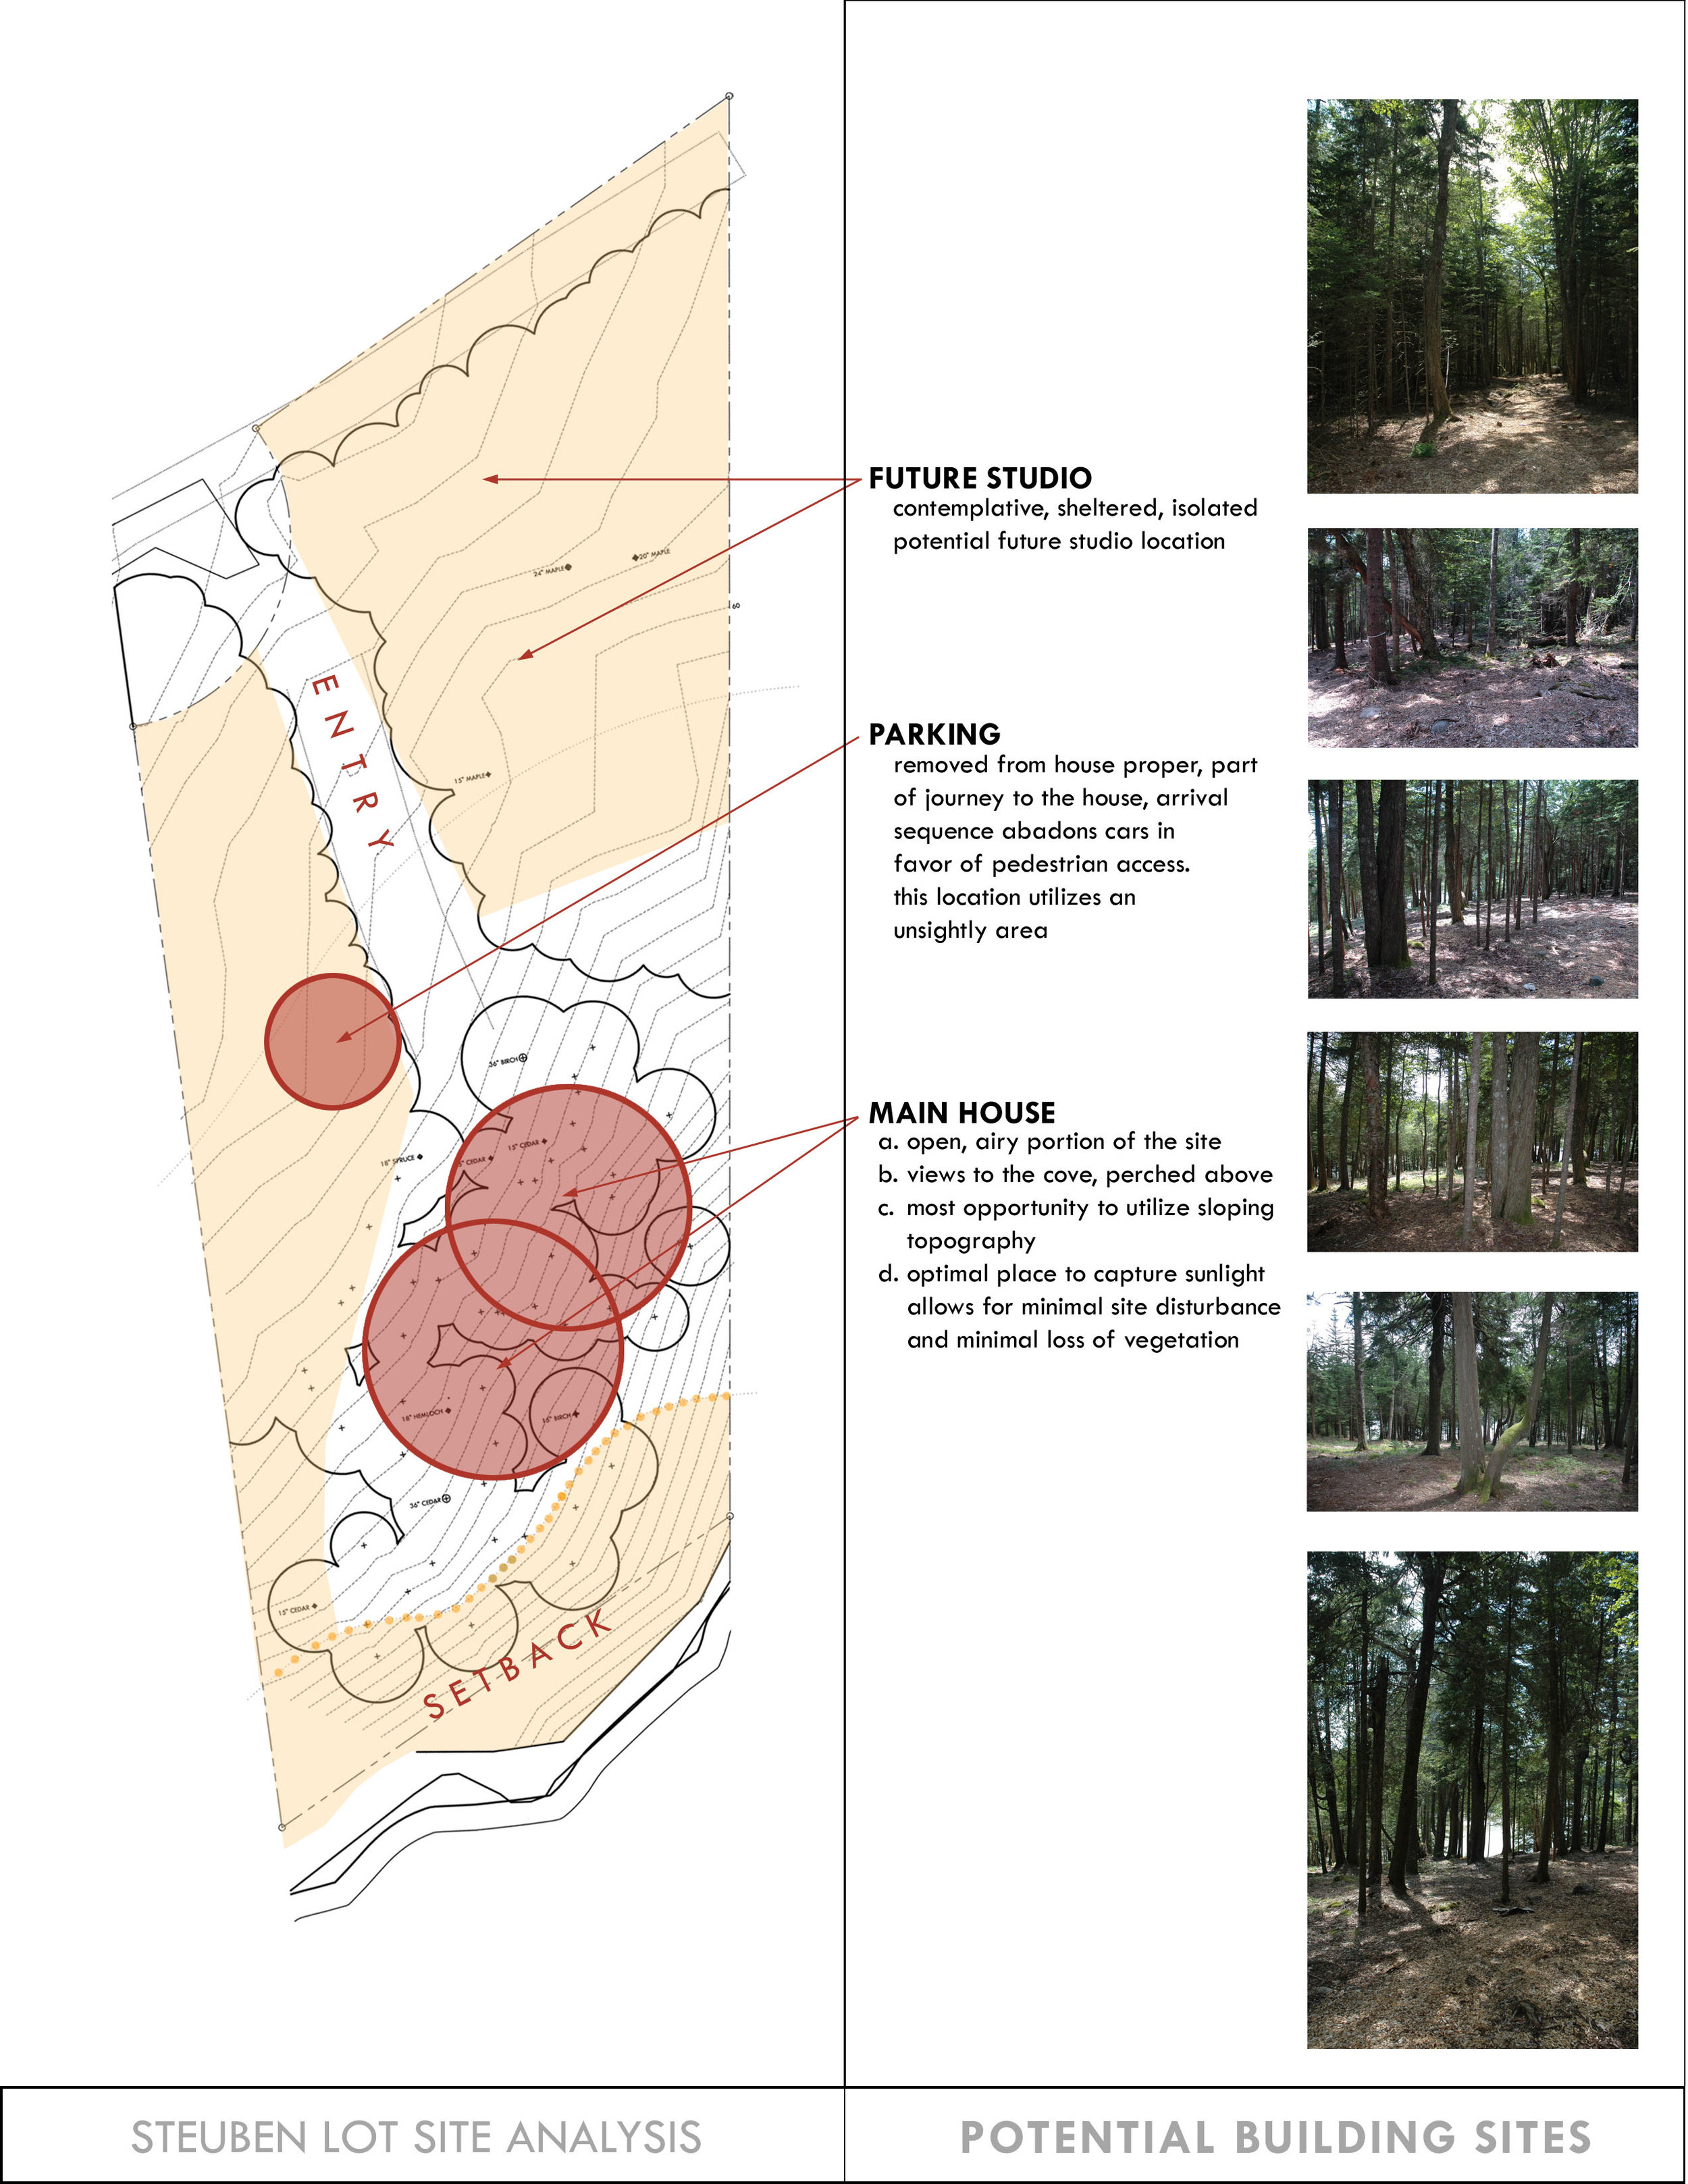
Once you’ve compiled as much of the information above, add it to your SITE file folder. You'll use all of this information to diagram the site. It need not be particularly good looking or graceful, it only needs to be useful. This synthesis of information usually quite quickly highlights areas of the site to be developed and suggests areas to explore. It may even result in design concepts. The diagram at left led me to a design concept for the house which I proposed for this site based on the idea of a camera lens. The gradation of light and view along with the existing site textures set in motion a particular thought process that led to this and other concepts for this property. My video describes a more fluid way of looking at all of these technicalities together but in the end, the goal is to get to a diagram that clearly describes the limitations of the site which at the same time graphically represents the possibilities of the site.
As always, I'd love to hear your thoughts and questions about your site, please feel free to contact me. Please subscribe to my YouTube channel if you'd like to keep up with future workshops.